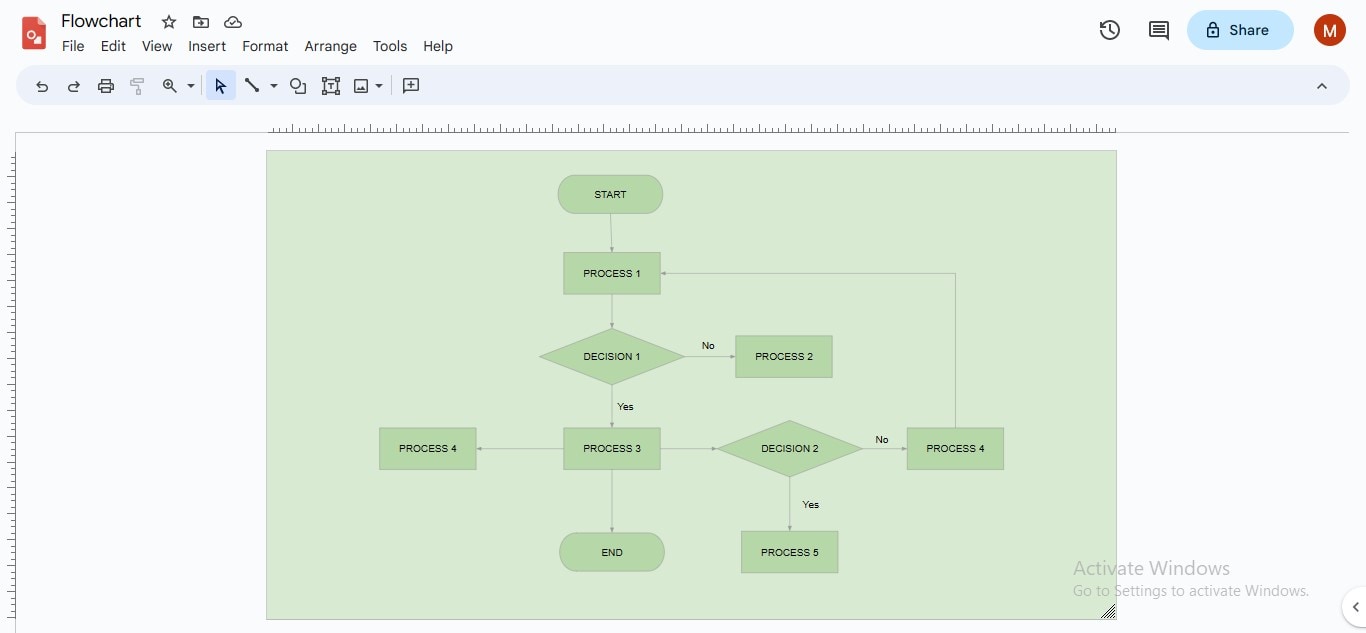
Can you believe if you're told you can create a flow chart in Google? Generally, audiences are familiar with prevalent Google workspaces, such as Google Docs, Drive, Spreadsheet, Maps, and Gmail, but very few may be acquainted with Google flow chart maker – Google Drawings.
Initially released in 2010, the tool is a multipurpose diagramming solution, also used as an online flowchart maker Google, provides both web-based and application interfaces. Rather than squandering money on propriety diagramming applications, you can exploit this cost-free platform to create, customize, and co-edit your visual diagrams. In this article, we will profoundly explain how to create a Google Drawings flowchart in a few simple steps.
1. Introduction to Google Drawings Flowchart
Google Drawings is a multi-usage online diagramming solution that you can employ for diversified uses, including 2-D diagrams, organizational charts, mind maps, concept maps, frameworks, circle-spoke diagrams, and wireframes creation. However, the most considerable application of Google Drawings is the flowchart online Google composition, enabling you to express process flows, structure your day-to-day routine, strategize business models, develop action plans, dictate chain of command, train employees, delegate information, deliver presentations, and more.
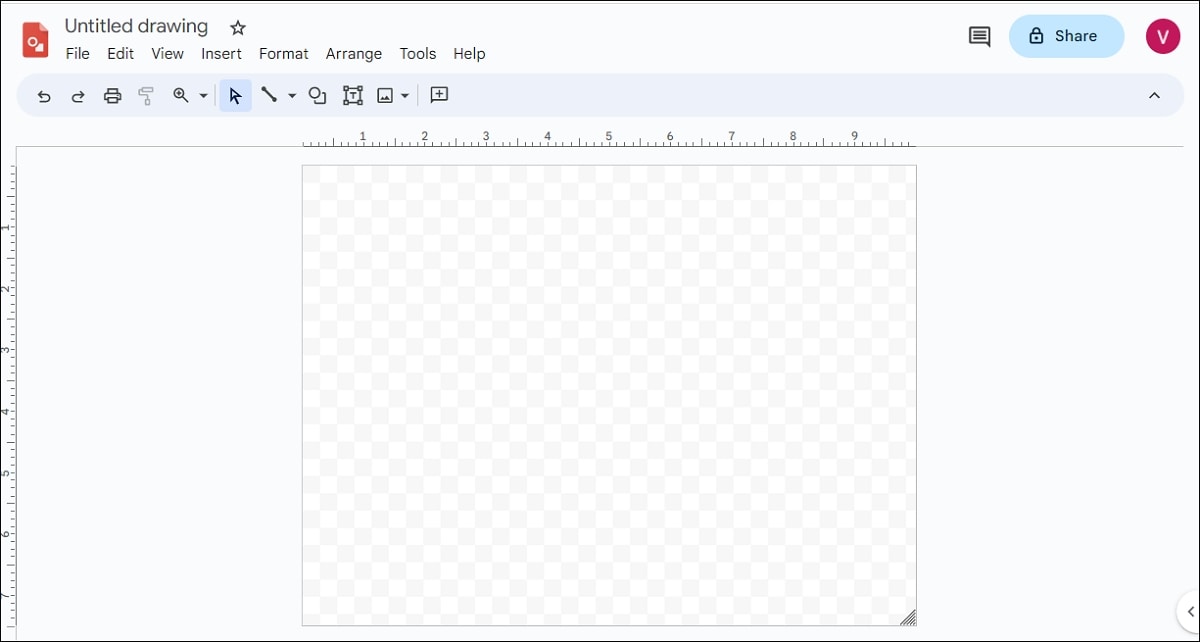
When you launch the Google Drawings interface, you will observe a plain-looking canvas with oversimplified menus, but let not this manifest outlook befool you. This flow diagram Google tool is actually endowed with multifaceted features like import/export capabilities, image & video embedding, Multilanguage support, version history, etc.
Google Drawings Flowchart
You can effortlessly draw your flowchart online Google with this valuable tool following a straightforward flowchart creation procedure. However, before diving into deeper details, let's learn the basics of the Google Drawings interface to utilize its options effectively without investing time in finding which option is located in which tab or menu.
The Title Bar
When you navigate to the main interface, you will observe a title bar at the top containing the editable title box, file starring option, and the Move icon used to move your Google Drive flow chart to a particular Drive folder. The title bar also contains a Cloud icon which allows you to access your flowchart Google Drawings offline if turned on. On the right top of the interface, there lies a History Version icon, Comments icon, Share button in blue, and your account icon.
The Menu Bar
Below the Title bar, the menu bar rests, including several menus for different functionalities.
File Menu
The File menu contains options for Google Draw flow chart file management, such as New, Open, Download, Share, Move, Rename, Version History, Make Available Offline, Language, Print, etc.
Edit Menu
The next is the Edit menu which allows you to undo, redo, copy, cut, paste, select, duplicate, delete, or find an object on the canvas.
View Menu
Next to the Edit menu is View, through which you can adjust how to display the interface of your canvas; for example, you can add or remove rulers, zoom in or out, show or hide comments, and display guides on your main interface.
Insert Menu
The Insert menu lies after the View tab, allowing you to insert text, image, shape, line, table, chart, diagram, word art, or comment to your diagram.
Format Menu
The Format tab displays when you select a particular object on the canvas, for example, a text, shape, or line. This tab contains formatting options, such as text formatting, fill & border coloring, alignment, indenting, line & paragraph spacing, bullets & numbering, and so on.
Arrange Menu
Next to the Format menu is the Arrange tab, which contains functionalities like object alignment, rotation, order, and distribution; you can also group certain elements to apply uniform formatting by choosing the Group option from this tab.
Tool Menu
The Tool menu comprises smart tools to make your overall drawing experience convenient, such as Dictionary, Spell Check, Accessibility, Preference, Notification Setting, etc.
Help Menu
The last tab is Help which you can utilize either to search functionalities, learn a particular operation, report a problem, or more.
Shortcut Options
Google Drawings displays shortcut options to add and customize elements to your flowcharts Google Drive. The shortcut keys include Undo, Redo, Print, Paint Format, Zoom, Select, Lines Gallery, Shapes Gallery, Textbox, Insert Image, Add Comment, and more. Below this, your drawing canvas lies, which you can extend using a triangular shape icon at its right bottom corner.
2. How To Create a Flowchart in Google Drawing?
Now that you have discovered the nitty-gritty of the Google Drawings interface, creating a flowchart will never be a problem. Follow the given steps to constitute a well-looking flow diagram on Google Drawings:
Step1
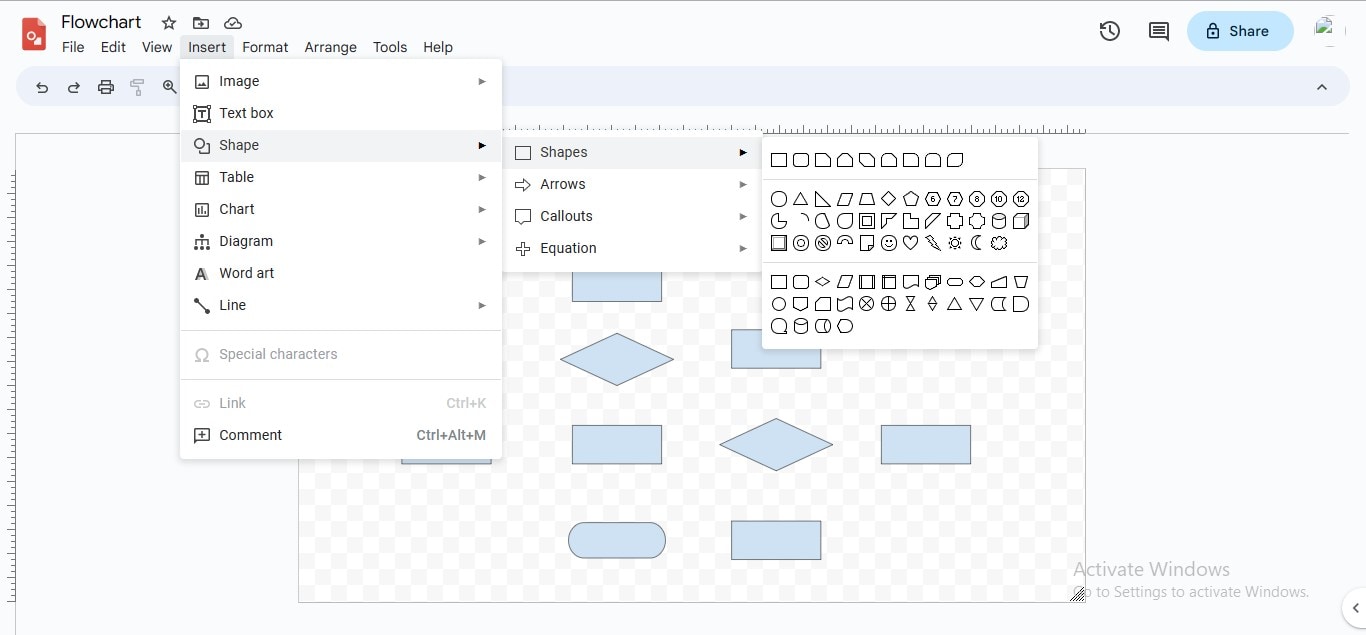
Navigate to the "Shapes" gallery in the shortcut bar or the "Insert>Shape>Shapes>Flowchart" to add all the required shapes to your Google Drawings flowchart. To draw a particular shape multiple times, copy and paste it.
Step2
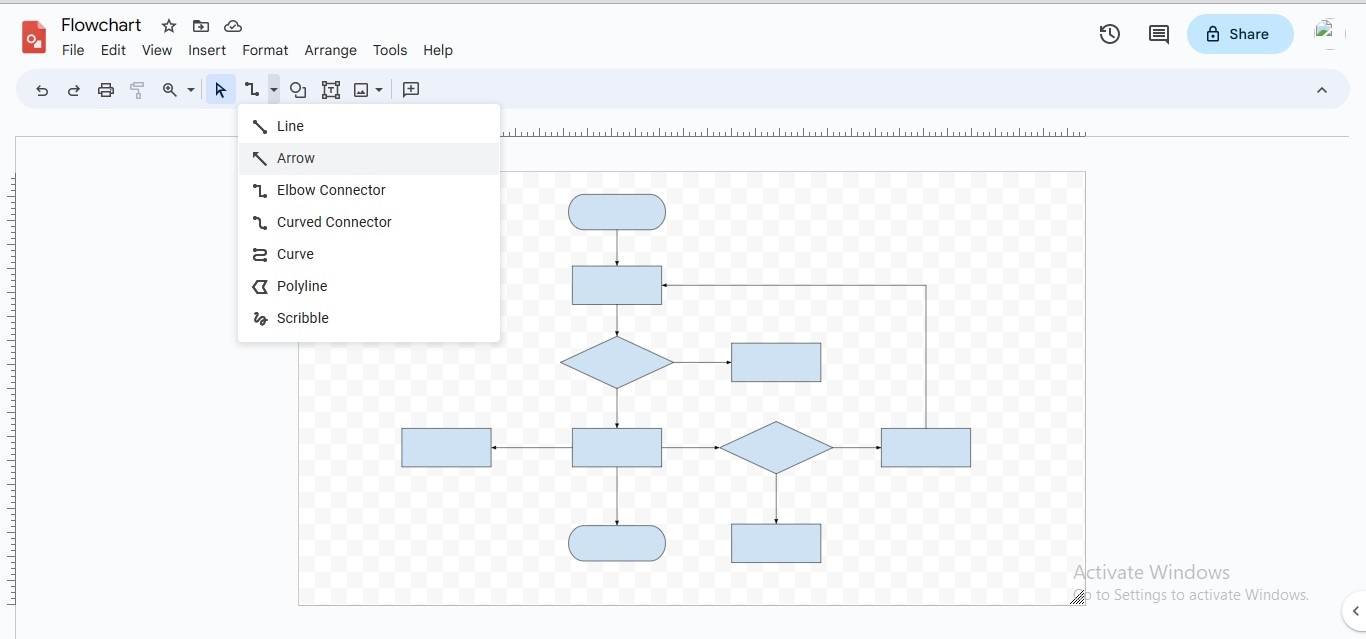
Draw the Lines or arrows to connect the shapes in their rightful sequence; to add connectors, go to the "Line" icon in the shortcut menu or "Insert>Line", and choose whatever type of connector you want to use.
Step3
Use the "Elbow Connectors" from the library for loops or twisting lines.
Step4
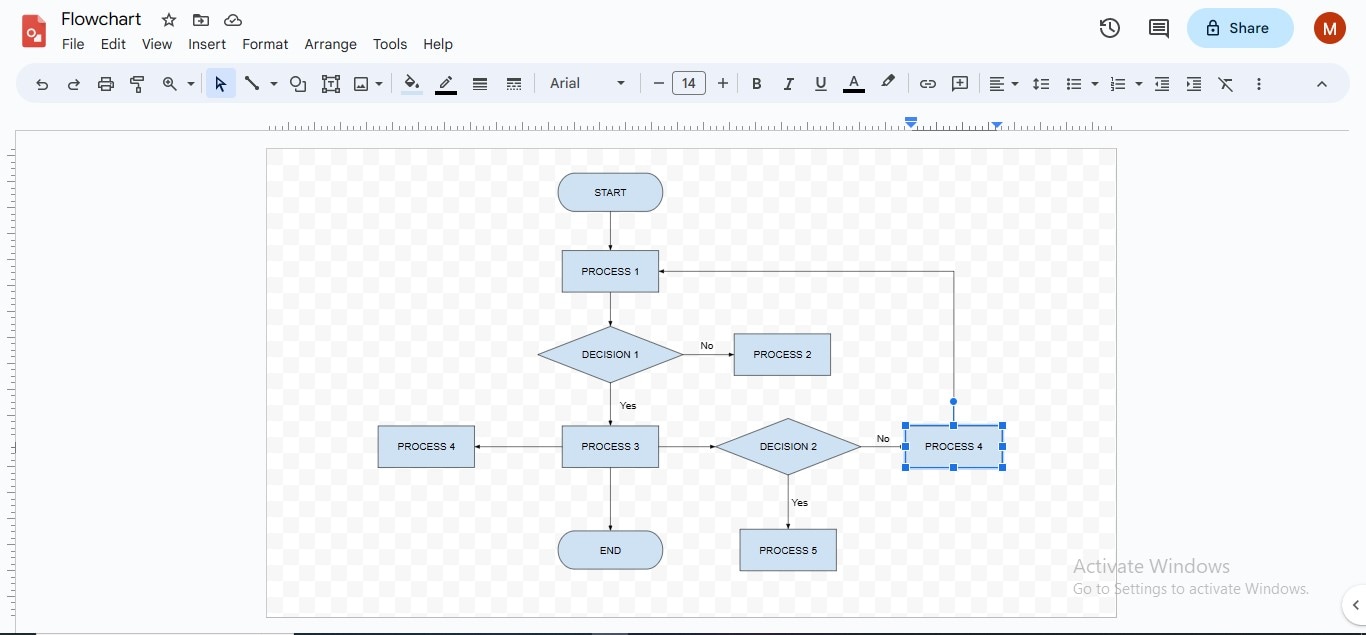
Label your shapes by adding appropriate text or phrases; navigate to the shortcut formatting bar or the "Format" tab to format the text.
Step5
To add the Yes and No routes to the decision boxes, click the "Textbox" icon in the shortcut menu.
Step6
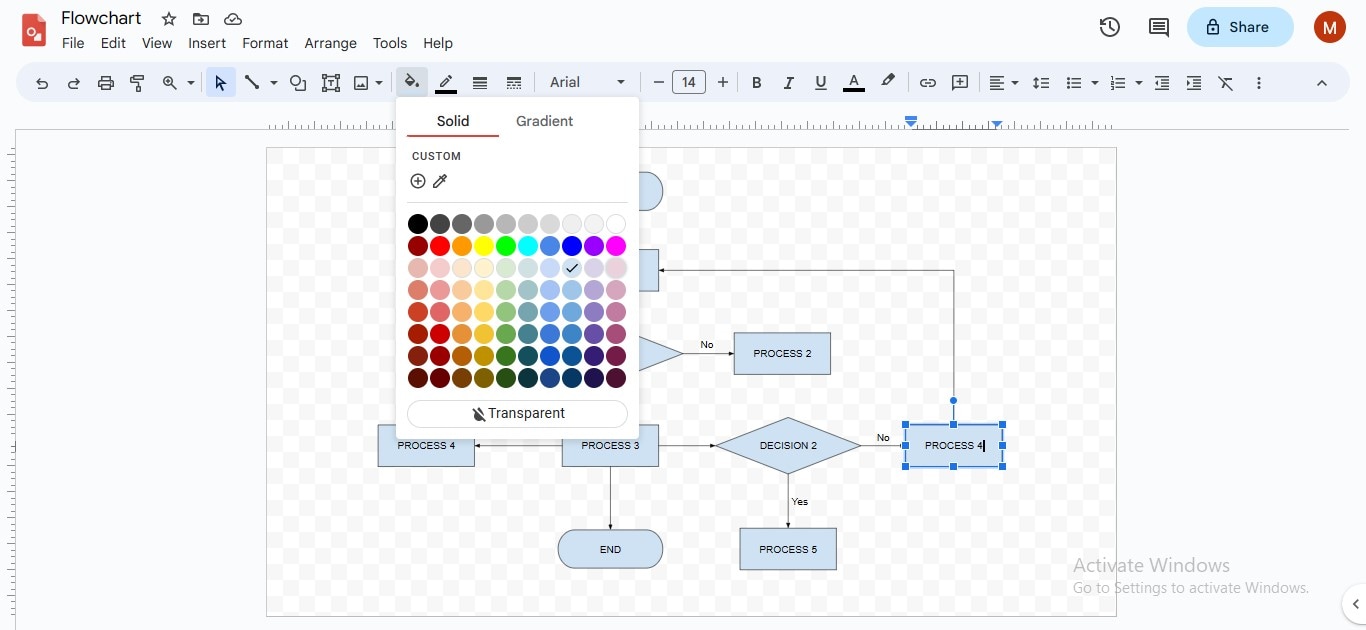
To add a fill color to a particular shape, select that shape, go to the "Fill Color" icon, and choose your preferred color.
Step7
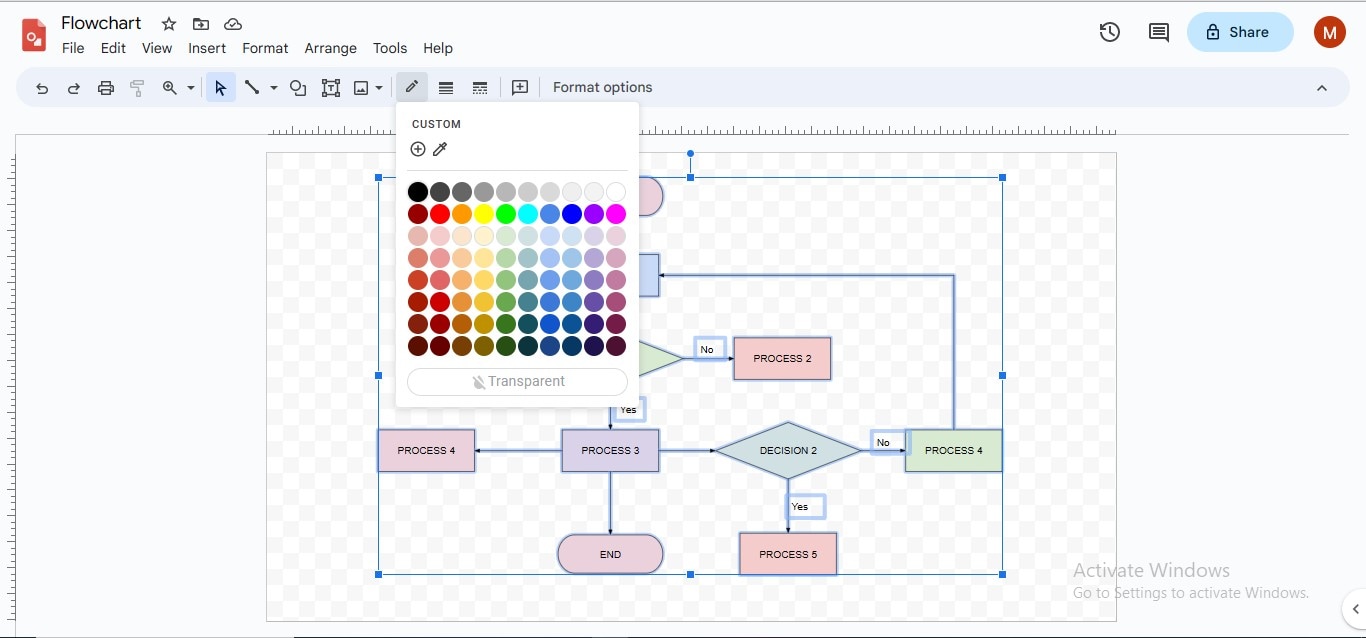
To set the border color of a particular shape or multiple shapes, select the shapes, click the "Border Color" icon, and choose your desired color; you can also select border weight and dash type.
Step8
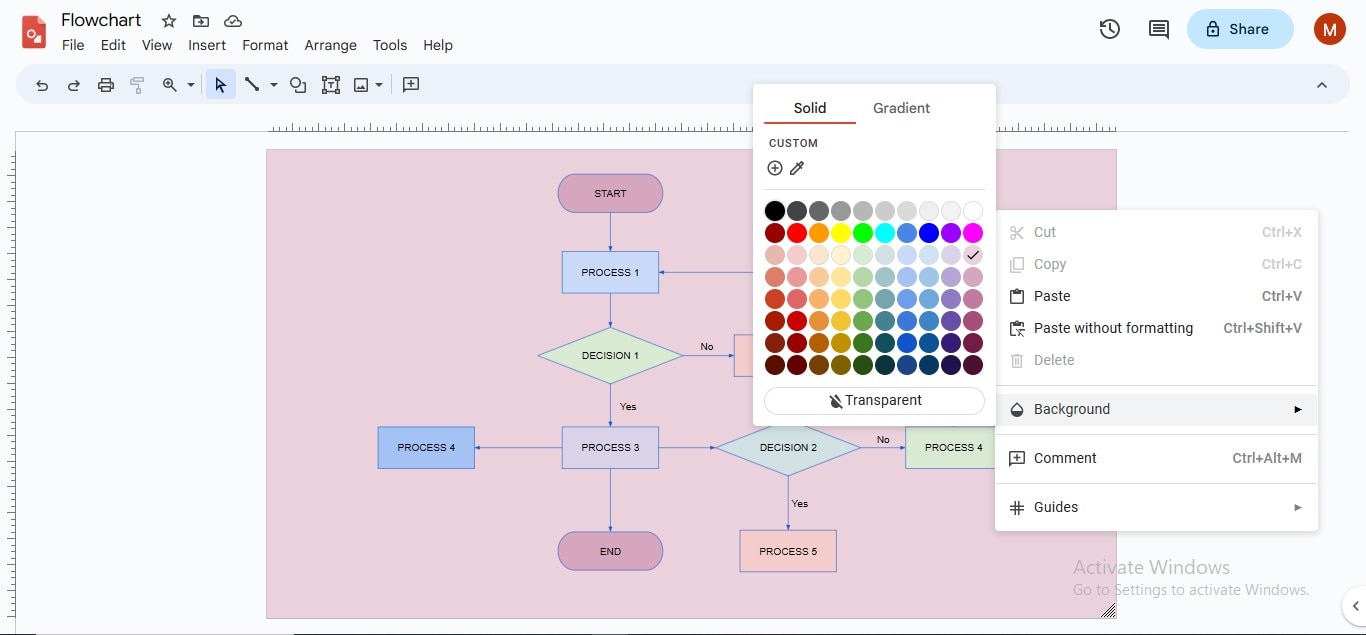
If you want to personalize the background color of your flow diagram, right-click anywhere on the canvas, click the "Background" option, and choose your favorite color for the background.
Step9
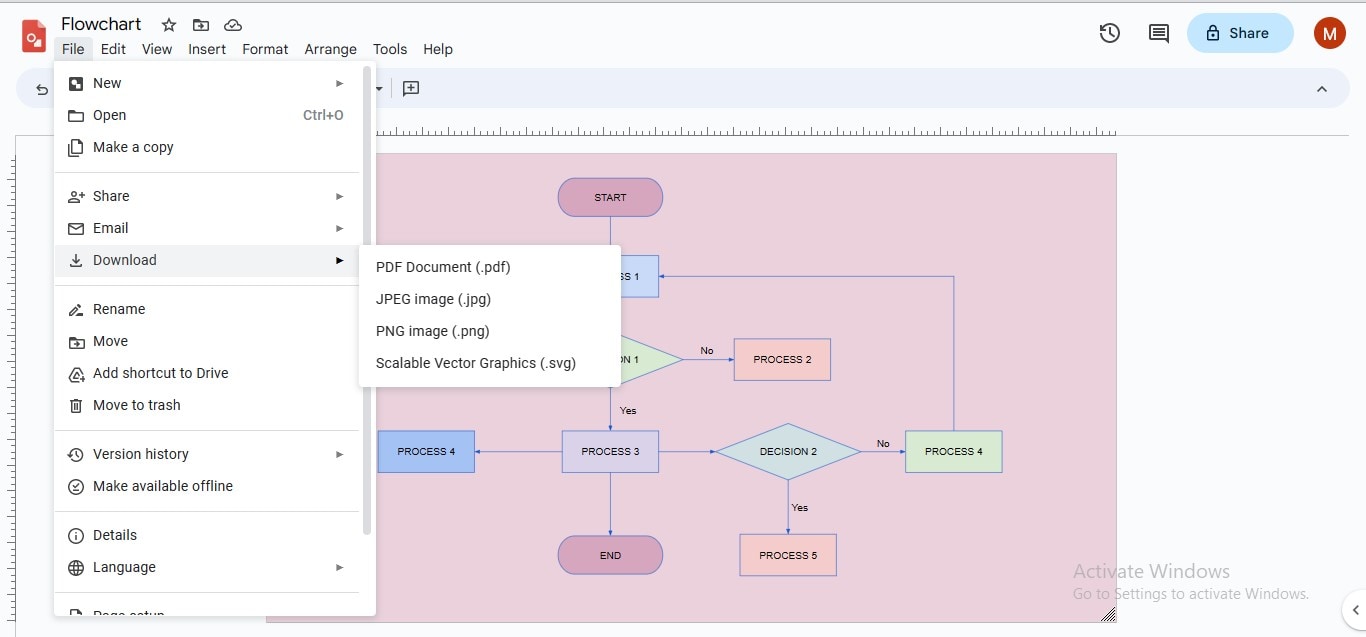
Navigate to the "File" tab in the menu bar, click the "Download" option, and choose your preferred export format to save your file.
3. EdrawMax- The Ultimate Solution to All Your Flowchart Designing Needs!
Developing a flow diagram from scratch can be a painstaking task because of drawing even-sized shapes, making overall alignment uniform, and customizing flowchart elements for a balanced outlook. The straightforward solution to this problem is utilizing a prebuilt template, already accomplished in terms of alignment and appeal. Although Google Drawings provides a smooth interface for a fast-paced diagramming environment, the absence of a templates gallery and mediocre customization features may inflict a little trouble on your flowchart-making experience.
Don't get fretful; we bring a reliable diagramming platform to your threshold: EdrawMax - a complementary toolkit for divergent uses. This unbeatable solution is equipped with countless instrumental features, including templates community, symbols library, drag-and-drop, multiple page creation, customization choices, slide creation, design assortments, several export choices, and more, to inspire innovation in your flow diagrams.
How to Design a Flowchart More Feasibly Using EdrawMax?
The multiplicity of EdrawMax features capacitates you to create complicated flowcharts in just a few minutes. If you are inclined to utilize EdrawMax for your prospective flow diagram, follow the given procedure:
Step1
Access the "EdrawMax" application on your device for flowchart creation.
Step2
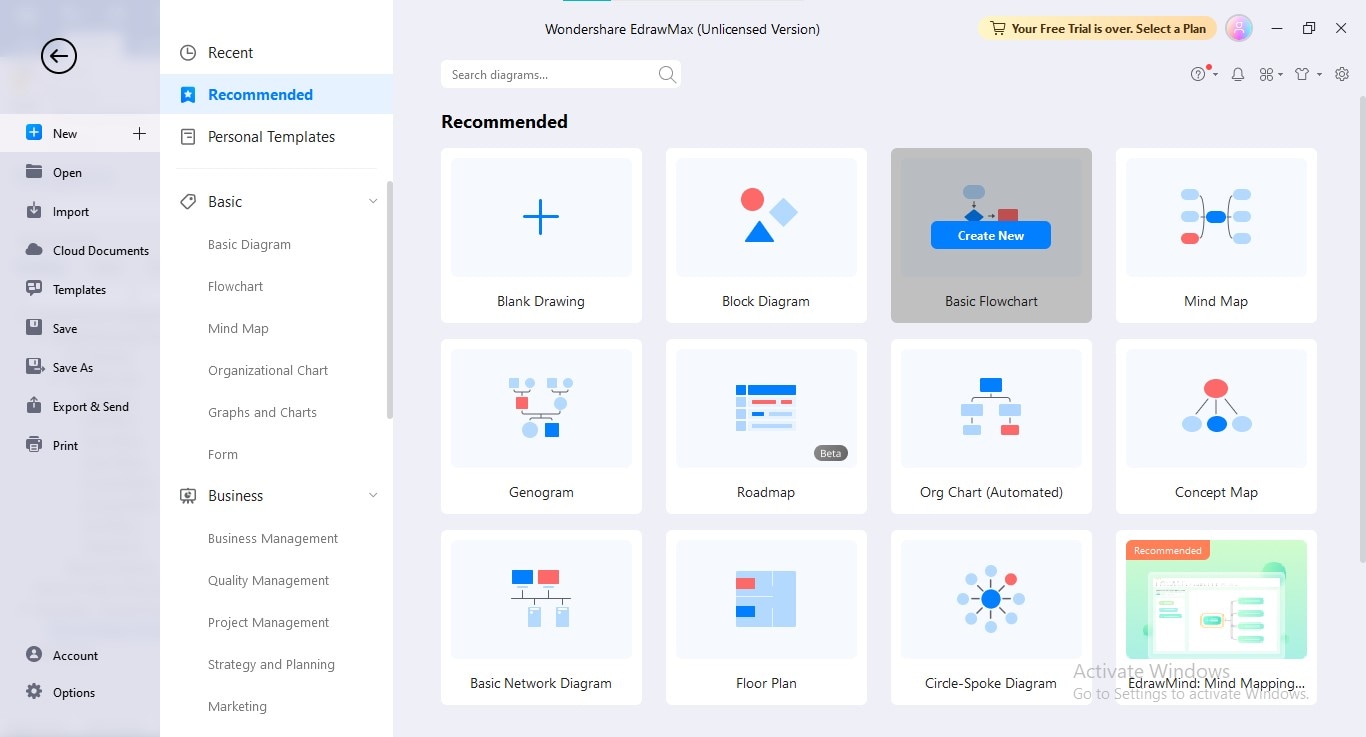
Click the "New" option in the right panel, hover over the "Basic Flowchart" option, and click the "Create New" button.
Step3
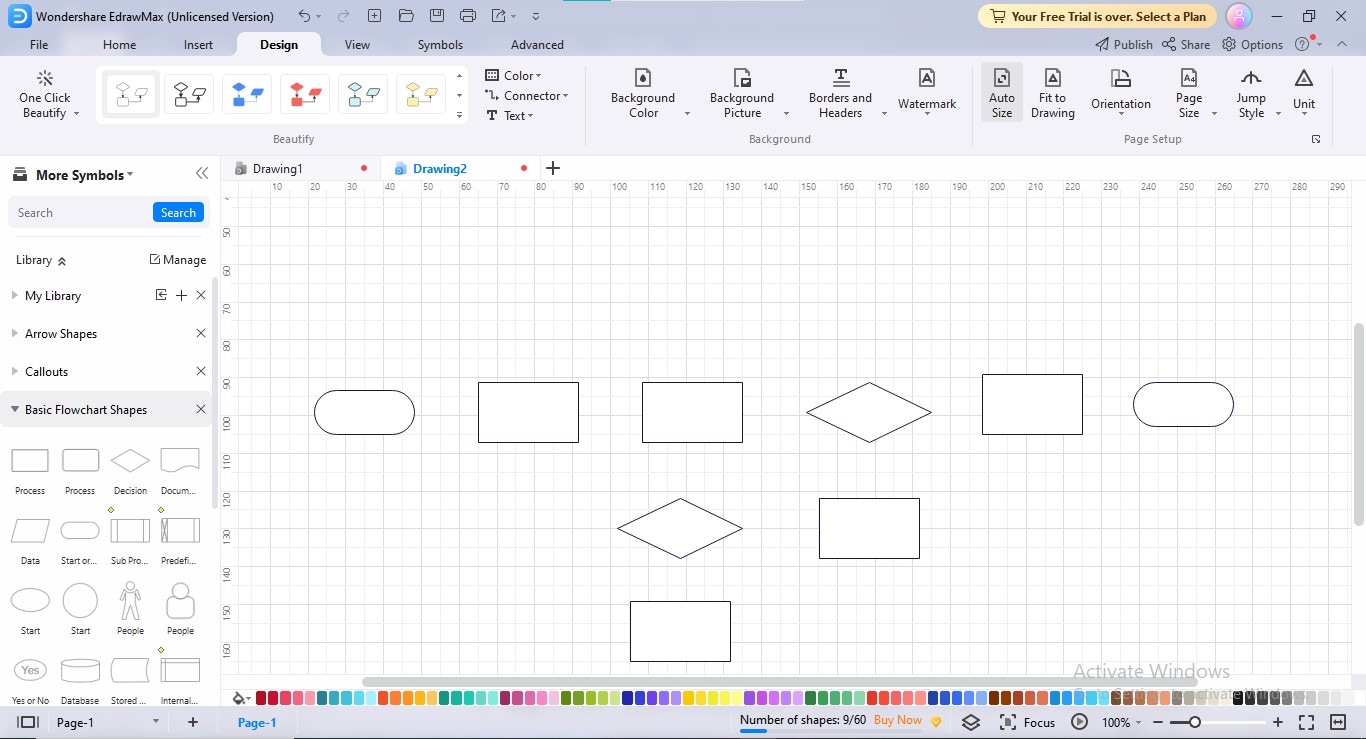
Draw all the shapes necessitated in your flowchart on the canvas through drag-and-drop.
Step4
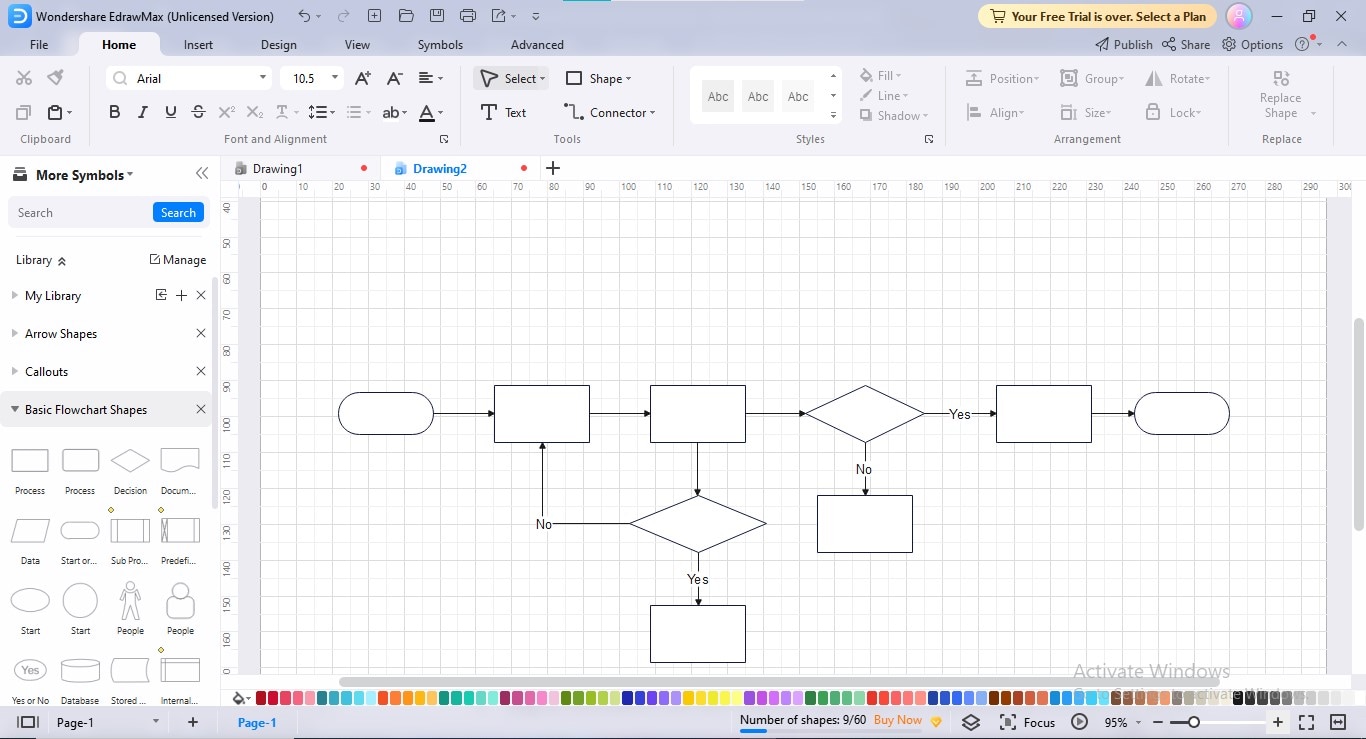
Connect your flowchart shapes by adding connectors in accurate sequence; go to the "Connectors" option under the "Home" tab to add connectors.
Step5
Now, embed accordant text to your shapes to complete your flowchart creation process.

Step6
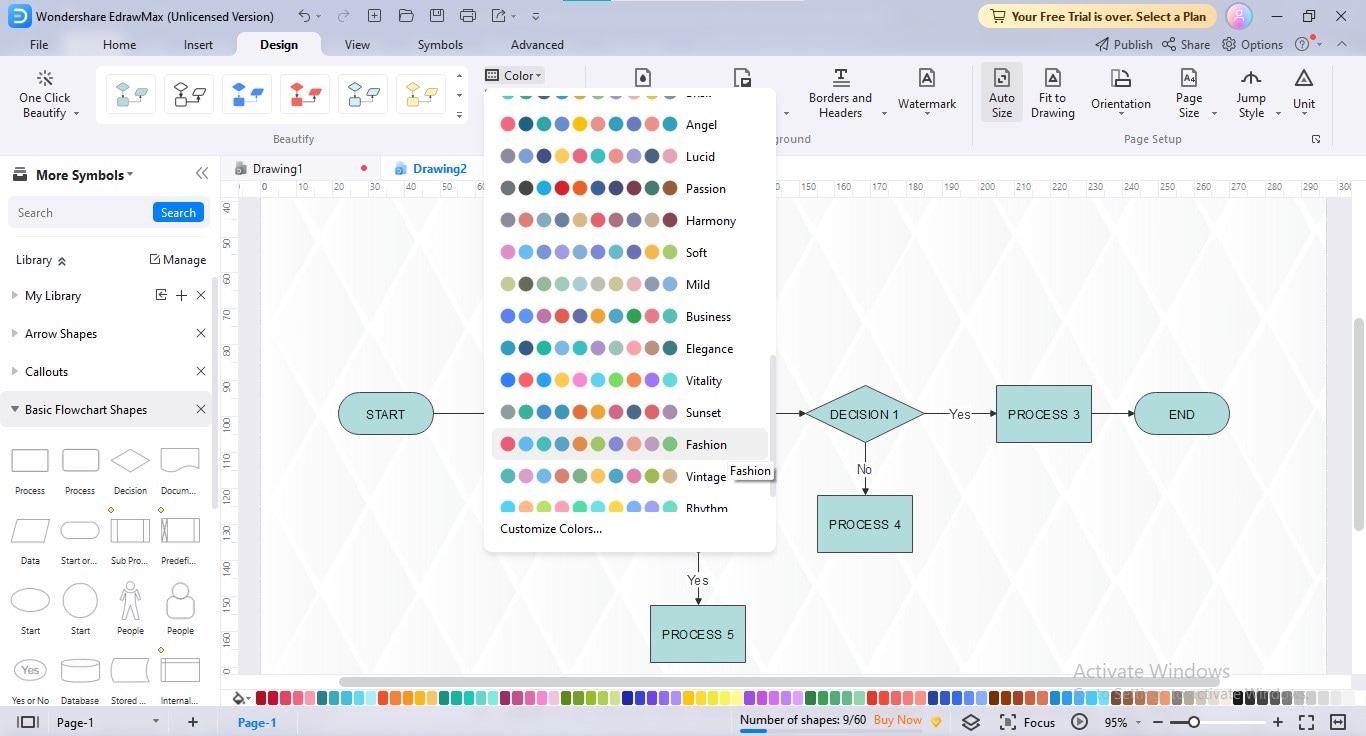
Personalize your flow diagram's appearance by implementing your favorite layout, theme, color scheme, background, and fonts; you can perform these customizations in the "Design" tab.
Step7
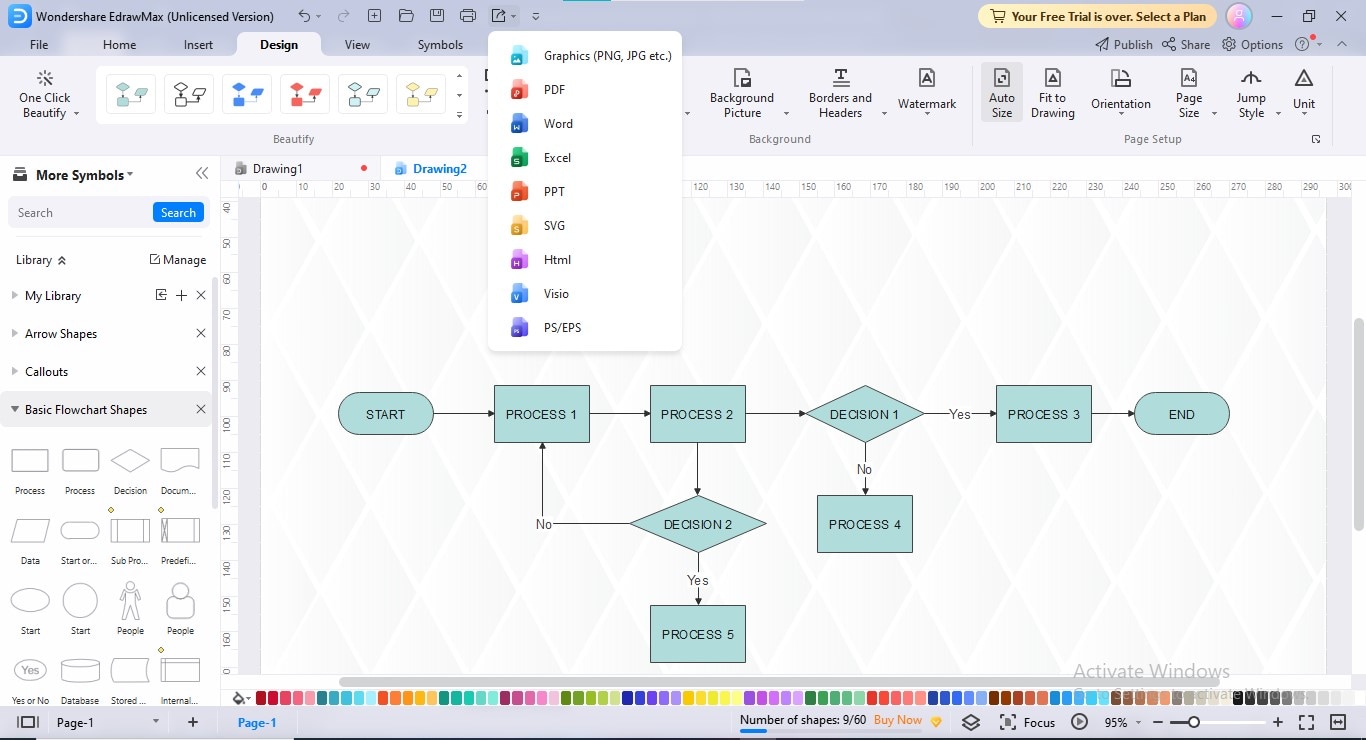
To export your flowchart, click the "Export" button at the top bar and choose your desired export format.
4. Conclusion
Google Drawings is a multifaceted Google flowchart tool through which you can make a flawless flow chart in Google. The navigable interface, extendable canvas, customization possibilities, import & export choices, and history version are all that make Google Drawing a competitive solution to the other eminent propriety diagramming software.
Explore the full guide if you want to create a Google Draw flowchart. You can also consider EdrawMax as an ultimate flowcharting solution if you don't find the Google Drawing flowcharts inviting.


