Flowcharts are an influential approach to streamlining your workflow or exhibiting the temporal sequence of a procedural operation. However, do you think only a flowchart diagram can efficiently convey your intended meaning or make your presentation effective? Presenting your operational steps in just a flow diagram is not enough; you need a flowchart animation to reveal each flowchart process step in a subsequent manner.
Animated flowcharts not only make your presentation more engaging but also help the audience understand the overall process by presenting it in a step-by-step manner. With that in mind, this article will show you how to create flowchart animations in MS PowerPoint using a simple, easy-to-follow tutorial.
In this article
Insights Into Flowchart Animation
Every flowchart type is not the same, nor are all flowcharts simple; some flowcharts illustrate complex procedures involving sub-processes and multiple decision paths. If these flowcharts are presented in a full-fledged, static form to the audience, very few of them may grasp the concept described because of the perplexing outlook.
Animated flowcharts display the content or sequential events of the process in animated form. Such dynamic-patterned flowcharts are instrumental, especially when you have to deal with some puzzling topics.
Importance of Flow Chart Animations
Animated flowcharts may have diversified uses, ranging from a simple justification of a process to explaining complex business project strategies. Here are some real-life cases where a flowchart can come to use:
- Process Description: Describe the thorough procedure, depicting where a process initiates, where it projects, and where it will end.
- Employee Training: Illustrate working procedures in a step-by-step sequence to new employees.
- Education: Explain complex scientific phenomena to your students, using stunning flowcharts to stimulate their interests.
- Strategy Explanation: Showcase a newly-established business strategy to the workers, giving them a direction on how to accomplish the prospective target.
How To Create an Animated Flow Chart in PowerPoint?
PowerPoint, an official product of Microsoft 365, has been in the marketplace since the 1980s, and it has proved to be the best presentation software yet. Besides establishing attention-grabbing personal & business presentations, you can also craft flowchart animations with this wonderful tool.
Building an Animated Flowchart in MS PowerPoint
Animated flowchart creation in PowerPoint involves two primary steps: creating a basic flowchart and applying animations to the flowchart. Here's how to do it:
Creating a Basic Flowchart in MS PowerPoint
Step1
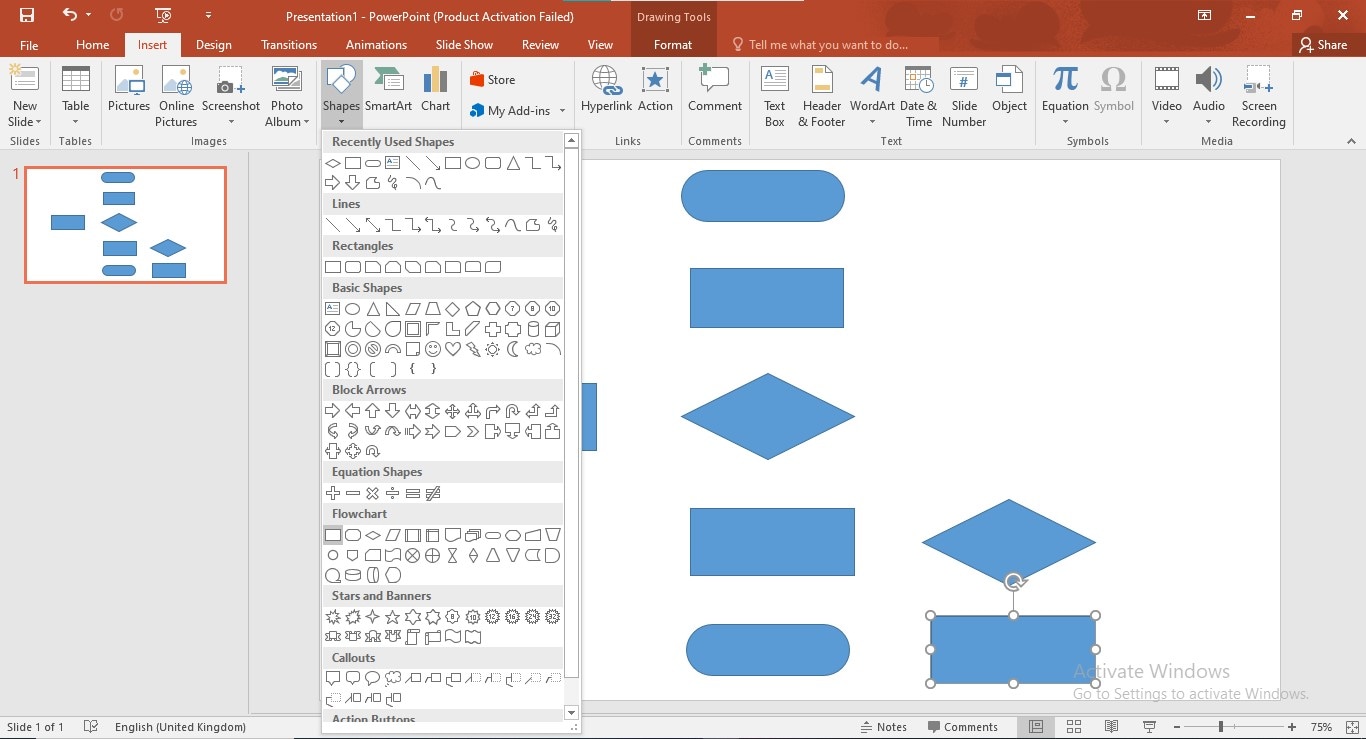
Navigate to the "Insert" tab in the main menu, click the "Shapes" option, go to the "Flowchart" shapes library, and draw your required shapes on the slide.
Step2
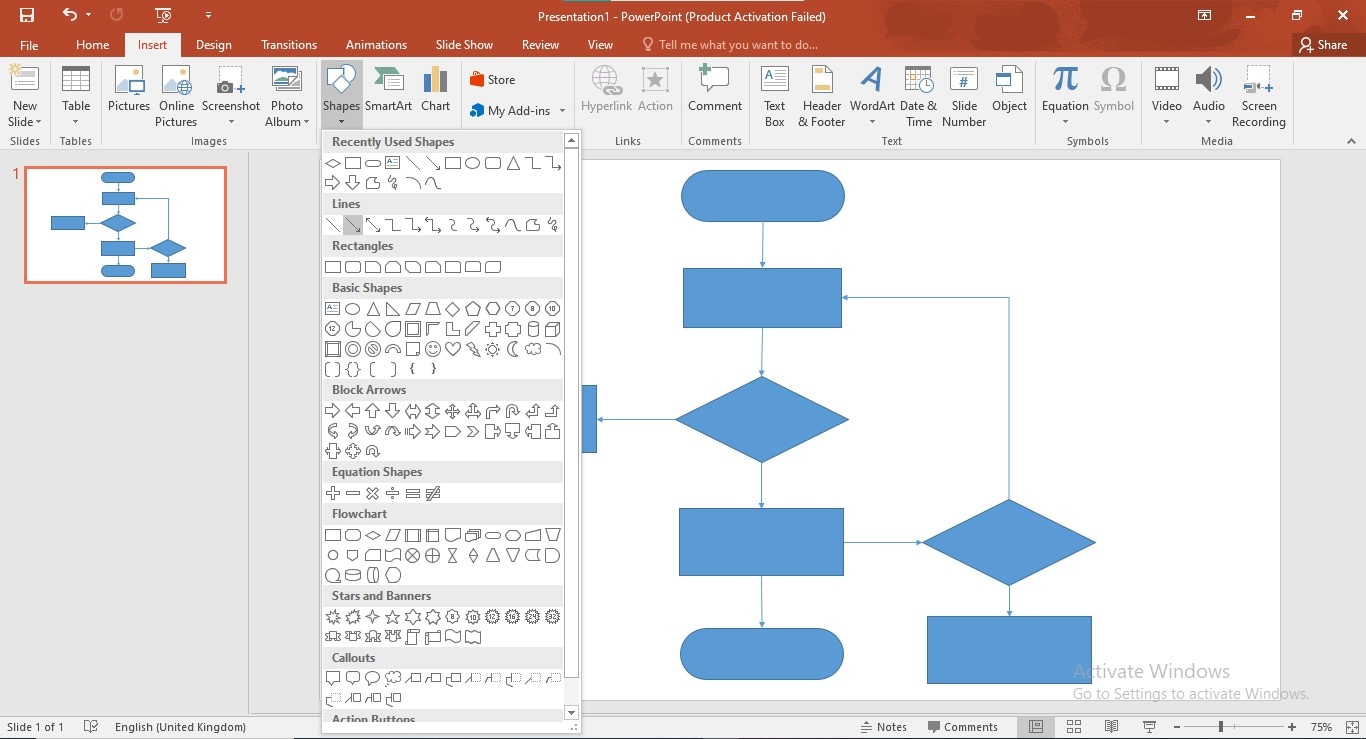
Go to the "Shapes" library again and insert the lines & arrows from the "Lines" gallery to connect your PowerPoint flowchart shapes.
Step3
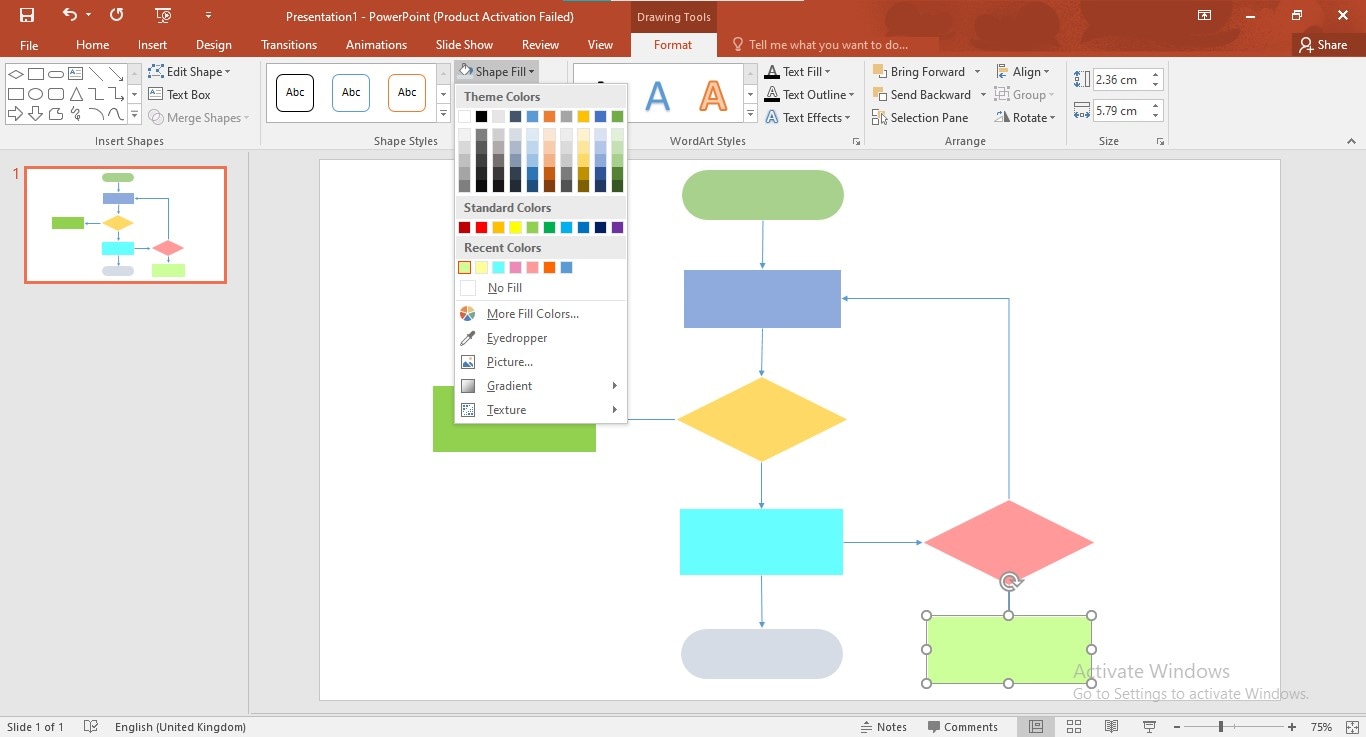
Set the fill and border color of your shapes & arrows according to your preference; for this, select a shape and go to "Format" > "Shape Fill".
Step4
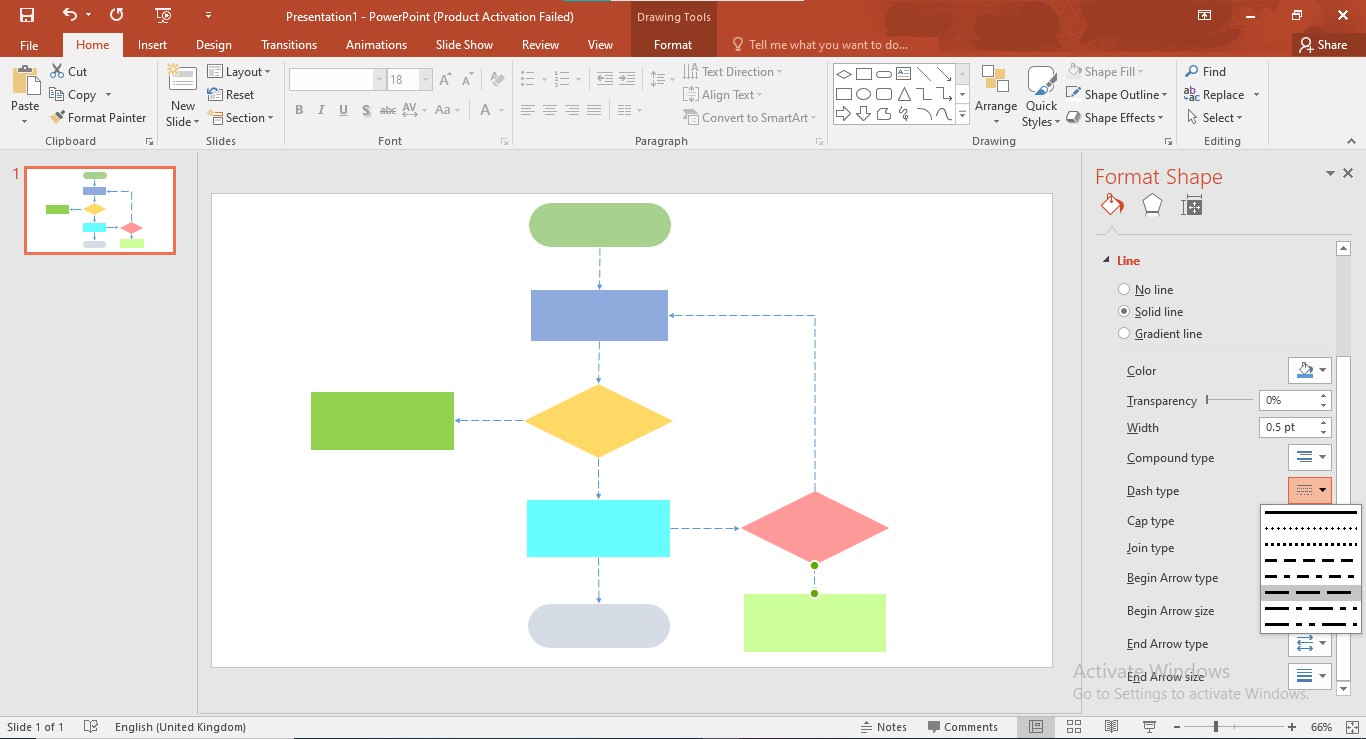
You can pick the type of arrow lines by right-clicking the arrows and then choosing the "Format Shape" > "Dash Type"
Step5
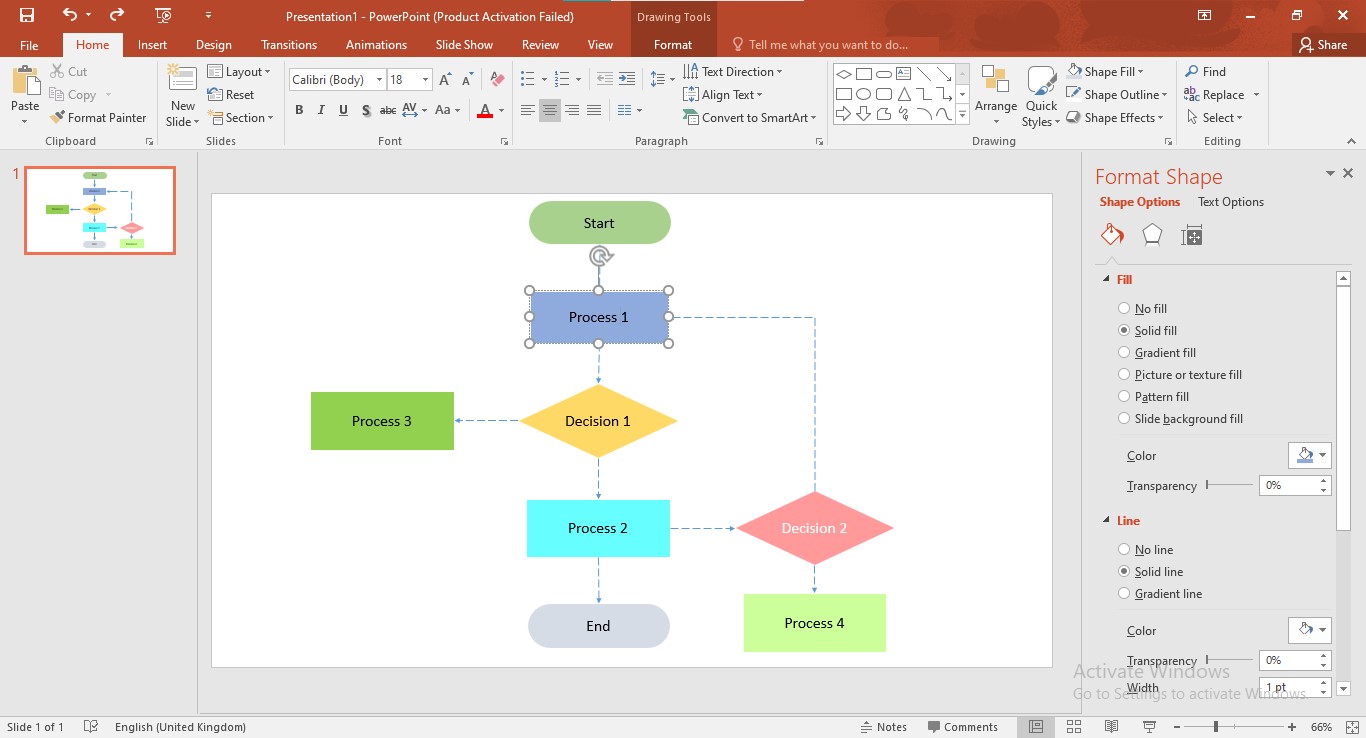
Insert text in each shape to complete your flowchart.
Applying Animations to Flowchart Shapes
Step1
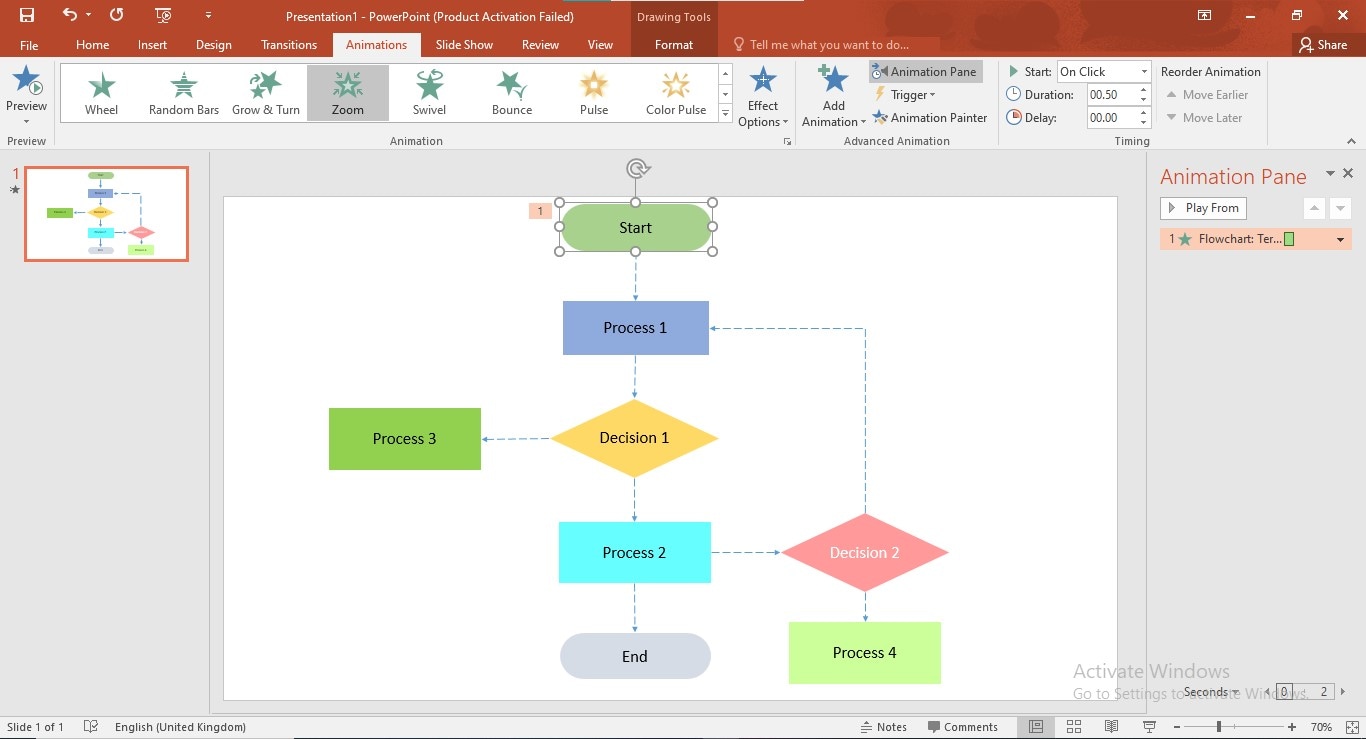
To apply animations to a particular shape, navigate to the "Animations" tab in the main menu, select that shape, and choose from the given animation styles.
Step2
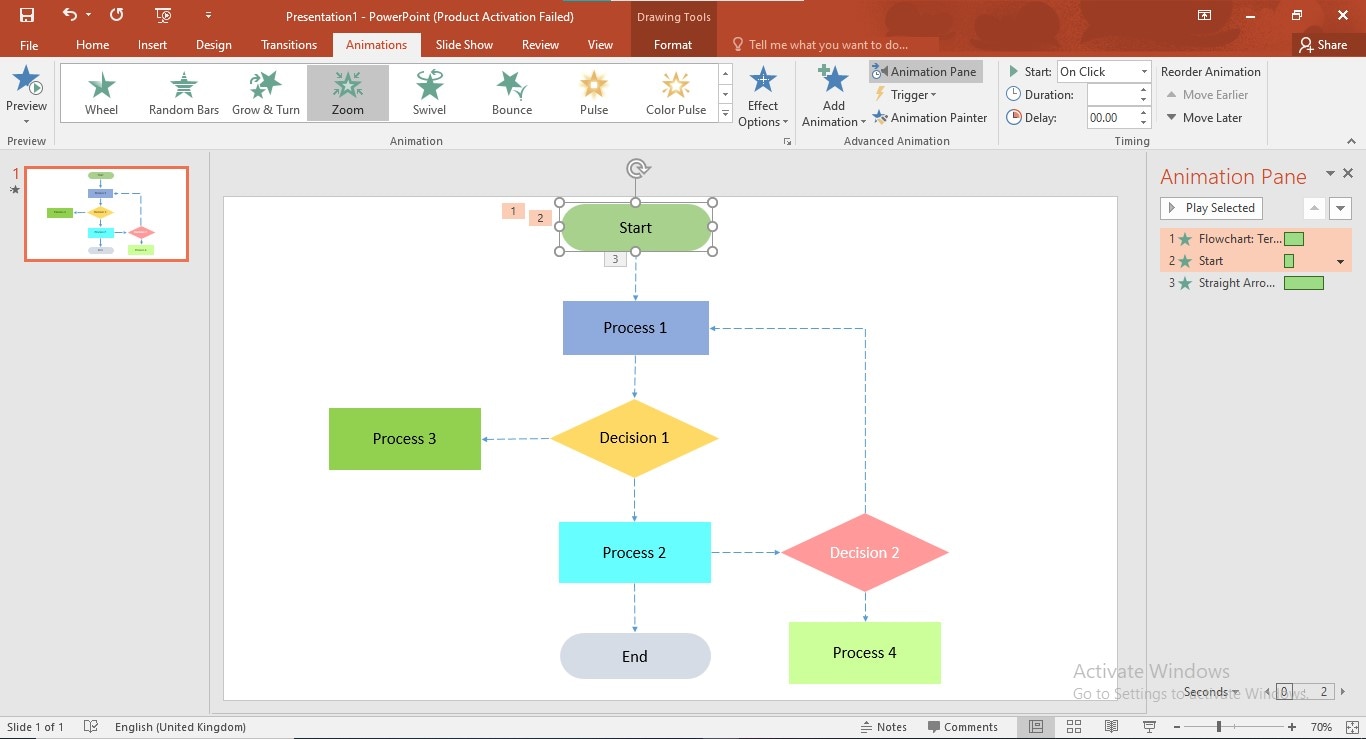
Choose a shape and apply an animation effect like "Zoom". Open the Animation Pane on the right side to play and check the applied animations.
Step3
To apply animation to multiple objects, select all of them, and apply animation to them.

Step4
You can select how to start playing your flowchart animation; for example, the next object will appear after clicking once if you select the "One Click" option.
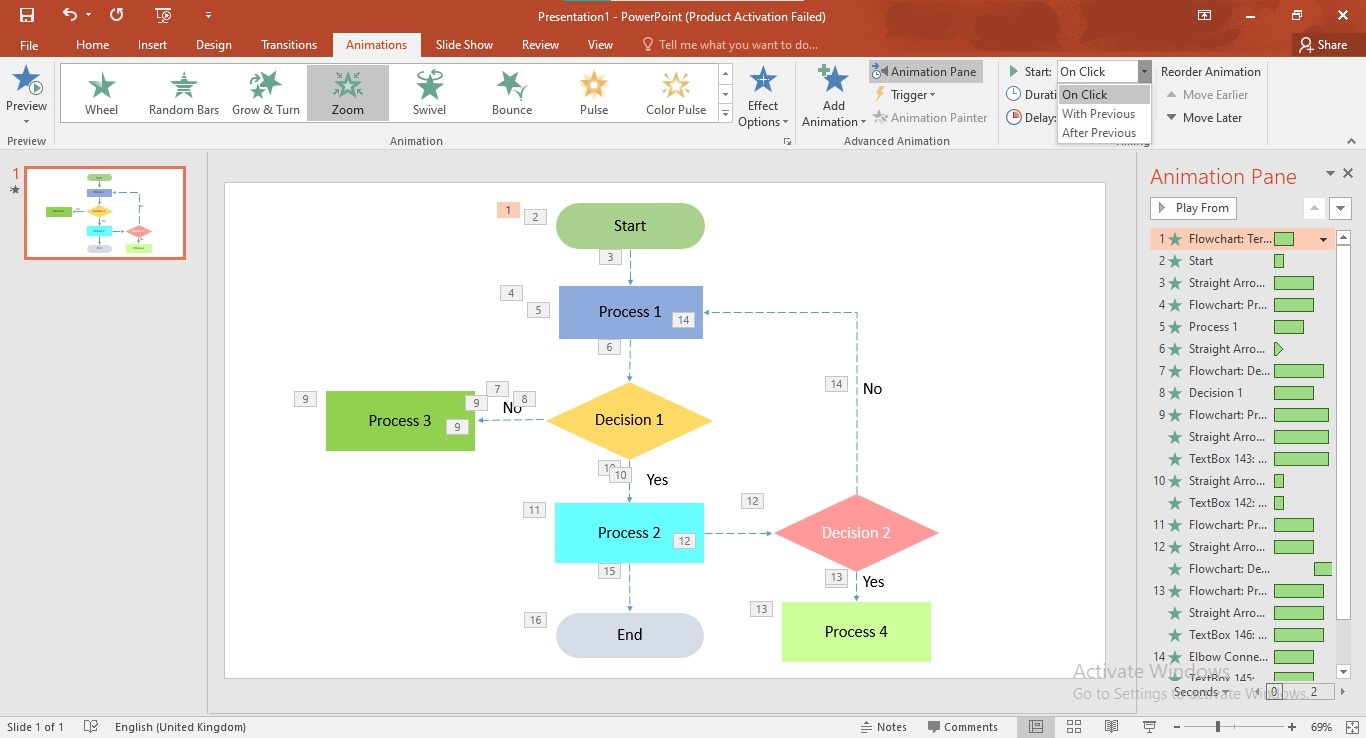
Step5
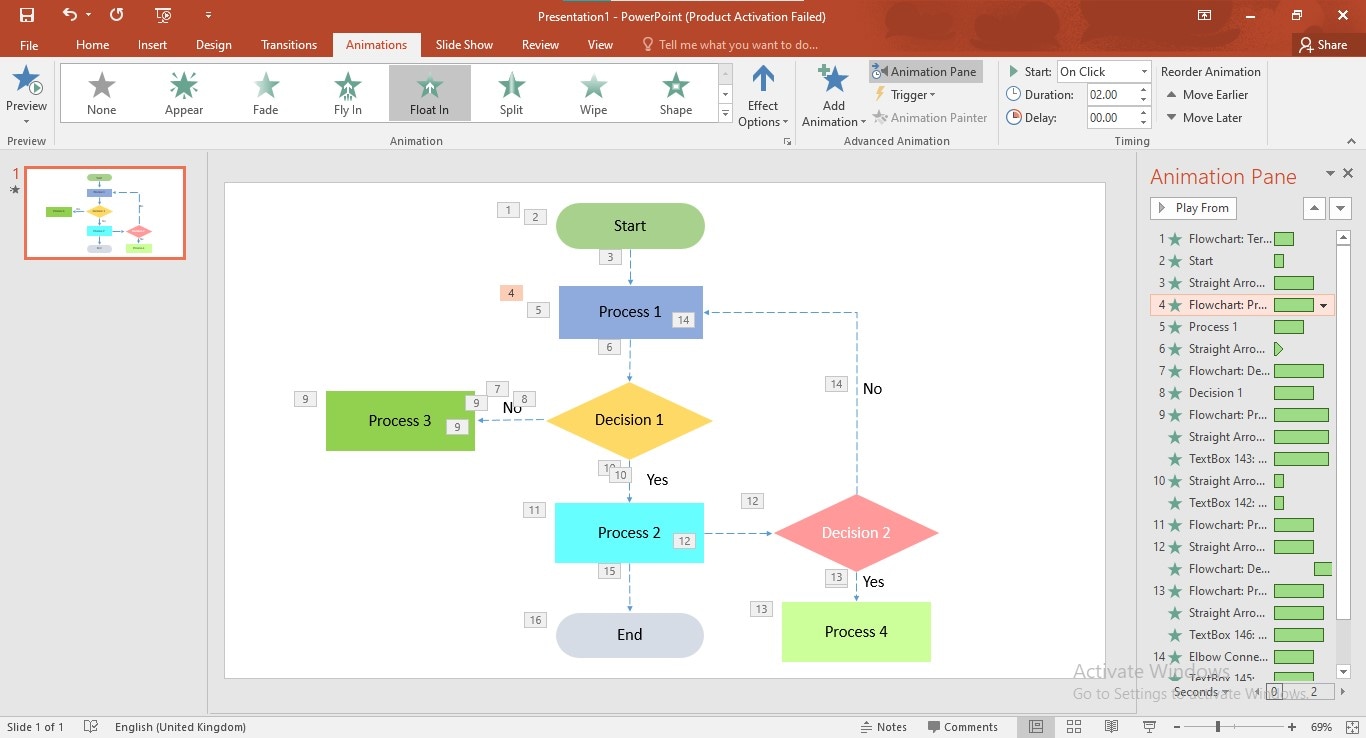
To set the duration of a particular animation to appear, go to the Animations menu and customize "Duration" option on the right. To alter the sequence of animation objects, select that object from "Animation Pane" and choose the "Mover Earlier" or "Move Later" option.
EdrawMax- An Innovative Way to Make Your Animated Flowchart Stunning!
Creating flowchart animation in MS PowerPoint can be a little complicated, requiring you to put in considerable effort since PowerPoint does not have smart sketching features for flowchart creation. Although MS PowerPoint contains an immense shapes library, you may get into trouble aligning those shapes into a proper pattern. The scalable solution to this problem is creating a flowchart in an innovative diagramming platform and applying animations to that diagram in MS PowerPoint.
In this situation, we suggest using EdrawMax; its smart alignment features will smoothen your flowchart creation, providing a more smooth drawing experience. You can create even a professional-level flowchart in minutes without investing excessive efforts in its patterning and customization.
Here are some more reasons why you should give EdrawMax a try:
Export Format: You can export a flowchart in the PPT format to modify it further in PowerPoint.
Rich Templates: There are numerous professionally made flowchart templates in the templates community of EdrawMax.
AI Flowcharting: You can generate a flowchart in one click with the help of AI.
Flowchart Analysis: You can use AI to describe, detect, and optimize a flowchart.
How To Design Animated Flow Diagram Using EdrawMax?
EdrawMax's cost-effectiveness, ready-to-use templates gallery, all-inclusive symbols library, incredible customization features, presentation creation capabilities, and multiple export choices are what entice every user. Furthermore, EdrawMax allows you to co-edit your flowcharts to foster teamwork and enhance productivity, providing unbroken real-time collaboration session opportunities.
How To Design a Flowchart Using EdrawMax?
EdrawMax is replenished with auto-alignment features, such as rulers, gridlines, and auto-detective adjustments, which make it a highly convenient solution for users. If you want to fabricate a flowchart using EdrawMax, follow the step-by-step procedure provided below:
Step1
Download, install, launch EdrawMax. Log in with a Wondershare ID or an account of Google, Facebook, or Twitter.
Step2
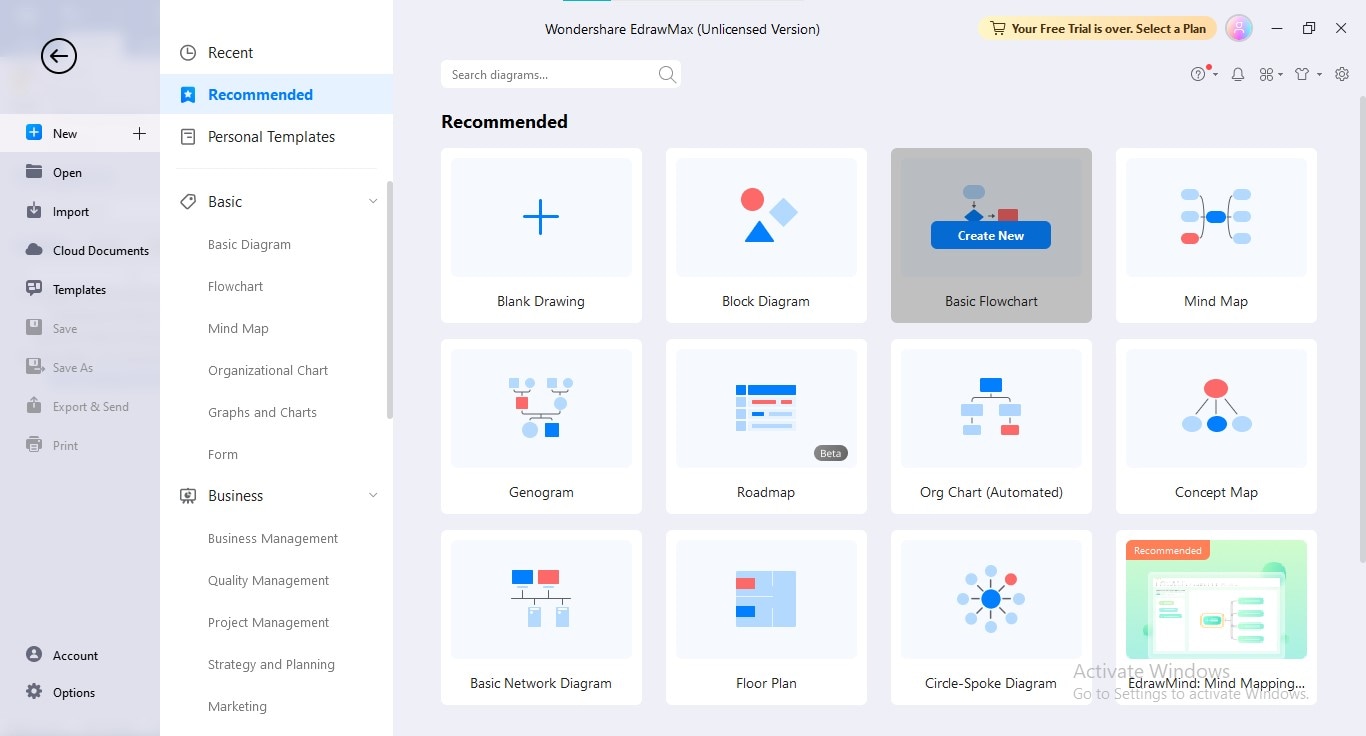
Click the "New" tab in the left panel, go to the main widget, and choose the "Basic Flowchart" option.
Step3
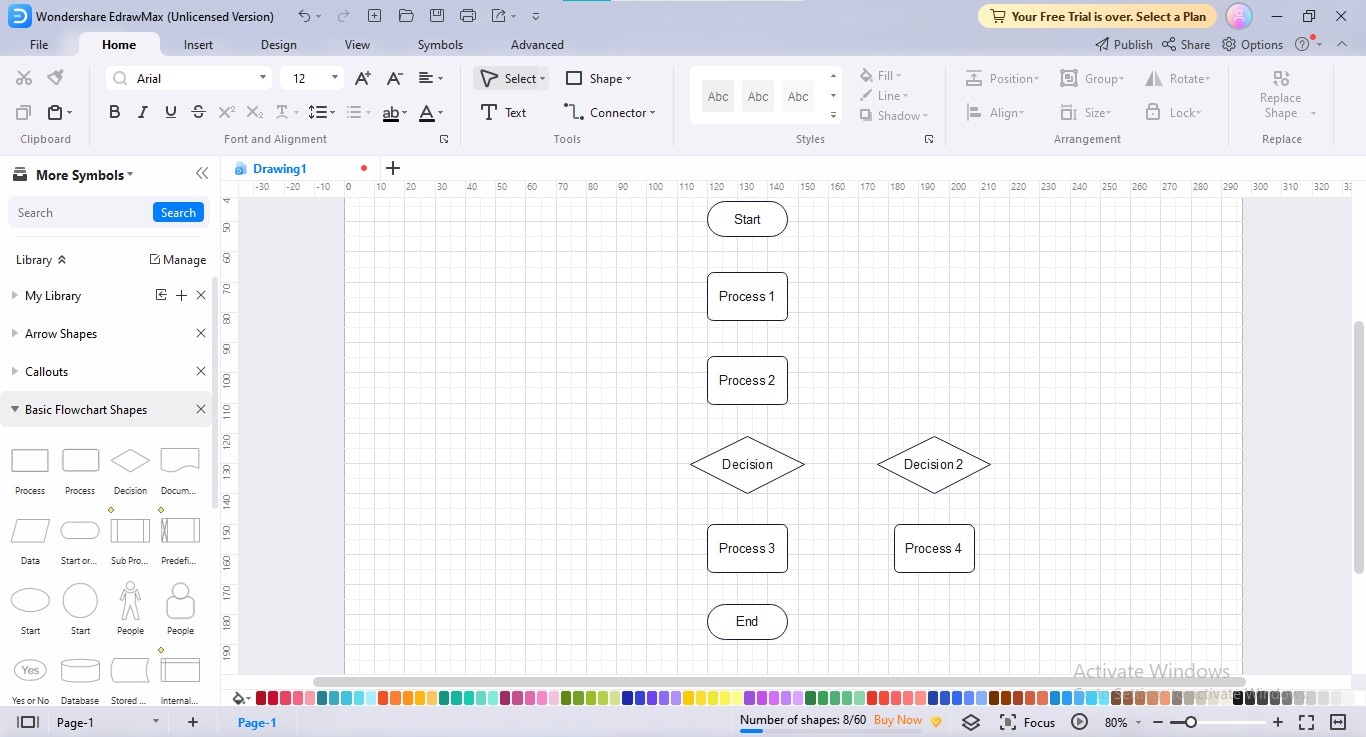
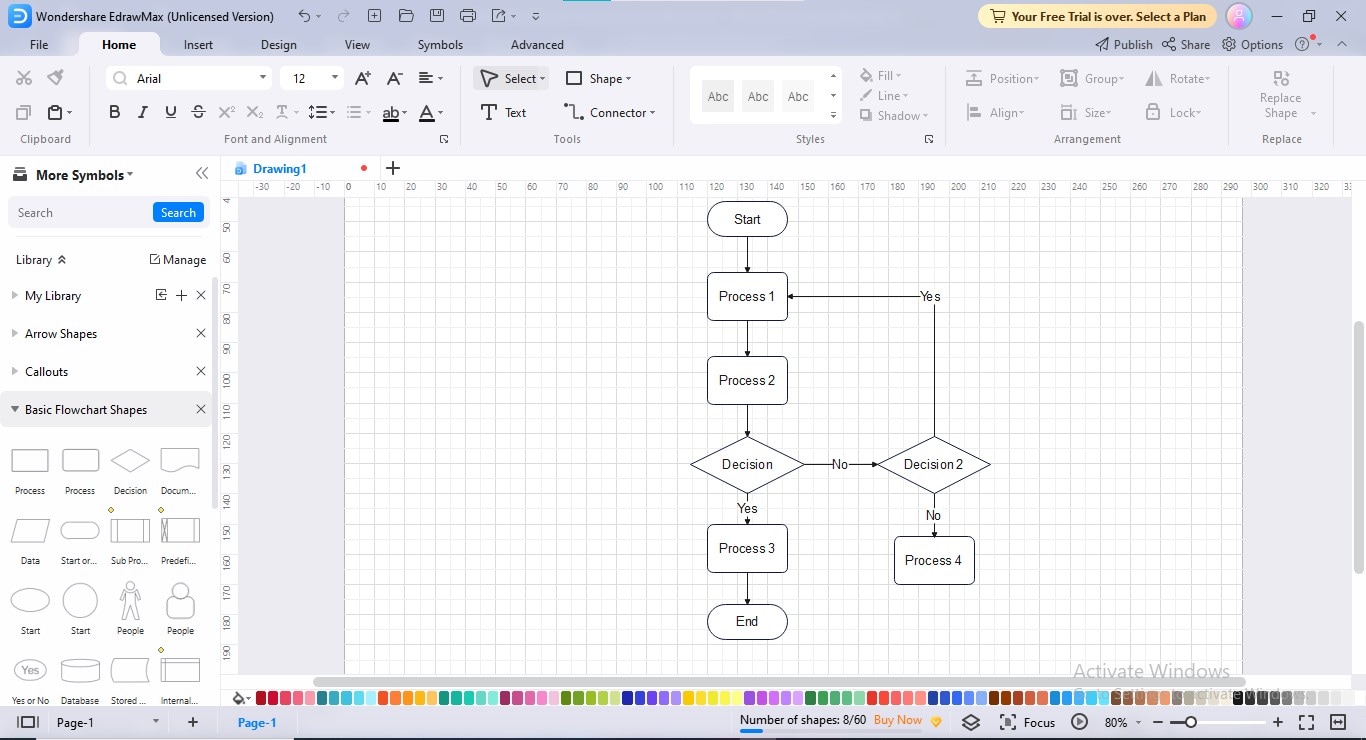
Enter the accordant text in each flowchart shape by double-clicking to describe the sequential process.
Step4
Connect the shapes in the accurate sequence using the connectors; navigate to the "Connectors" option in the "Home" menu to add connectors.
Step5
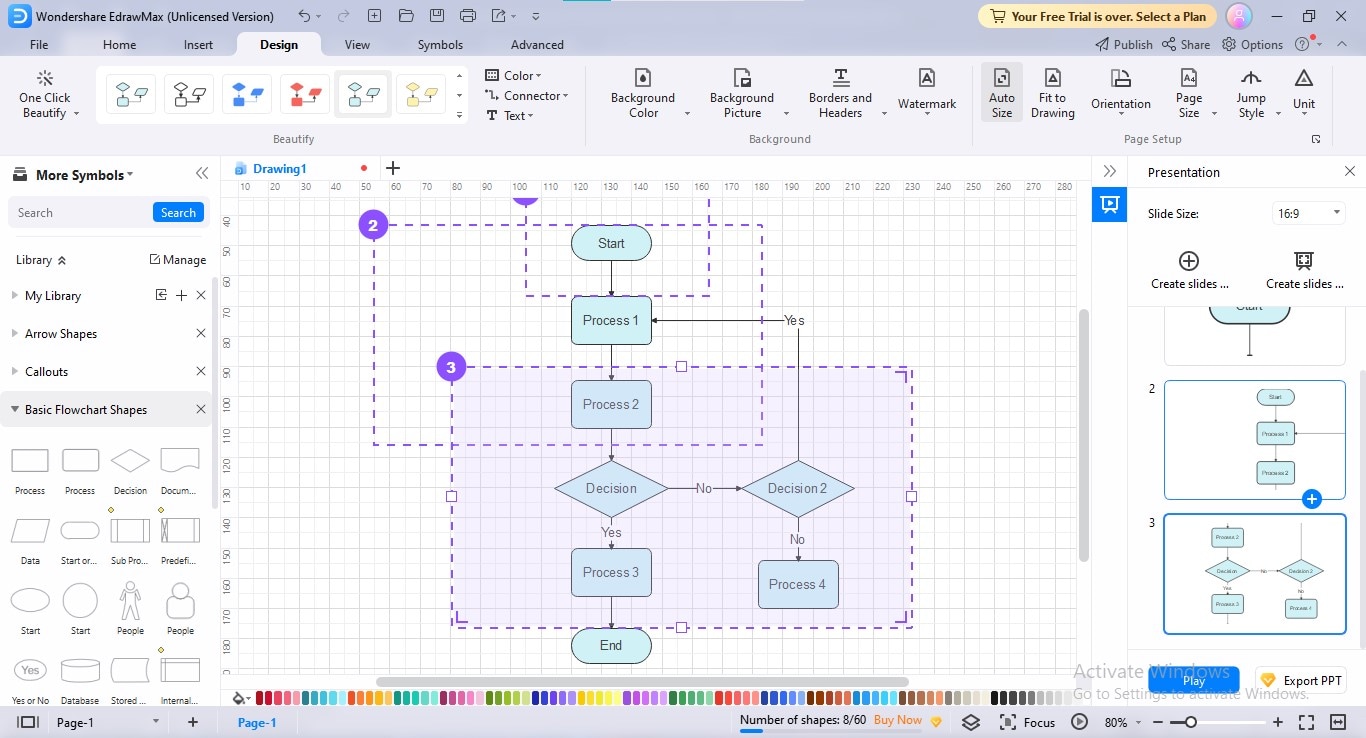
To add a visual appeal to your flow diagram, customize it according to your requirements and preferences; go to the "Design" tab for outlook customization. Circle areas of the flowchart to create a slideshow.
Step6
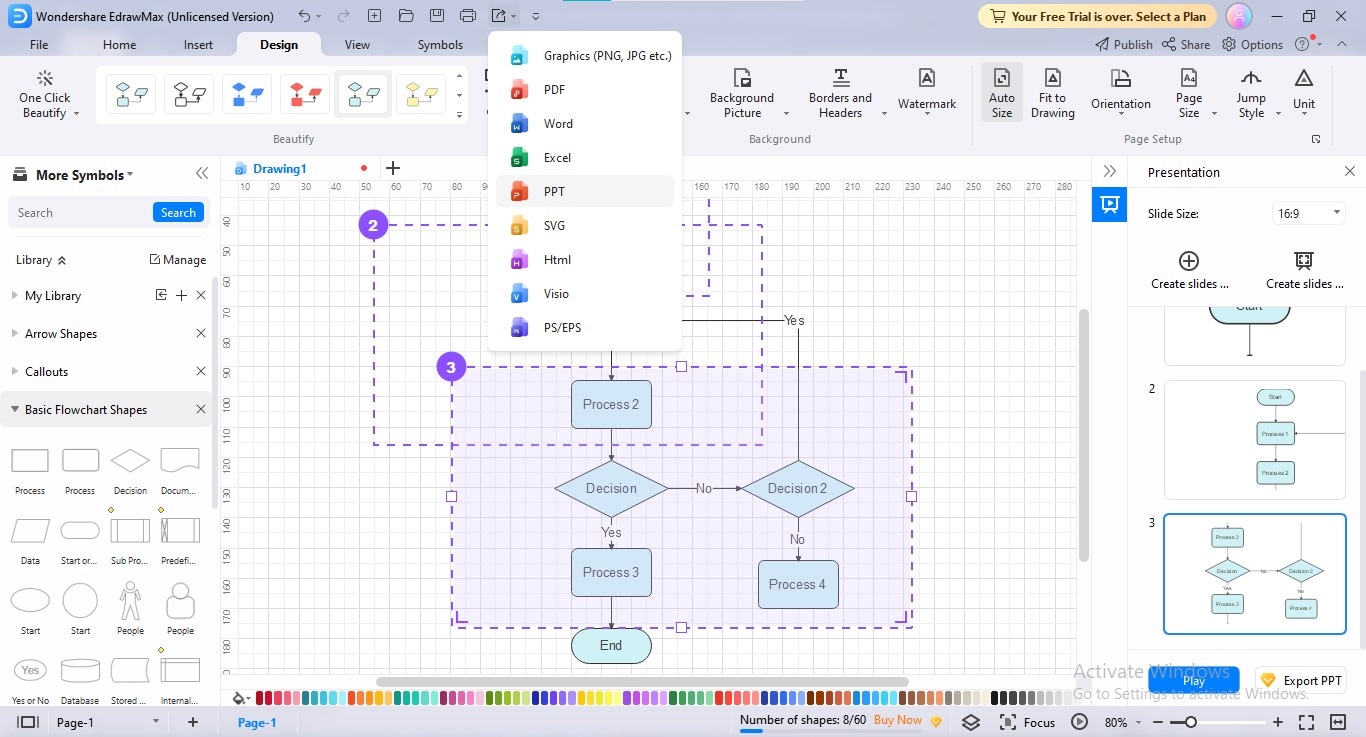
Export your flowchart in PPT format by navigating to the "Export" icon at the top bar and choosing the PPT format from the dropdown.
Conclusion
Flowcharts doubtlessly portray complex processes in simplified illustration, but creating a flowchart and presenting it as-it-is to the audience can confuse their minds because some flowcharts have messy structures, unclear start & end points, and long-winded processes. Thus, you can use animated flow charts to illustrate from where a flowchart starts, how it proceeds, and where it will end. Using this dynamic technique, you can also captivate the viewers' attention.
Use this article as a guide to establish flow chart animations using Microsoft PowerPoint; if you find PowerPoint a little bit intimidating, you can employ EdrawMax as an alternative flowchart creator.


