


A 2D floor plan tells you where walls go. It doesn't tell you how a room feels. Clients see lines and measurements. They don't see the kitchen they'll cook in or the bedroom they'll wake up in.
Due to this gap, buyers hesitate. Renovation projects get delayed. Design approvals drag on.
Nano Banana Pro takes 2D floor plans and generates 3D views that show depth, perspective, and spatial relationships. The process takes seconds instead of hours.
In this article, I'll walk you through converting 2D plans to 3D using Nano Banana Pro. You'll get ready-to-use prompts and two methods to generate inside EdrawMax.
In this article
- Why People Prefer 3D Floor Plans
- Convert a 2D Floor Plan Into a 3D Floor Plan with Nano Banana Pro
- Best Free Prompt Templates You Can Use Right Away
- Common Issues and How I Fixed Them
- Tips for Getting Accurate 3D Plans
- Convert Better with Nano Banana Pro Feature in EdrawMax
- Why Use Nano Banana in EdrawMax
- Wrap-Up
Why People Prefer 3D Floor Plans
"Will This Feel Cramped?"
I used to assume square footage told the story. Then I saw how a 3D view instantly revealed whether a room actually felt tight or open. Ceiling height, windows, and furniture layout finally made sense when viewed in space rather than on paper.
"How Does the Layout Flow?"
On a 2D plan, moving from the kitchen to the dining room looks effortless. In 3D, I noticed awkward turns, clashing doors, and blocked paths that weren’t obvious on paper. Flow became something I could judge, not something I could imagine.
"Can I Picture Living Here?"
People need to see themselves in a space. Asking them to visualize from lines on a sheet is a stretch. Once I started using 3D plans, buyers reacted to actual rooms with furniture and appliances, not abstract boxes.
"Does This Match What I Approved?"
I’ve seen clients nod through 2D approvals, only to feel blindsided during construction. A 3D view forces clarity. It shows the final reality before anyone pours concrete.
"Is This Worth the Investment?"
Investors think in outcomes. A 3D floor plan makes value obvious in seconds. It shows what the project becomes, not what it measures.
Convert a 2D Floor Plan Into a 3D Floor Plan with Nano Banana Pro
Follow these four steps to turn a flat layout into a dimensional view.
Step1 Prepare Your Reference File
- A cluttered floor plan confuses the AI. This is another thing I learned the hard way.
- If feasible, clean your file before uploading:
- Remove dimension text.
- Delete construction notes.
- Erase grids.
- Keep only walls, doors, windows, and room outlines.
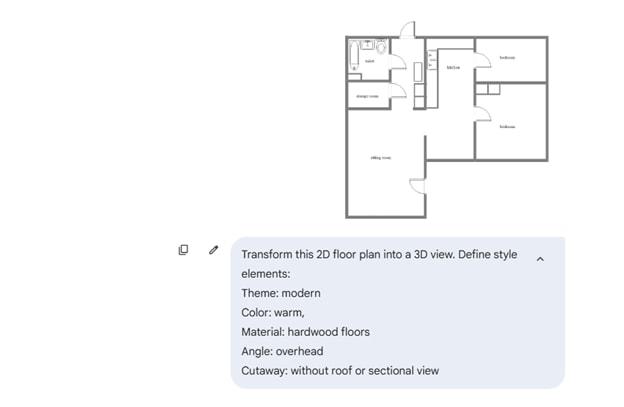
Step2 Write a Conversion-Friendly Prompt
- Your prompt explains what to convert, how it should look, and from which angle.
- Start with clear instructions: “Transform this 2D floor plan into a 3D view.”
- Define style elements:
- Themes: contemporary, industrial, coastal, farmhouse
- Colors: neutral, warm, monochrome
- Materials: hardwood floors, marble counters, concrete walls
- Determine the view settings:
- Angle: 45-degree isometric, overhead, corner perspective
- Cutaway: without roof or sectional view
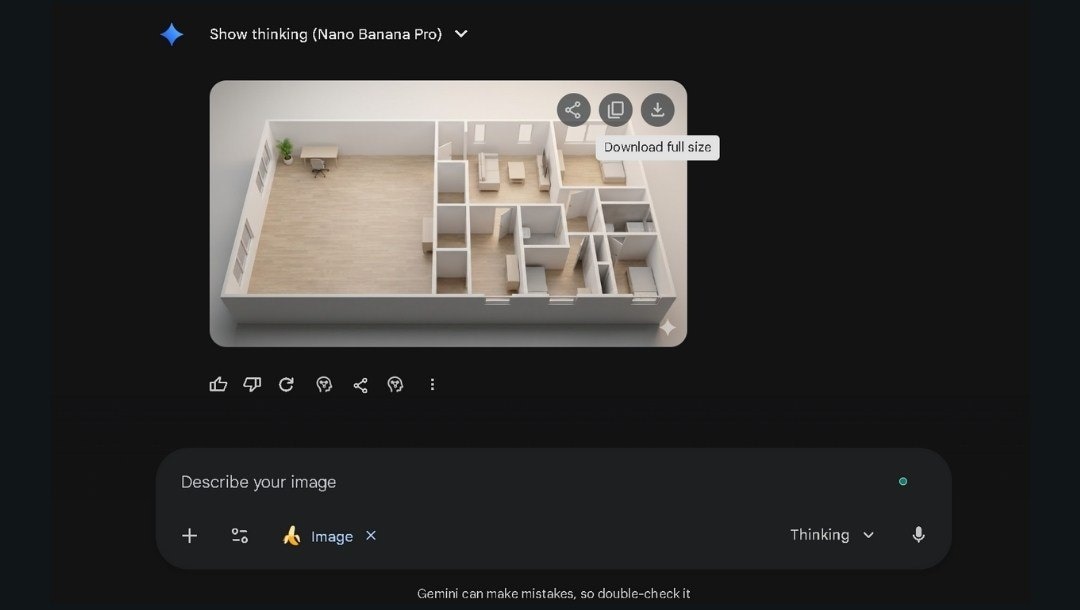
Step3 Generate and Export The 3D Floor Plan
- Upload the cleaned file and paste your prompt.
- Enable the Nano Banana Pro feature from the tools.
- Enter to generate the 3D floor plan.
- Compare the result with your 2D plan:
- Are all rooms present?
- Are hallways positioned correctly?
- Do room sizes feel proportional?
- Minor revisions fix missing details fast.
- Sometimes I regenerate with the same prompt to get better results.
- Download your final 3D floor plan.
Best Free Prompt Templates You Can Use Right Away
These templates work for specific use cases. Copy one, replace the bracketed text with your details, and generate.
Prompt for Architects
Convert this 2D floor plan into an isometric 3D visualization. Show the structure without a roof to reveal the interior layout. Wall height is [2.7/3.0/3.5] meters. Display all load-bearing walls in [gray/concrete texture]. Include door swings and window placements exactly as shown. Use a technical architectural style with neutral colors. View from [front-left/front-right/rear] corner at 45 degrees. No furniture. No decorative elements.
When to use: Structural presentations, client meetings, design reviews.
Prompt for Interior Designers
Transform this 2D floor plan into a 3D interior visualization. Use a [modern/scandinavian/industrial/minimalist] design style. Include furniture appropriate for each room: [sofa and coffee table in the living room], [dining table for 6 in the dining area], [queen bed and nightstands in the bedroom]. Floor material: [light oak hardwood/gray porcelain tile/polished concrete]. Wall color: [warm white/soft gray/cream]. Show natural lighting from windows. Ceiling height [2.7] meters. Isometric view from [direction].
When to use: Design proposals, mood presentations, client approvals.
Prompt for Real Estate Marketing
Create an attractive 3D floor plan from this 2D layout for property marketing. Use bright, inviting colors. Include modern staged furniture in all rooms. Living room: contemporary sofa set. Kitchen: clean counters with [appliances visible/minimal accessories]. Bedrooms: made beds with neutral bedding. Bathrooms: towels and simple decor. Use warm natural lighting. Ceiling height [2.5] meters. View from an angle that shows all rooms clearly. Style: [contemporary/transitional]. Make the space feel open and welcoming.
When to use: Property listings, brochures, virtual tour previews.
Prompt for Homeowners Planning Renovations
Convert this 2D floor plan into a 3D view showing my renovation plans. The current layout includes [describe existing rooms]. Changes: [new kitchen island/removed wall between living and dining/added bathroom]. Show the updated layout with [style preference: modern/traditional/farmhouse] design. Include basic furniture to show scale. The kitchen should have [cabinet color] cabinets and [counter material]. Floors: [material and color]. Wall color: [color]. Ceiling height [height] meters. View from [angle that shows renovation area best].
When to use: Contractor discussions, family planning meetings, permit visualizations.
Common Issues and How I Fixed Them
I quickly learned that 3D generation from floor plans requires precise guidance. Here are the issues I ran into and what actually solved them.
The Layout Gets Shuffled or Messy
Rooms shifted from their intended positions.
Fix: I cleaned my 2D file by separating overlapping lines. Once each boundary was clear and the wall lines were thicker, the AI kept the layout.
Ceiling Height Looks Wrong
Spaces looked stretched or compressed.
Fix: I started stating exact heights in my prompt, like "ceiling height 2.7 meters." The difference was immediate.
Windows Face the Wrong Direction
Windows appeared on solid walls.
Fix: Marking them clearly in the plan and saying "windows only where marked" gave me accurate placements.
Furniture Style Clashes with Interior
I asked for modern. It delivered random antique looks.
Fix: I named styles precisely: “mid-century modern sofa” or “minimalist dining chairs.” Generic wording never worked.
Hallways Disappear
Corridors got absorbed into rooms.
Fix: Increasing line weight around hallways and adding “preserve all corridors” fixed it.
Colors Don’t Match the Request
White turned beige or gray.
Fix: I switched to the exact phrases “pure white walls” or “charcoal gray cabinets.” Clear terms make the AI obey.
Tips for Getting Accurate 3D Plans
These tweaks improved nearly every output I generated.
- Crop Tightly Around the Floor Plan: Removing borders and blank areas helped the AI focus.
- Keep Line Weights Consistent: Uniform wall thickness made detection cleaner. Doors and windows stayed thinner.
- Avoid Hatching and Patterns: Textures confused the model. Solid fills or empty spaces worked best.
- State Room Functions Clearly: Instead of hoping it understood layout cues, I told it what each room was used for.
- Describe Furniture Placement: “Sofa against the longest wall” produced correct layouts. Vague placement didn’t.
- Request Empty Rooms First: For complex models, I learned to generate structure alone, check accuracy, and then regenerate with furniture.
- Use the Same Lighting Consistently: Specifying "natural daylight" or "even overhead lighting" removed mismatched shadows.
- Check Door Swing Direction: Noting "all doors swing inward" fixed the wrong door orientations.
Convert Better with Nano Banana Pro Feature in EdrawMax
EdrawMax integrates Nano Banana Pro for floor plan generation. Use the method that suits your workflow.
Method 1: Use the AI Floating Button (Desktop)
Step1 Add Your 2D Plan in the AI Panel
- Click the floating AI button on the right side.
- It appears when you install EdrawMax on your desktop.

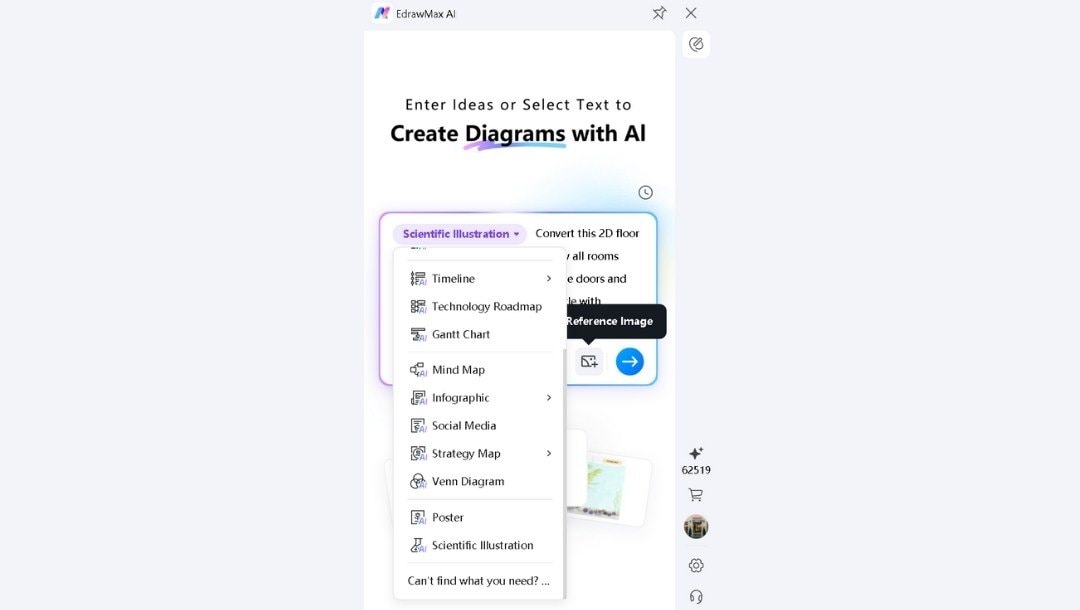
- The generation panel opens up.
- Select Scientific Illustration from the drop-down menu to access the Nano Banana Pro feature.
- Click the Upload icon to upload your 2D floor plan image.
Step2 Enter Conversion Details and Generate
- Write your prompt specifying view, style, and contents.
- Example: "3D isometric view, Scandinavian style, light colors, furniture in each room, no roof."
- Hit Enter or tap the send icon to generate your 3D floor plan.
- The AI processes your floor plan in seconds.
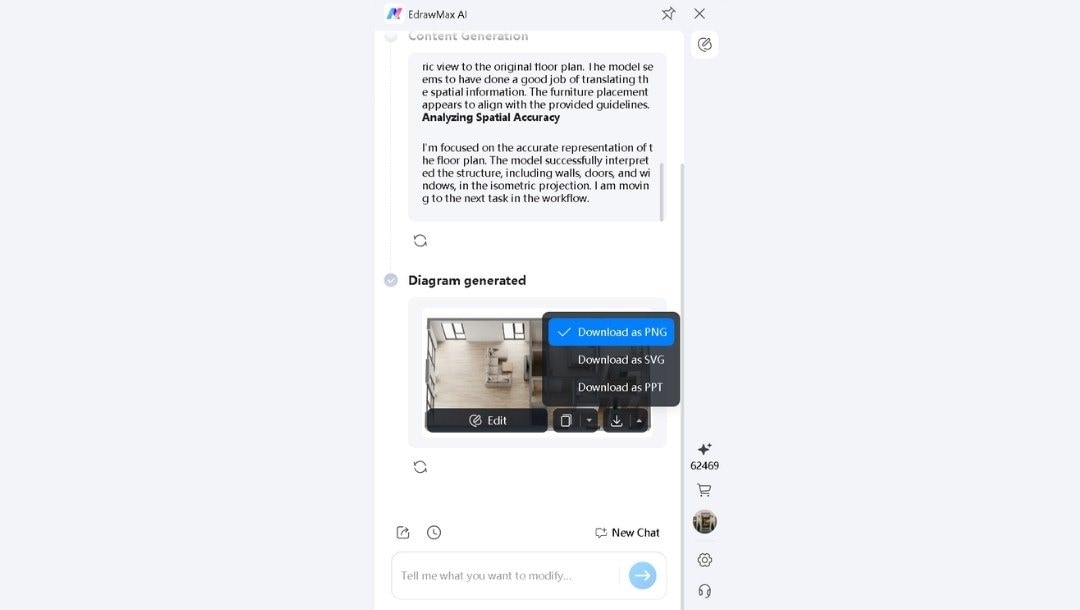
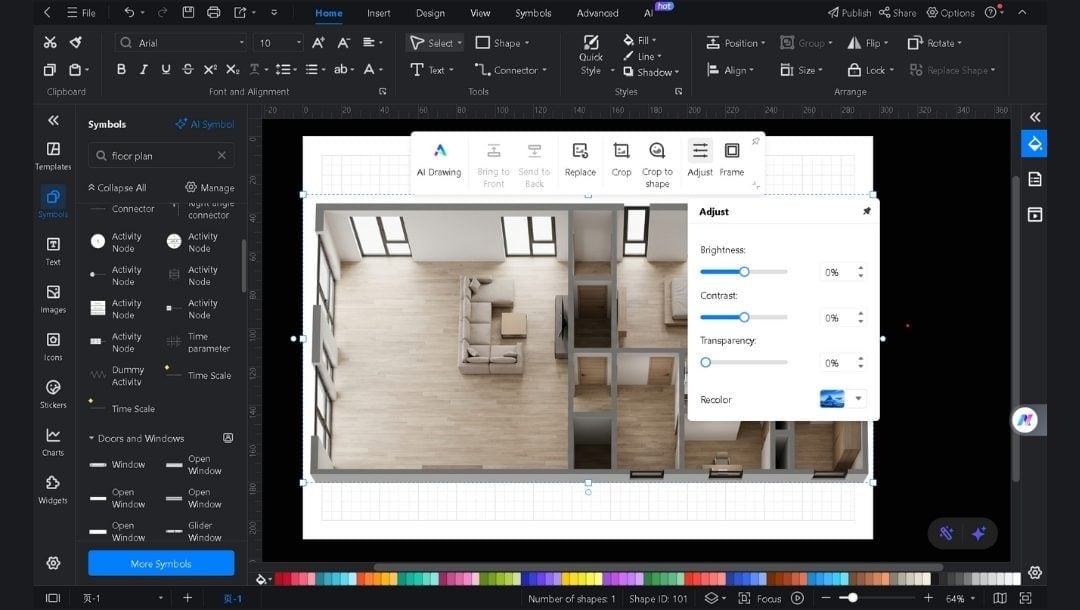
Step3 Use the Output the Way You Want
- Review the output against your original.
- Send to the EdrawMax canvas for editing.
- Adjust the Brightness, Contrast, and Transparency from the pop-up menu.
- You can add the required elements from the floor plan symbol library.
- Export in the required format when complete.
Method 2: Use the EdrawMax Web App
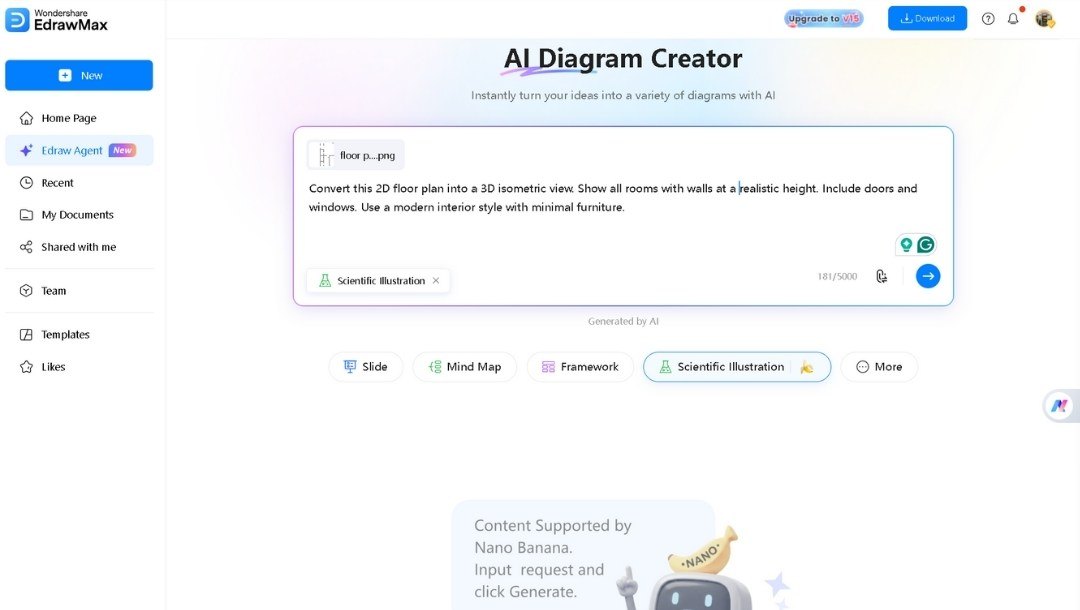
Step1 Prepare the Edraw Agent
- Click Edraw Agent on the left on the EdrawMax Online AI Diagram Creator homepage.
- Select the floor plan generation model.
- Get ready to upload.
Step2 Upload the 2D Model and Give a Prompt
- Insert your 2D floor plan image.
- Write your prompt and hit Enter or the send icon.
Step3 Finalize and Export
- Hover over to check the output on Canvas in a new tab.
- Tap Insert to customize your 2D-to-3D floor plan conversion.
- Add text labels, shapes, images, and more.
- Download in your preferred format (PNG or SVG) when ready.

Why Use Nano Banana in EdrawMax
- Complete the Picture: AI gives a base. I finalize it with exact labels, sizes, and notes.
- Work at Any Scale: I zoom in to refine details and zoom out to review layouts without lag.
- Maintain Version Control: I save versions, compare changes, and roll back to any version at any time.
- Export Flexibly: Share as PDF, PNG, or SVG, depending on the audience's needs.
Wrap-Up
Turning a 2D layout into 3D once took special tools and long hours. Nano Banana Pro cuts that down to one prompt and a few seconds.
EdrawMax makes the output further functional. Add furniture symbols. Insert room labels. Adjust positioning. Export for any purpose.
Whether you're an architect presenting to clients, an agent marketing properties, or a homeowner planning renovations, this workflow delivers results fast.
Try EdrawMax with Nano Banana Pro. Convert your 2D floor plan to a 3D floor plan today. See what your layouts look like with depth, perspective, and real spatial context.
AI Diagram Generator
Enter your prompt. Upload files if needed. Generate diagrams, charts, or slides instantly.


