Diagrams are essential for system document creators and software architects. However, making changes using a GUI tool every time can bog down your workflow. That's the main reason why developers are increasingly going for code-based diagrams.
Writing code simply and clearly in PlantUML allows one to generate class diagrams easily. It is quick, compatible with version control, and also does not need layout adjustment by hand. You only have to write and render.
There are still some users who continue to favor EdrawMax over PlantUML. The main reason is that they can have visual control or access to built-in templates without getting into the syntax.
This PlantUML class diagram tutorial walks you through writing class diagram code step by step. You'll learn how to create class diagrams with PlantUML and keep them in sync with your design process.
In this article
Core Syntax
Understanding PlantUML syntax is essential before designing a class diagram. You should be familiar with the process of declaring classes, the use of visibility symbols, and stating relationships. Developing a use case diagram with PlantUML code is structurally different.
Alternatively, class diagrams have particular regulations. The major settings that you will utilize are discussed below.
Class Declaration
PlantUML gives you three easy methods to define classes. A minimalist style just contains the class name. A full member format specifies attributes and methods within the braces. Using the incremental format, you first create a simple class and then update it with new information. Pick the one that goes well with your workflow.
' Format 1: Minimalist
class Customer

' Format 2: Full members
class Order {
  -orderId: String
  +createOrder()
  #calculateTotal(): Decimal
}

' Format 3: Incremental
class Product
class Product {
  +name: String
  +stock: Int
}

Visibility Notations
In PlantUML, visibility notations indicate the access level of class members. For public members that can be accessed from anywhere, use +. To indicate private members, which remain invisible to other classes, use -. The # character means protected. This allows access only within the class and its subclasses.
~ stands for package visibility; hence, the member is accessible only within the same package. These signs are a convenient way of keeping the diagram's access levels consistent. Employ them to indicate the status of a member, whether it is exposed or hidden.
| Symbol | Meaning | Example |
| + | Public | +save(): void |
| - | Private | -dbConnection: DB |
| # | Protected | #validate(): Bool |
| ~ | Package | ~internalId: Long |
Relationship Types
Gaining knowledge about class relationships is crucial. It makes it clear how objects are related.
' 1. Inheritance
Vehicle <|-- Car
Inheritance illustrates that a particular class is a subtype of another one.
' 2. Interface Implementation
Runnable <|.. Thread
Interface Implementation indicates that a class agrees to some specific behaviors.
' 3. Composition
Computer *-- CPU
Composition represents a close relationship where one part is completely dependent on the whole.
' 4. Aggregation
Library o-- Book
Aggregation is a kind of lighter connection in which parts can still exist without the whole.
' 5. Bidirectional Association
Professor "1" -- "1..*" Student
A Bidirectional association signifies that the link between the two classes is two-way. This reveals how they correspond and are interdependent.
Advanced Techniques
Once you have mastered the fundamentals, there is a lot more you can do with PlantUML. Simple layout changes and modular configurations make it easy to read complicated diagrams. Such abilities amplify the plantuml class diagram syntax to communicate beyond just images. To delve deeper, we will explore how to handle the layout and organization.
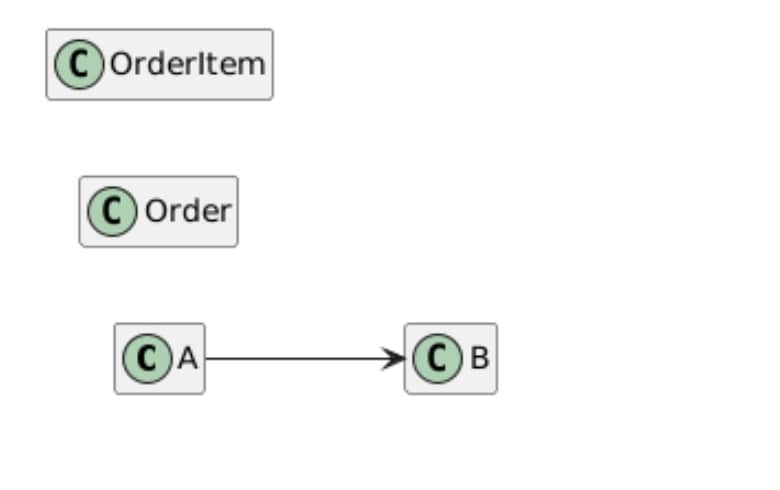
Layout Control
' Force horizontal flow
left to right direction

class A
class B
A --> B

' Cleanup empty connectors
hide empty members

' Group alignment
together {
  class Order
  class OrderItem
}
By controlling the layout, your class diagram becomes easier to comprehend. Utilizing the left-to-right direction will allow you a horizontal flow between classes. Incorporate the hide empty members feature to remove the unused space. Enclose them in a block together for alignment. All these layout tools help maintain the neatness of your diagram.
Custom Styling
' Reusable style template !define ENUM_STYLE <> #FFCC00;line:blue class OrderStatus < > { PENDING SHIPPED COMPLETED } ' Batch styling skinparam class { BackgroundColor #F9F9F9 ArrowColor #333333 FontName Arial }
To make your class diagram more attractive, try custom styling. With !define, you can easily create styles that can be reused for elements. If you want to make changes on a bigger scale, you can use the skinparam class. These options not only make your diagrams cleaner but also save you from the hassle of doing it manually.
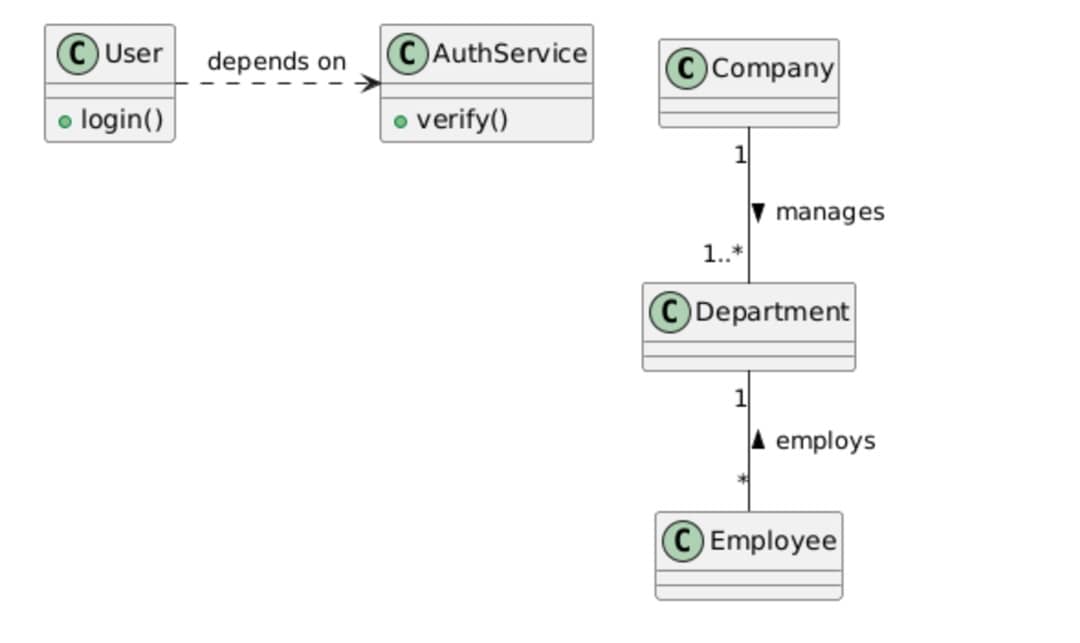
Complex Relationships
' Multiplicity notation
Company "1" -- "1..*" Department : manages >
Department "1" -- "*" Employee : employs <

' Directional labels
class User {
  +login()
}
class AuthService {
  +verify()
}
User .right.> AuthService : depends on
PlantUML allows a simple way to visualize class relationships in detail. Multiplicity lets you specify the number of elements involved in the relation. Introduce directional labels for indicating the movement between the classes. These functions make it clear what kind of interaction the classes have in the practical application.
Modular Design
' Multiplicity notation
Company "1" -- "1..*" Department : manages >
Department "1" -- "*" Employee : employs <

' Directional labels
class User {
  +login()
}
class AuthService {
  +verify()
}
User .right.> AuthService : depends on
Big diagrams can sometimes become difficult to handle. PlantUML is a modular design tool that allows you to distribute your diagram over several files. !include is the command to use when you want to insert the parts that are common to all. This ensures the team members working on different sections are on the same page.
Use Cases
Since you have learned how to design and style class diagrams, it is beneficial to get an understanding of their applications. Class diagrams are the jack-of-all-trades in system planning as well as technical documentation. Some of the PlantUML class diagram examples are as follows.
E-Commerce System
left to right direction

package "E-Commerce" {
  class User {
    +register()
    +login()
  }

  class Product {
    +search()
    +getDetails()
  }

  class Cart {
    +addItem()
    +checkout()
  }
}

User --> Product : browses
User --> Cart : manages
This e-commerce system demonstrates the best way to organize essential functions. The User communicates with the Product and the Cart through simple operations such as browsing and managing. Every class reveals just the main methods. Taking advantage of the left-to-right direction makes the layout neat and more readable. It's an easy and functional model.

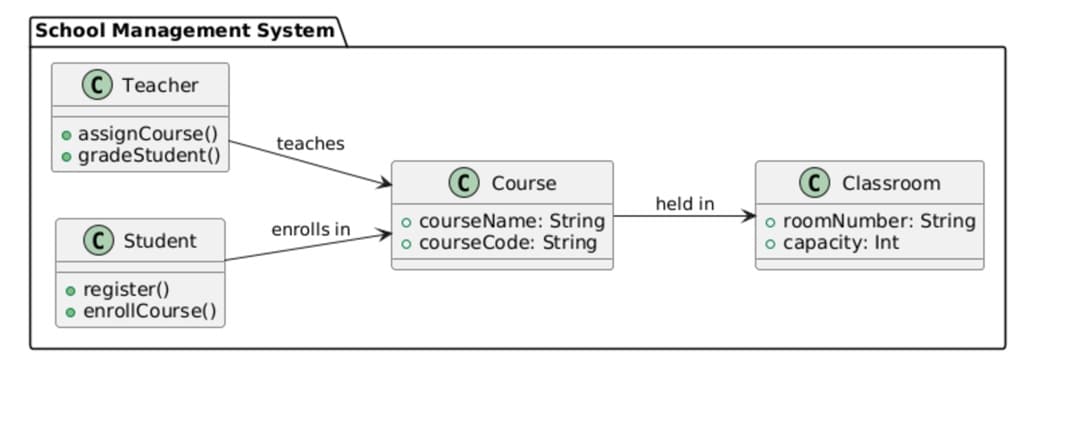
School Management System
@startuml
left to right direction
package "School Management System" {

  class Student {
    +register()
    +enrollCourse()
  }
  class Teacher {
    +assignCourse()
    +gradeStudent()
  }
  class Course {
    +courseName: String
    +courseCode: String
  }
  class Classroom {
    +roomNumber: String
    +capacity: Int
  }
}
Student --> Course : enrolls in
Teacher --> Course : teaches
Course --> Classroom : held in
@enduml
The school management system enables you to see how students and teachers connect with courses. It illustrates that students sign up for courses, and teachers are chosen for them. Besides that, each course also links to a classroom. Such a setting depicts the primary academic workflows in the system design.
Online Banking System
@startuml
left to right direction
package "Online Banking System" {
  class Customer {
    +openAccount()
    +login()
  }
  class Account {
    +accountNumber: String
    +balance: Decimal
  }
  class Transaction {
    +amount: Decimal
    +date: Date
    +process()
  }
  class BankService {
    +transferFunds()
    +checkBalance()
  }
}
Customer --> Account : owns
Account --> Transaction : records
Customer --> BankService : uses
@enduml
The e-banking system demonstrates the essential features of banking. The Customer class has methods for creating an account. The Account class stores account data. Moreover, every Account log holds Transactions illustrating the flow of money during a certain period. This configuration is compatible with real-world banking workflows.

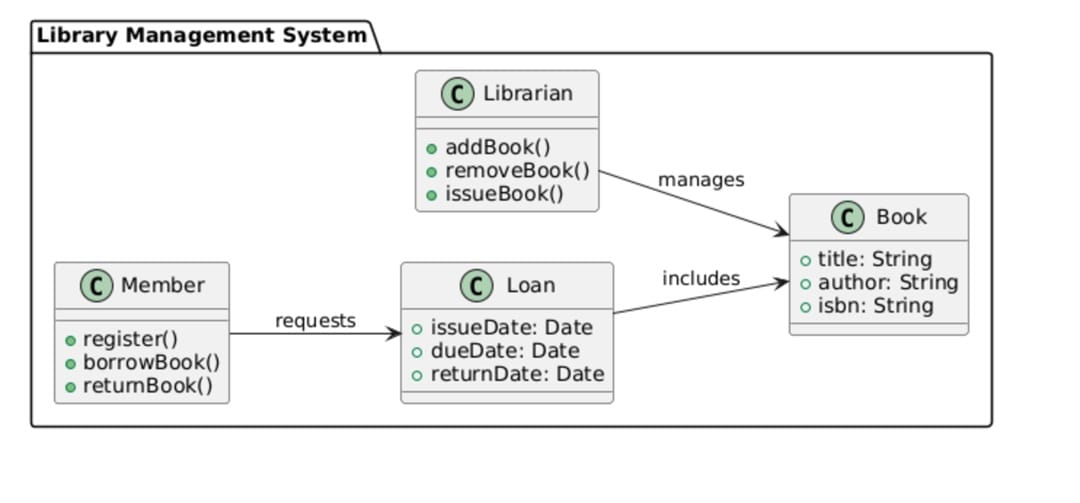
Library Management System
@startuml
left to right direction
package "Library Management System" {
  class Member {
    +register()
    +borrowBook()
    +returnBook()
  }
  class Librarian {
    +addBook()
    +removeBook()
    +issueBook()
  }
  class Book {
    +title: String
    +author: String
    +isbn: String
  }
  class Loan {
    +issueDate: Date
    +dueDate: Date
    +returnDate: Date
  }
}
Member --> Loan : requests
Librarian --> Book : manages
Loan --> Book : includes
@enduml
This is a library management example that demonstrates the way the system delegates tasks. The Loan class is the main link between the Member and the Book. It enables monitoring of borrow and return dates. The Librarian takes care of catalog management, so the control of operations remains separate from the users.
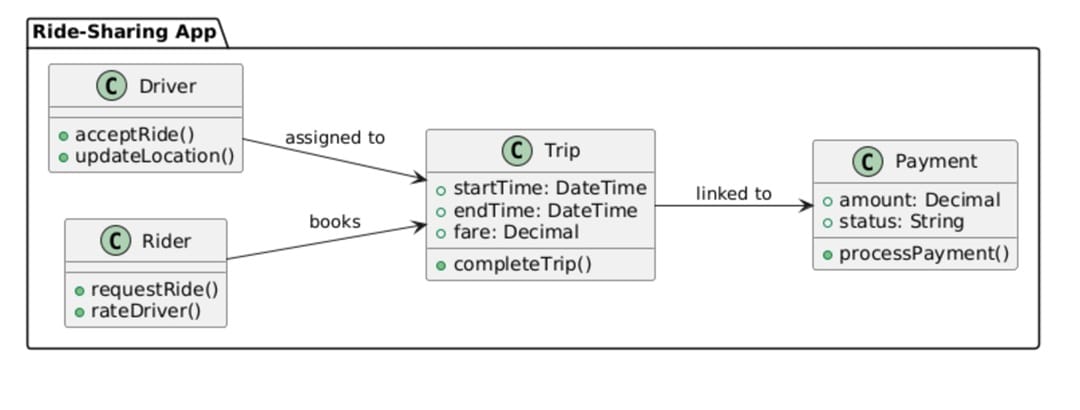
Ride-Sharing App
@startuml
left to right direction

package "Ride-Sharing App" {
  class Rider {
    +requestRide()
    +rateDriver()
  }
  class Driver {
    +acceptRide()
    +updateLocation()
  }
  class Trip {
    +startTime: DateTime
    +endTime: DateTime
    +fare: Decimal
    +completeTrip()
  }
  class Payment {
    +amount: Decimal
    +status: String
    +processPayment()
  }
}
Rider --> Trip : books
Driver --> Trip : assigned to
Trip --> Payment : linked to
@enduml
This ride-sharing app model distributes logic across major components. Rather than blending payment or driver logic into the trip, Trip remains dedicated to ride information. The Payment class manages transactions. Driver and Rider are weakly connected to Trip. This facilitates scaling, for example, dealing with more bookings or assigning drivers dynamically.
When to Consider Alternatives
You can generate class diagrams from code PlantUML at a faster rate, but it's not true for every user or scenario. Certain jobs require design flexibility or features suitable for novices. We will provide you with a super replacement for PlantUML that will help you make flawless class diagrams.
PlantUML Limitations
- Non-developers face a steep learning curve: Users who are not familiar with coding may find it difficult to understand the syntax and structure.
- There is no dynamic code integration: PlantUML cannot create visualizations from real codebases. You have to write class definitions manually.
- Absence of true generics support: The tool can show the syntax, such as
. However, it is not considered a type parameter, nor is it going to enforce any relationships
PlantUML visualizes this in the form of a static class having plain text. It doesn't understand T as a type or provide you with the capability to represent Repository
@startuml class Repository{ +save(item: T) +getById(id: String): T } @enduml
An Easier Alternative to Code-Based Tools: Try EdrawMax
PlantUML enables developers to create diagrams that communicate structure through code. But what if you need to go faster and the syntax is of secondary importance? And what if you have to explain your work to a non-technical audience? That's where GUI tools come in handy. If you want an easy-to-use tool, then EdrawMax Online is one to consider.
EdrawMax offers a cloud-based UML diagram editor. You can use drag and drop class elements to the canvas or use online templates to get a jumpstart. Besides, it supports rich exports (PNG, SVG, Visio) and provides smart alignment tools. This makes it more natural than code‑first tools for teams that need quick visuals without typing complex syntax.
Why You Will Love It
- Built‑in UML Class Templates: Use several pre-designed class diagram templates to help you with your project.
- Drag‑and‑Drop Symbol Library: Easily insert classes, interfaces, and relationships with no need for code.
- Rich Export Options: Export your diagrams as Visio, PDF, SVG, or Office files.
- Cloud File Access and Save: With EdrawMax login, you can save, open, and organize your class diagrams in the cloud anytime and anywhere.
Final Words
This PlantUML class diagram tutorial has discussed all the aspects of the syntax, as well as advanced structuring techniques. For anyone wondering how to create class diagrams with PlantUML, we have covered it all here.
However, different teams have different requirements. If visual speed and convenience are more important than code management, EdrawMax is a smart fit. It provides a simple, free-syntax approach. It's really handy when you have to make a presentation to people who are not developers or when you have very little time to prepare the visuals.
Try both tools for yourself and choose the one that makes your work easy!