


Stop wasting hours dragging boxes and aligning arrows. While manual flowchart creation used to be the norm, Google's latest AI model has completely revolutionized the workflow—turning complex data into structured diagrams in seconds.
In this article, we’ll explain how to directly create AI flowcharts using a tool called “Nano Banana Pro” – one of the latest AI models from Google.
In this article
Advantages and Disadvantages of Creating Flowcharts With Nano Banana
Nano Banana is the code name for Google’s latest image generation tool. It’s also called Gemini 2.5 Flash Image.
As the first part of our discussion of Nano Banana, here are some of its advantages and disadvantages:
Overall, though, the fact that you can create beautiful flowcharts in a short time with just a few steps is a massive advantage. It’s also free to use, so you can guess how the advantages make the disadvantages feel negligible.
Steps To Create a Flowchart in Nano Banana
Here, let’s get into the practical stuff and create an actual flowchart with Nano Banana. For the steps below, let’s use web page development as an example.
Step1 Break Down the Tasks
First, create a text or Word file to break down the major parts of your flowchart. Here’s an example for web page development:
- Requirement Definition
- Information Architecture
- Wireframe Creation
- Design production (Visual Design)
- Coding
- Testing & Debugging
- Deployment
- Maintenance & Updates
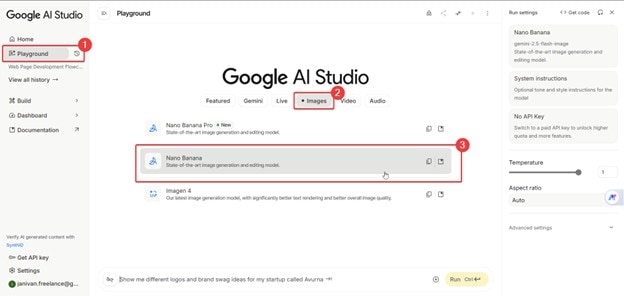
Step2 Log In to Nano Banana
Go to Google’s AI Studio and log in with your Google account. Then, go to Playground > Images > Nano Banana.
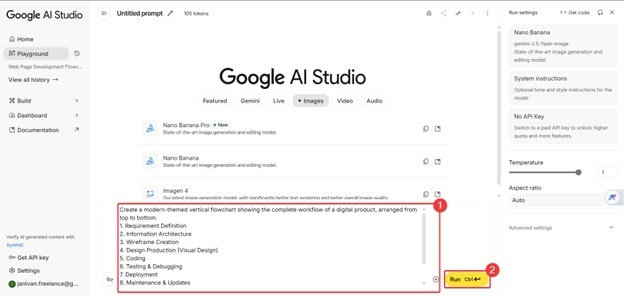
Step3 Enter the Prompt
Now, let’s craft your first prompt for Nano Banana. Below, each part of the prompt will be broken down, so you may use them as guidelines.
Take note of how we worded the prompts to achieve the best possible results.
Create a modern vertical flowchart that outlines the complete workflow of a digital product, arranged from top to bottom.
This initial part of the prompt must describe the kind of flowchart you want. Specify the direction and general style. Remember, a more specific prompt is better.
- 1. Requirement Definition
- 2. Information Architecture
- 3. Wireframe Creation
- 4. Design Production (Visual Design)
- 5. Coding
- 6. Testing & Debugging
- 7. Deployment
- 8. Maintenance & Updates
In Step 1, we created a list of the flowchart's major parts. This list consists of those tasks. It’s also important to put them in order as a numbered list.
Use minimalist shapes, balanced spacing, and a soft color palette. Add simple connectors to show progression and optional loops, such as returning to Testing after Maintenance if issues arise.
This part can be fused with the opening paragraph of the prompt. It’s actually more specific instructions for the AI to create the flowchart.
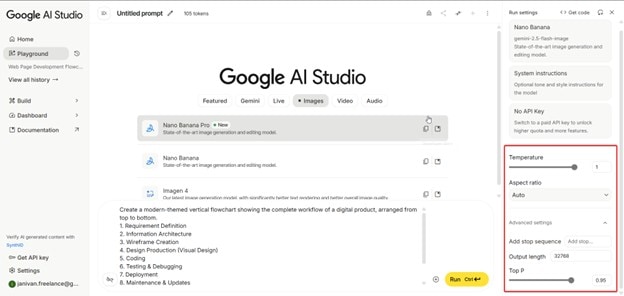
Step4 Adjust the Parameters
On the right-hand panel, you will see some values and parameters that you can edit. It’s recommended to adjust these if you’re already more familiar with the tool and need specific outputs.
Nevertheless, here’s a quick explanation of their functions if you’re interested.
- Temperature: This option controls the “creativity” of the output. A value that’s closer to 0 gives more factual or safer results. On the other hand, values closer to one provide a more unique and imaginative generation.
- Add Stop Sequences. This lets you set a specific string or word that tells the model to stop generating. It controls where the text ends, preventing multiple answers for a single query or generation.
- Top-P. These settings narrow or broaden the pool of possible next words or the AI's vocabulary. So, if you want an easier-to-read flowchart, then it’s probably best to set this at a lower value.
- Output Length. Tokens run AI. If you want to save tokens and create more flowchart iterations, try reducing the output length. If you’re willing to spend, set it higher.
Step5 Run and Wait
Once you’re satisfied with the prompt, press Ctrl+Enter on your keyboard or click Run.
Step6 Modify Through Further Prompts
One great thing about Nano Banana is that you can have it generate a flowchart, then ask it to perform very specific edits. This allows you to refine the diagram into perfection.
For example, if you want to change the color of arrows, then ask it to “change the color of the arrows to red.” It’s really important to perform these steps to fine-tune the flowchart according to your needs.
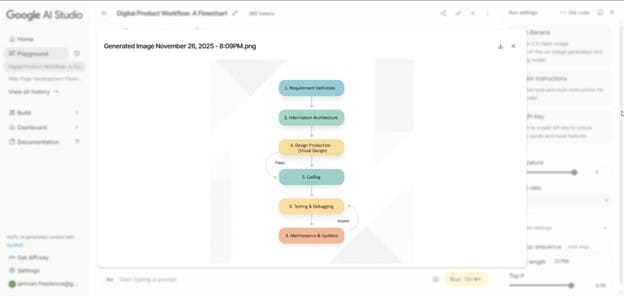
Here’s an example of a completed flowchart made by Nano Banana:
Tips and Things To Note When Creating Prompts
You’ll make more use out of AI if you know how to prompt. In this part, let’s take a look at three key points to help you create a flowchart smoothly:
Use English As Your Prompt Language
Most AI models are made for English. Google is no exception. While Google’s AI tools support a wide range of languages, it understands instructions best in English. This results in more accurate outputs.
Besides, asking Nano Banana to generate non-Latin script, such as Japanese or Chinese, may result in garbled text, as mentioned in the earlier section.
Enter Instructions Clearly and Concisely
While the ideal is to be as specific as possible, it’s best to balance it with conciseness. This is because AI uses a token system, so longer prompts may make it harder for it to understand your intent.
Therefore, it is best to keep the input as concise as possible to generate and edit charts more smoothly.
Don’t Rely Too Much on Nano Banana
As a rule of thumb, you can generate your initial diagrams with Nano Banana. You can even refine it within the app. However, make sure to use other image editing apps as well to ensure better adjustments.
After all, you can’t manually edit parts of Nano Banana’s outputs. You have to rely on prompts, and it might frustrate you at times when the AI cannot understand your actual intent.
Comparison of Multiple AI Flowchart Creation Models
For your reference, here are additional AI flowchart generation tools beyond Nano Banana you might want to consider. We have compared their features in the table below:
| Tool | Features |
|---|---|
| GitMind |
|
| Miro |
|
| Lucidchart |
|
| EdrawMax |
|
EdrawMax: AI Flowchart Creation Tool
Above, we provided you with four alternatives to Nano Banana’s flowchart capabilities. Here, however, we’ll focus on Wondershare EdrawMax as one of the top choices for AI-generated diagram creation.
There are three ways you can use AI to generate flowcharts with EdrawMax’s different functions.
Take note as well that EdrawMax supports the generation of scientific research diagrams with Nano Banana Pro. So, get ready for that later.
How To Create a Flowchart With EdrawMax (Desktop)
First, let’s take a look at how you can generate flowcharts within EdrawMax’s PC (Windows or Mac) version.
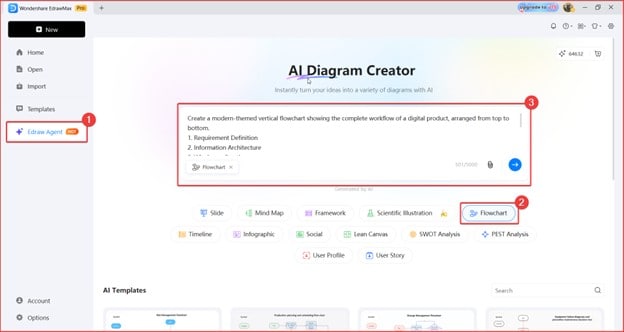
Step7 Use the AI Flowchart Generator
Here’s how you can access EdrawMax’s flowchart generator:
- Go to Edraw Agent > Flowchart.
- Type in your prompt in the text box.
- You can use the prompt we made for Nano Banana earlier.
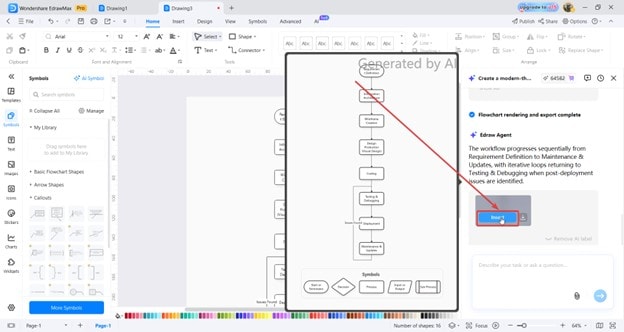
Step8 Insert the Flowchart into Canvas and Edit
Then, here’s how you can insert the flowchart generated into the canvas:
- Click Insert after hovering your mouse over the generated flowcharts.
- Double-click to edit the content of the flowchart.
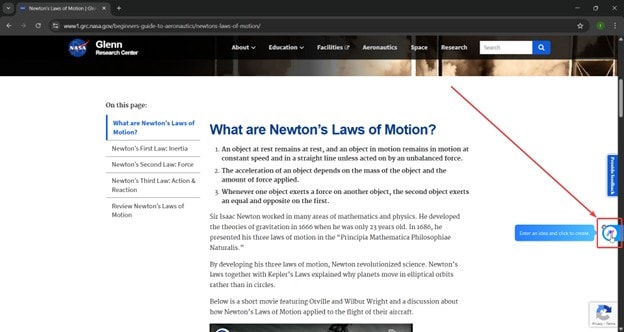
Bonus: Generate Scientific Illustrations with EdrawMax's AI Floating Ball
Another AI feature of EdrawMax is the AI floating ball. You can generate scientific research diagrams and more from a webpage you’re viewing in the browser or from documents you have in Office.
The cool thing here is that you can also use Nano Banana Pro to generate your scientific illustrations and research diagrams.
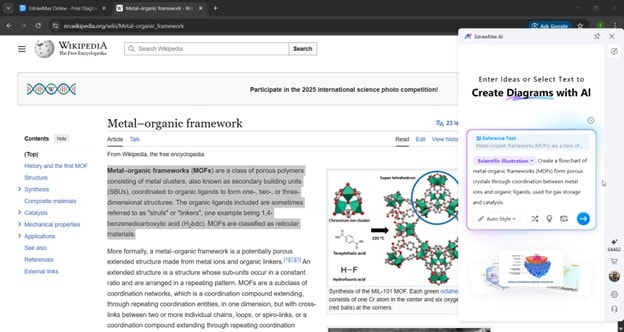
Step9 Open the Floating Ball
Here’s how you can access the floating ball:
- Open the article or document you want to make a flowchart from/
- Click the floating ball (by default, it’s on the right-hand panel).
Step10 Change to Scientific Illustration Mode
Then, ensure that the AI diagram generation is in flowchart mode.
- Click the drop-down options (by default, it’s on Smart Match)
- Change the mode to Scientific Illustration
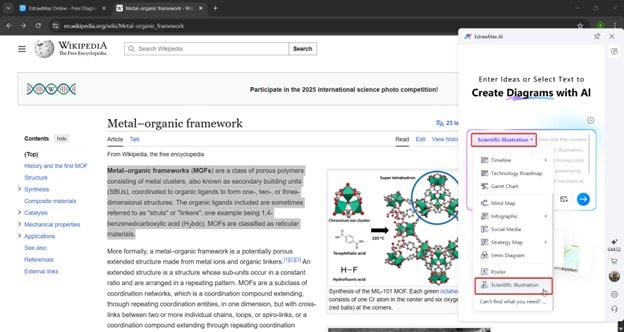
Step11 Input the Content
The next step is to select the flowchart generation mode.
- Highlight the content from the article.
- Open the floating ball (while the content is highlighted).
- In the prompt, make sure to add “Create a flowchart” or similar phrases to generate a flowchart.
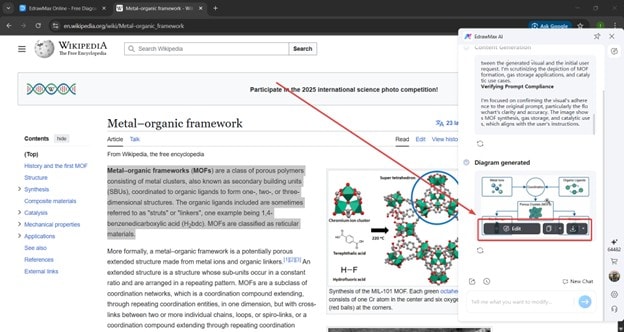
Step12 Download the Flowchart
After the floating ball generates the flowcharts, you can now perform the following actions:
- Edit to open the flowchart in EdrawMax desktop
- Copy the image of the flowchart to the clipboard
- Download as PNG, SVG, or PPT
Or, You Can Do This With EdrawMax's Online AI Agent
Lastly, here’s another way of generating flowcharts with EdrawMax’s online AI agent. This also uses the Nano Banana Pro model to create a scientific research diagram.
Note that the Nano Banana Pro model is also available in the EdrawMax desktop’s Edraw Agent. The workflow/UI should be similar to what we’ll show below:
First, access the AI diagram creator and input your prompt:
- On the homepage, go to Edraw Agent > Scientific Illustration
- Type in your prompt
- Press Enter or click the Go (arrow) button.
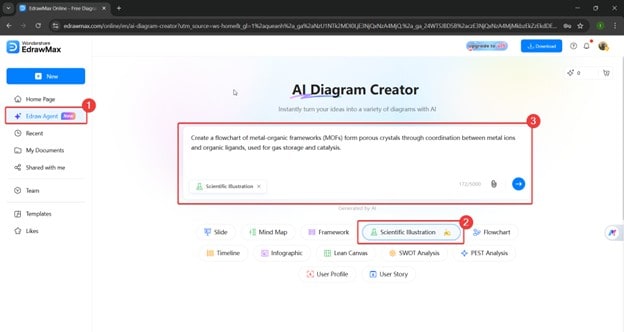
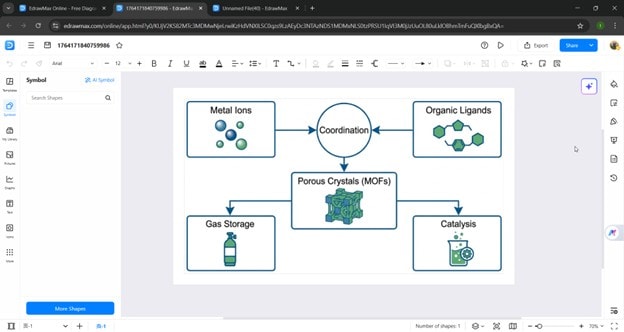
After the AI generates, you can now access the generated scientific diagram in a new tab.
AI Diagram Generator
Enter your prompt. Upload files if needed. Generate diagrams, charts, or slides instantly.
