


Effective project management often requires clear and organized planning diagrams, such as flowcharts. With flowcharts, you can communicate effectively, follow steps in the right order, and meet deadlines.
Flowcharts are vital tools for visually representing processes, making complex workflows easier to understand and manage. Aligning your flowcharts with the proper standards ensures clarity and consistency, which helps avoid costly mistakes and improve overall productivity.
So, let's discuss step-by-step how to create a flowchart. Whether you're a project manager, team leader, or anyone needing to streamline tasks, this guide will help you with practical tips to enhance your workflow and achieve your goals more efficiently.
In this article
Method 1: How to Make a Flowchart on a Computer
Let's make things easier. We need a professional flowchart program to make and edit a flowchart on your Windows or Mac machine. There are tons of options on the market. Here, we will use EdrawMax, an easy-to-use flowchart maker. More importantly, this tool lets us make a basic flowchart for free.
Compared to most flowchart makers, EdrawMax flowchart maker is easier and more compatible:
- Its drag-and-drop feature makes adjusting the elements of a flowchart easy and fast.
- There are thousands of free flowchart examples to choose from. This saves a lot of time.
- It provides hundreds of free flowchart symbols and elements. We can just browse and pick up some we need.
Now, let's download EdrawMax for free and start making a flowchart with easy steps.
Steps to make a flowchart on the computer
Step1 Start the software
After installing the software on your computer, launch it. Sign up for the software and finish the login.
Step2 Create a canvas
On the initial interface, locate the +New button and click on it. Then, choose Flowchart to proceed. This way, EdrawMax will add a basic flowchart layout on a new canvas for you. This is where we edit our flowchart.
Step3 Edit the flowchart
Here comes the most important part: to edit the flowchart. There are a few things we need to do:
- Adjust the shapes of the nodes or the connecting lines. You can also change where an arrow points. Just select and drag the arrow with your cursor.
- Add more flowchart symbols. This helps you and anyone who sees the flowchart to better understand every step.
- Add text to the shapes and arrows to make the process complete.
- Select any element and check the right panel. There, you can configure the color, fill, shadows, and more appearance of the flowchart.
Step4 Export the flowchart
After editing the flowchart, let's save and export the flowchart file. Locate the Save button from the menu bar. Choose to save the file on your computer or the cloud. Also, you can choose the format to save this file.
Note:. You'd better save it as an eddx file - the default format of EdrawMax. So you can edit the flowchart anytime with EdrawMax. If you choose an image or other file formats, it might cause trouble for your later editing.
Then, the backup of this flowchart file is well done. Let's export and share it with more people. Click Export and choose from these formats:
- Graphics like jpg and png. This is the easiest format for other people to check your flowchart. Add your personal watermark if you'd like to.
- MS formats like Word, Excel, PDF, and PowerPoint. They are great for a report or presentation.
- More professional formats like HTML, CAD, Visio, PhotoShop, and SVG.
Method 2: How to Make a Flowchart in a Browser
If you hate downloading and installing a program from scratch, try an online flowchart tool. Here, we will use a famous tool named Draw.io. This is a leading product in all flowchart software. It lets people generate a flowchart in easy steps.
It's free to use online. We can now start to make a flowchart online for free.
Step5 Visit the Draw.io Dashboard.
On your browser, enter draw.io or app.diagrams.net. This will open the cloud dashboard. Then it will ask you to choose a place to save the output file. You can select one or just decide later.
Step6 Add elements
Unlike EdrawMax, Draw.io will just open a blank canvas without a preset flowchart layout. So, we need to add everything manually.
Locate an element in the library on the left. Decide the first shape of the node. For instance, add a rectangle.
Then, click the blue arrows. This will add an arrow and a new shape for the next node.
Step7 Complete the flowchart
After the layout is set, it's time to add text to the flowchart. Name every shape and add YES/NO or more to some arrows if you need.
Next, you can adjust the flowchart appearance like the color, background color, and more.
Step8 Export the flowchart
To save or export the flowchart file, click on File. Choose Save or Save as. Then, you can name the file, decide the format, and select a destination. Click Save to complete.
Method 3: Create a Flowchart From Templates
For the first two methods, we need a lot of manual steps. This is difficult for beginners. If you need a complex flowchart, use a flowchart example.
This is an easy and quick way. An example is just someone else's completed flowchart. We can use an example directly for our case. Or we can redo the text and slightly adjust the layout to make it perfect for our situation.
All in all, we can save a lot of time and effort. We don't need to make a flowchart from scratch.
Cons of using a flowchart example
Before we use a flowchart example, we need to know that it might cost.
Most editable flowchart examples are from providers like Visio, Canva, EdrawMax, and more. They have their own file formats.
- To edit an example, we have to choose one program and pick an example from its library. Then, edit and export the flowchart. The program may charge for the example or the export option.
Or, there's another way out. We can use a blank flowchart example. It has no text on it. We can save the blank example as a picture. And use Photoshop to edit the flowchart. But the cons are:
- You can only use this flowchart as a picture. No HTML, CAD, Visio, and more.
- You cannot change the layout of the example unless you're very good at Photoshop.
Where to Find a Flowchart Example
This is easy. Simply Google "flowchart examples" and pick one from the Internet. Then, use Photoshop to add new text.
Or, choose a professional flowchart tool that provides examples. Here, we will use EdrawMax to show you the process. Don't worry, you can pick another flowchart tool and its examples.
Steps to use a flowchart example
Step9 Download and launch EdrawMax
First, download and launch EdrawMax. Or try the web dashboard. Log in to your Wondershare ID or access it with your social network accounts.
Navigate to the Template option from the main menu to create a flowchart.
Step10 Search and select a template
Once there, use the search bar to enter the keyword flowchart. This will display a variety of flowchart templates. Browse through the available options, and when you find the one that fits your needs, scroll down to it and click Use Immediately to start customizing the template.
Step11 Customize the template
It’s time to customize your template to meet your specific needs. To change or enhance your chosen template, use the Templates option in the left-hand sidebar
Step12 Edit text and symbols
To edit any text or symbol, navigate through the left-hand sidebar or use the Insert tab at the top to add shapes. Simply drag and drop your desired symbols or text elements into place.
Step13 Change colors
To add colors to your flowchart, navigate to the Design tab and choose from various built-in themes. This allows you to apply a consistent color scheme to your template easily.
Method 4: Create a Flowchart Using AI
AI is helpful and common. We can use AI to generate a flowchart. In this case, we can just enter our requirements and let AI do the rest. If we're not satisfied with the draft, ask it to make another.
As for the cost, many AI flowchart makers have free trials. We can make some flowcharts for free. So, here comes the question: which AI flowchart tool should we choose?
Let's use EdrawMax AI. It's free to use. Once logged in, it gives us 500 free AI tokens. This is enough for us to make more than 10 flowcharts with AI.
Steps to make a flowchart with EdrawMax AI
Step14 Select AI Flowchart
Once logged in, click the EdrawAI feature from the recommended menu at the top. Select the AI Flowchart option from the tabs below.
Step15 Enter the prompt
Now, you will be redirected to a new, blank canvas where an AI chatbot will appear on the right side. In the AI chatbot, enter your desired prompt to create the initial draft of the flowchart.
Step16 Beautify the flowchart
Next, customize your flowchart using the one-click beautify option from the design tab. Choose the element you want to enhance, such as a diagram, shape, or text. Next, click the One Click Beautify button, and EdrawMax will automatically apply the formatting improvements to the selected element.
Tip: Try an AI online flowchart maker
If you don't want to download the software, don't worry. EdrawMax has an online AI flowchart maker. Enter your prompt and hit Generate For Free. Then, you can edit the flowchart online or just save it on your computer.
FYI: What Is a Flowchart
Think of a flowchart as a visual representation of a process or system, divided into sequential steps and connected by arrows. It simplifies complex concepts by breaking them into individual actions, making them easier to understand. The flowchart uses symbols to represent these actions and arrows to show the flow of the process.
Flowcharts are used in various areas of our daily lives. Let us take a look at different uses of flow charts.
- Teachers use flowcharts to deliver lectures on complex topics.
- Students of different levels use flowcharts for better understanding and learning.
- Project managers use flowcharts to plan the direction and implementation of the projects.
- Software developers use flowcharts to design algorithms and debug code.
- Medical professionals use flowcharts to organize and simplify patient care.
Benefits of Using Flowcharts
Flowcharts offer numerous advantages across various industries by providing a clear and visual representation of processes. Here are some key benefits:
1. Simplify the Process
If you are a software developer, a flowchart can help you build the logic of an algorithm and help developers grasp the sequence and structure of the code. So, the flowchart helps in the simplification of the process.
2. Strengthen the Communication
Put yourself in the shoes of a project manager who needs buy-in from key players and the team to get the job done well. Stakeholders and your team can visually understand and communicate your project concept via flowcharts. This way, the flowchart facilitates better communication between individuals regardless of their expertise.
3. Efficiency and Productivity
If you are in the manufacturing department, the flowchart will help the managers understand the bottlenecks in the workflow and allow the authorities to adjust. This will help improve efficiency and increase productivity.
4. Effective Problem-solving
With the use of flowcharts, it becomes easy to identify where the problems lie within that particular process. For instance, a flowchart can guide technicians through a step-by-step diagnostic procedure in troubleshooting technical issues, leading to quicker and more accurate resolutions.
5. Help in Training Employees
If you train new employees, a flowchart should be your go-to option. A flowchart helps outline the department's SOPs. This allows new hires to understand and perform their tasks correctly from the start.
Types of Flowchart Structures
You are wrong if you think a flowchart is just some boxes following arrows. There are numerous types of flowcharts, and each flowchart serves a unique purpose.
And Guess what? EdrawMax's template gallery contains examples of different types of flowcharts. Let's look at three popular types of flowcharts and their designs.
Decision Flowchart
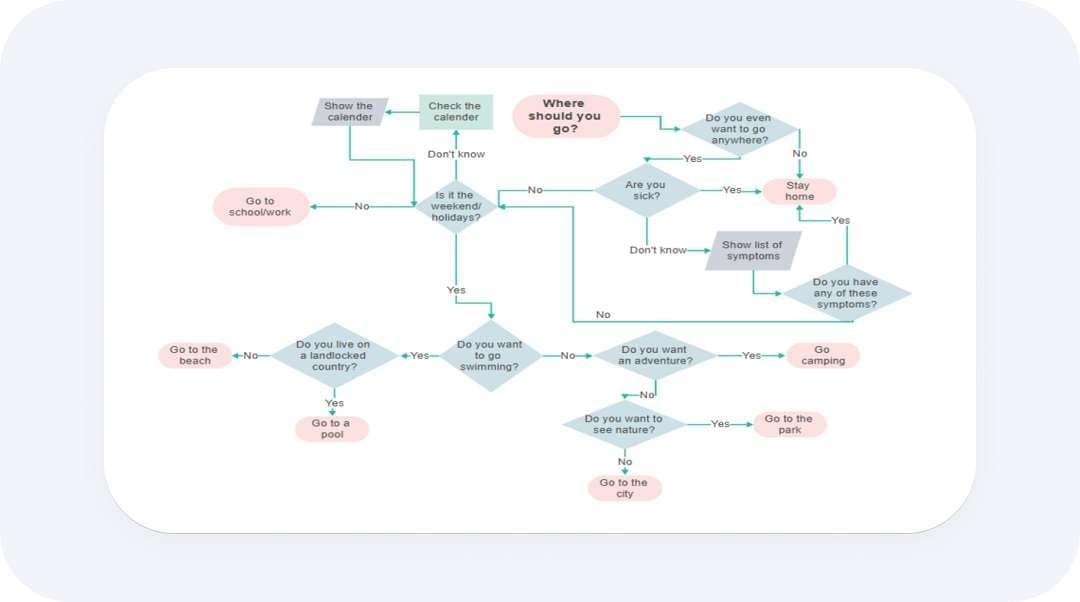
As the name suggests, decision flowcharts are used in the process of making decisions. The decision points in this type of flowchart are in diamond-shaped symbols.
The decision points of the flowchart create branches, showing different routes based on the decision. These charts incorporate questions, answers, and yes and no as part of the flow.
Usage of Design Flowchart
- Project managers use it for strategic decision-making and process optimization.
- Software developers used to design and debug algorithms with conditional logic.
- The customer service team follows standardized troubleshooting protocols.
- Medical professionals use it to ensure consistent patient care and treatment plans.
Process Flowchart
A process flowchart describes the actions and steps of the process. These flowcharts contain standard symbols to tell the process or actions and arrows to match the sequences of each action.
Consider this flowchart as a guideline to help you achieve the task or hit your goal. It will help you understand, analyze, and improve the process by splitting the tasks into manageable tasks.
Usage of Process Flowchart
- To outline the steps in the production line, from raw materials to finished products.
- To detail customer service processes, like handling customer inquiries or processing returns.
- To describe procedures such as employee onboarding or document approval workflows.
- To map out patient care processes, from admission to discharge.
Swimlane Flowchart
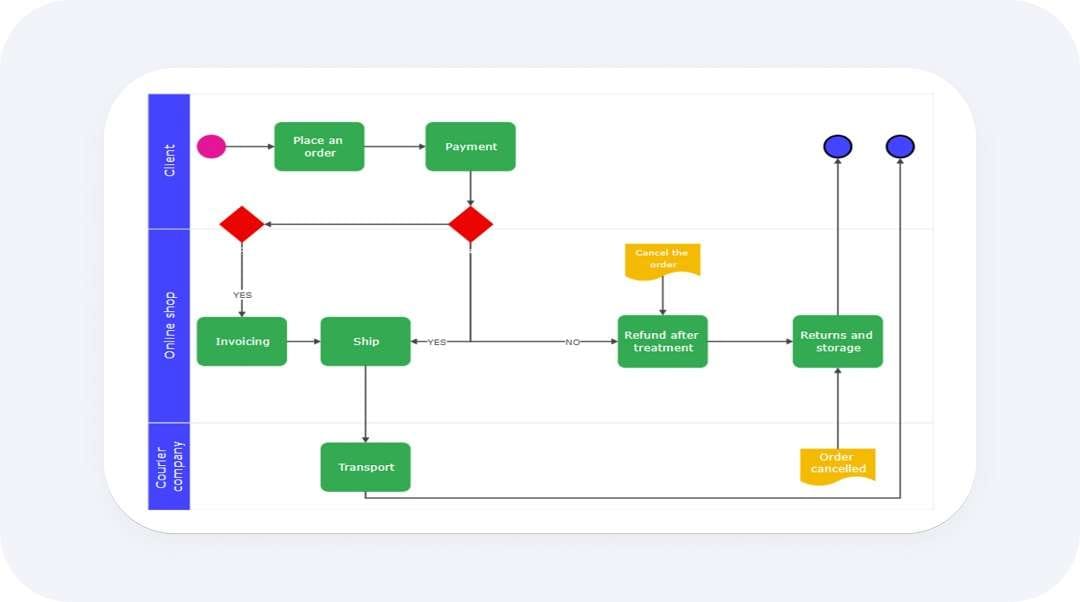
Have you ever felt like you need clarification with a complex flowchart? This is where the swimlane flowchart got you. A swimlane flowchart is a type of flowchart that consists of multiple lanes of information from every angle.
Each lane describes the different departments, roles, or participants. This diagram shows how numerous components interact and contribute to the process.
Usage of Swimlane Flowchart
- To map out cross-departmental workflows, such as product development or order fulfillment.
- To detail project tasks and responsibilities across different teams.
- To show the flow of customer inquiries through various support levels and departments.
- To illustrate patient care processes involving multiple departments (e.g., admissions, diagnostics, treatment).
Start Flowcharting Today!
You may not be wondering how to make a flowchart anymore. An effective flowchart enhances project management, communication, and overall productivity. If you follow the steps and tips given in this article, you are more likely to break down your complex projects into simple steps and avoid any inconvenience.
If following all the steps seems tiring, go with EdrawMax flowchart templates. All of them are editable; a few changes will make it your flowchart. So, what are you waiting for; start flowcharting today and simplify your professional life.
AI Diagram Generator
Enter your prompt. Upload files if needed. Generate diagrams, charts, or slides instantly.
