


Mitosis is the crucial process where a single parent cell divides to produce two genetically identical daughter cells, essential for growth, repair, and asexual reproduction.
This complete guide breaks down the five phases of mitosis, highlights its differences from meiosis, and provides easy-to-follow steps and free templates to help you draw a perfect, labeled diagram.
In this article
- What Is Mitosis? Understanding Cell Division Basics
- Mitosis vs. Meiosis: Key Differences in Cell Division Types
- The 4 Phases of Mitosis Explained
- How to Draw a Mitosis Diagram in 5 Minutes
- Steps to Create a Mitosis Diagram
- Common Mistakes to Avoid When Illustrating Mitosis
- Mitosis Diagram Templates and Resources
What Is Mitosis? Understanding Cell Division Basics
The type of cell division in which two genetically identical daughter cells are produced from a single parent cell is called mitosis. Before mitosis starts, a cell spends most of its life in interphase. During this time, cells grow and replicate their DNA.
Why Mitosis Matters in Cell Biology
Mitosis is a critically significant process in cell biology because it ensures the accurate and equal distribution of genetic material between daughter cells. Here are some of the key reasons why mitosis matters:
- Mitosis is responsible for replacing damaged and dead cells from the injury site with healthy and genetically identical cells.
- For eukaryotic and some multicellular organisms, mitosis is a way to reproduce asexually. For example, amoebas reproduce this way.
- Multicellular cells start with a single fertilized cell and undergo trillions of mitotic cell divisions to develop into a complex mature organism.
Mitosis vs. Meiosis: Key Differences in Cell Division Types
Both meiosis and mitosis are forms of cell division. Although they share some common processes, they have critical differences that serve distinct biological purposes. The main difference is that mitosis produces two identical diploid cells; on the other hand, meiosis results in four genetically unique haploid cells.
Mitosis is crucial for tissue healing, repairing, or an organism’s growth, while meiosis is a specialized process that only occurs in reproductive organs, ensuring genetic diversity in offspring. Remaining differences are explained in the table below:
| Feature | Mitosis | Meiosis |
| Purpose | Asexual reproduction, wound healing, and growth | Sexual reproduction |
| No. of divisions | 1 | 2 ( Meiosis I and Meiosis II) |
| No. Of the cells produced | 2 diploid (genetically identical) | 4 haploid (genetically unique) |
| No. Of chromosome | Stays same | Halved from parent cells |
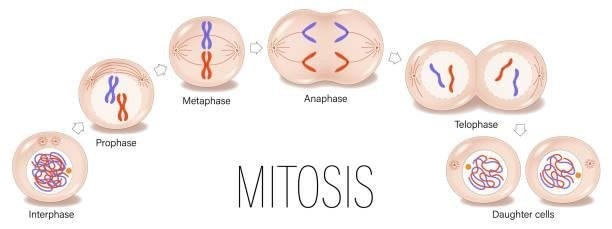
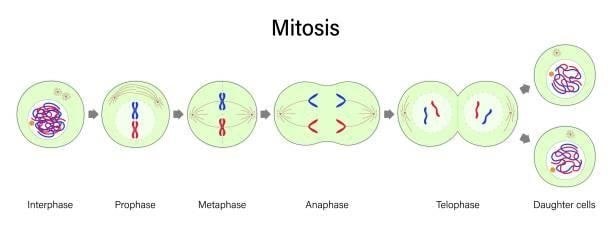
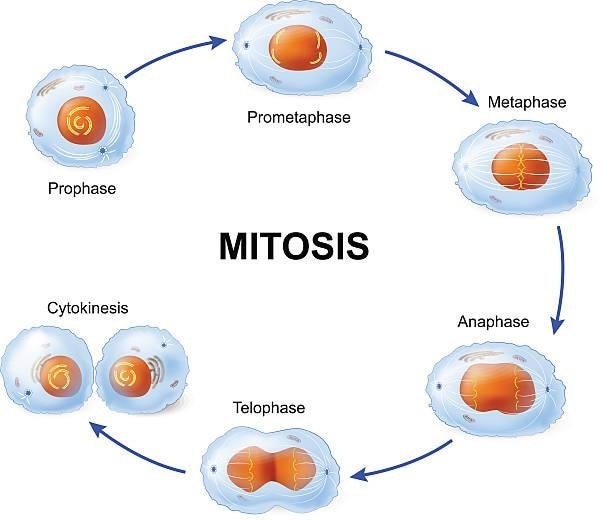
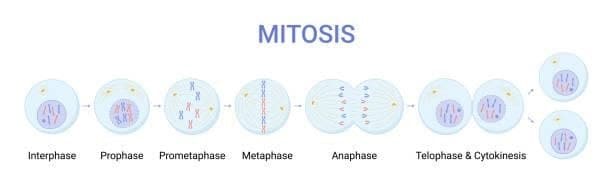
The 4 Phases of Mitosis Explained
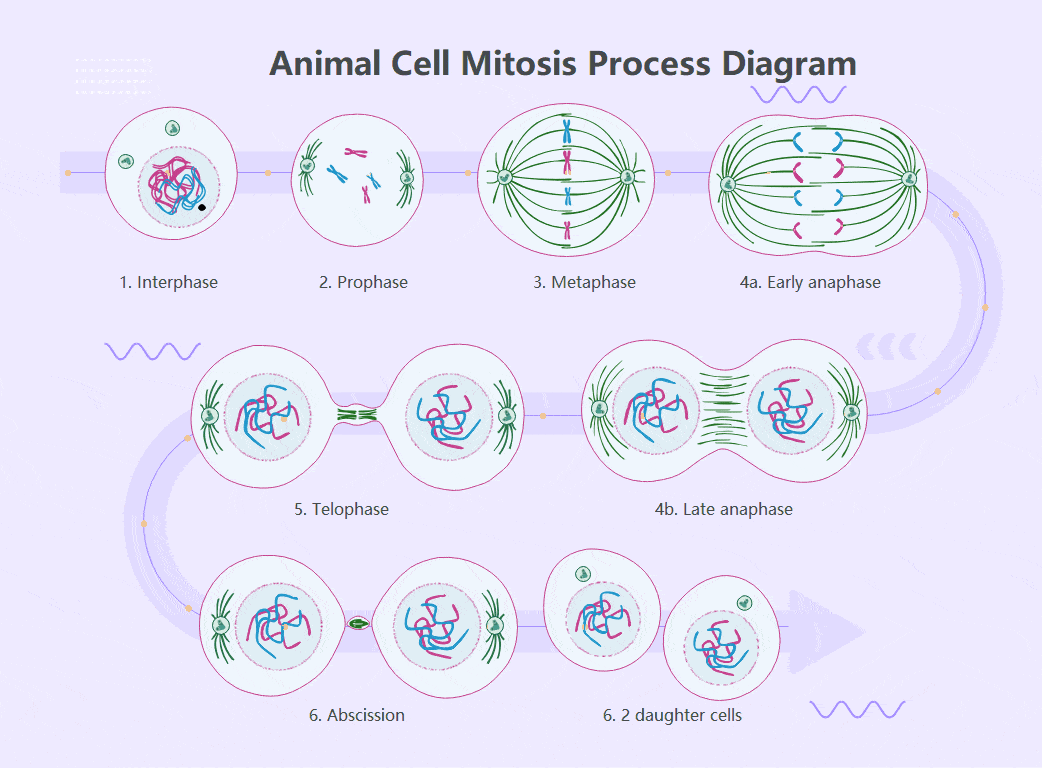
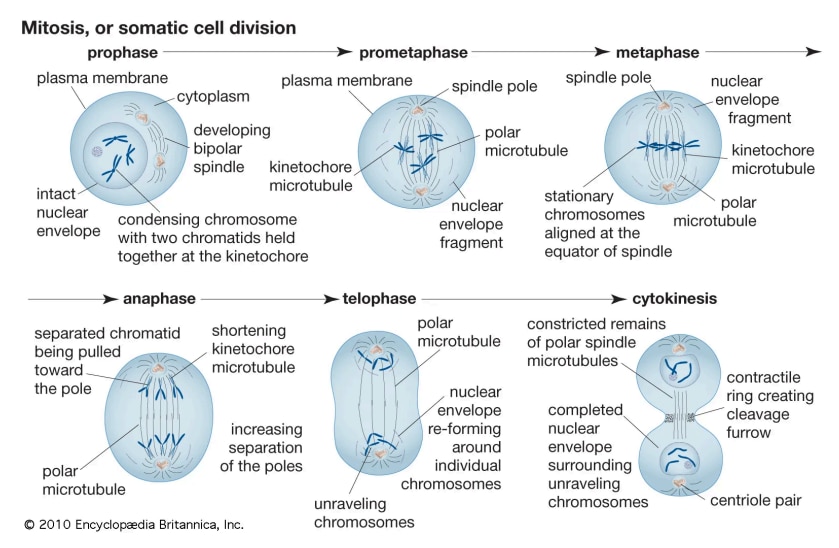
Mitosis involves four basic phases: prophase, metaphase, anaphase, and telophase. Some textbooks specify five, dividing prophase into two phases: prophase (the early phase) and prometaphase (the late phase). These phases occur in strict chronological order, after which cytokinesis occurs.
Before mitosis, the cell is in interphase (late G₂ phase). By this point, the DNA has been replicated, and each chromosome now has two identical sister chromatids. However, the chromosomes are still in a loose, decondensed state, making them difficult to see with a microscope.
The cell also replicated its centrosome, resulting in two centrosomes that will organize the spindle during mitosis. (Plant cells do not have centrosomes with centrioles, but instead use different microtubule-organizing structures that provide a similar function.)
Prophase
During early prophase, cells start to break some structures and build others. This is the preparatory phase of mitosis. Chromosomes condense, mitotic spindles begin to form, and the nucleolus begins to disappear.
In late prophase, chromosomes become even more compact, the nuclear envelope breaks down, and chromosomes are exposed to the cytoplasm. Some microtubule starts to capture chromosomes.
Metaphase
In metaphase, the spindle has caught all of the chromosomes and arranged them in the center of the cell, preparing for division. The metaphase plate is the plane where all of the chromosomes align. At this point, the two kinetochores of each chromosome should be connected to microtubules at opposing spindle poles.
Before entering anaphase, the cell must pass the spindle checkpoint, which ensures that all chromosomes are properly aligned on the metaphase plate and their kinetochores are correctly connected to opposing spindle microtubules.
This is known as the spindle checkpoint, and it helps ensure that the sister chromatids divide evenly between the two daughter cells when they separate in the next stage. If a chromosome is not properly aligned or connected, the cell will stop dividing until the issue is resolved.
Anaphase
During anaphase, sister chromatids split and are pulled to opposing ends of the cell.
The cohesin protein complex that holds the sister chromatids together is broken down, allowing them to separate. Each separated chromatid is now considered an individual chromosome. The chromosomes of each pair are drawn to opposing ends of the cell. Microtubules that are not connected to chromosomes elongate and push apart, separating the poles and extending the cell.
Telophase and Cytokinesis
In telophase, the cell is almost finished dividing and begins to re-establish its regular architecture while cytokinesis (division of the cell contents) occurs. The mitotic spindle is disassembled into its component parts. Two new nuclei emerge, one for each set of chromosomes. Nuclear membranes and nucleoli resurface. The chromosomes begin to decondense and return to a "stringy" state.
Cytokinesis, the division of the cytoplasm into two new cells, coincides with the final stages of mitosis. It can begin in either anaphase or telophase, depending on the cell, and cease shortly after telophase.
In animal cells, cytokinesis is contractile, squeezing the cell in half like a coin bag with a drawstring. The "drawstring" is a band of actin filaments, whereas the pinch crease is referred to as the cleavage furrow. Plant cells cannot be separated in this manner because they contain a cell wall and are too stiff. Instead, a structure known as the cell plate forms in the center of the cell, dividing it into two daughter cells separated by a new wall.
How to Draw a Mitosis Diagram in 5 Minutes
Drawing a mitosis diagram is not that complicated if you use the right tools and templates. So, how to draw a mitosis diagram in just five minutes? Here is a step-by-step guide to help you out. Whether you are a student worrying about your lab report, assignment, or exams, this guide will help you out in making an efficient mitosis diagram in 5 minutes:
Step-by-Step Drawing Tutorial with Free Template
Follow these simple steps to create the finest mitosis diagram in just 5 minutes:
- First of all, draw a simple circle representing the cell membrane. Inside this circle, draw a smaller circle and add dots that represent chromatin to show DNA in its uncondensed form.
- Now, in the next step, draw another circle indicating cell membranes, and inside it, draw the nuclear envelope using a dashed or partial line. Draw X-shaped chromosomes and small dots indicating centrioles moving to opposite sides.
- Now, to indicate metaphase, draw a horizontal oval shape inside. Draw dots on the right and left sides, originating from these, create horizontal lines attaching X-shaped chromosomes, and arrange them in the middle in line.
- To show anaphase split the chromosomes and show them moving towards opposite sides.
- Now, for telophase, create a circle around separated chromatids to indicate the formation of the nuclear envelope.
- Divide the cytoplasm by using a partial line between newly formed nuclei.
Essential Tools for Drawing a Mitosis Diagram
Before you start, you need to make sure that you have all the right tools. Everything is digital in today’s world. So here are some of the most efficient digital tools you can consider:
- EdrawMax: It is one of the best tools for making biology diagrams. The best thing is that it already has some ready-made mitosis tools.
- Canva: Many people know Canva; it is especially well-suited for beginners.
- BioRender: It is used for professional-grade scientific illustrations, most commonly for research papers.
- Google Drawings: It is a free tool, suitable for students to make a quick assignment.
Among all these, EdrawMax stands out as it offers shape libraries, labeling tools, and customizable cell biology templates to create the fastest and cleanest mitosis diagram.
Steps to Create a Mitosis Diagram
Creating a Mitosis diagram is a lot easier using a professional tool like EdrawMax. Here is a step-by-step guide that can help you rate an amazing call division diagram.
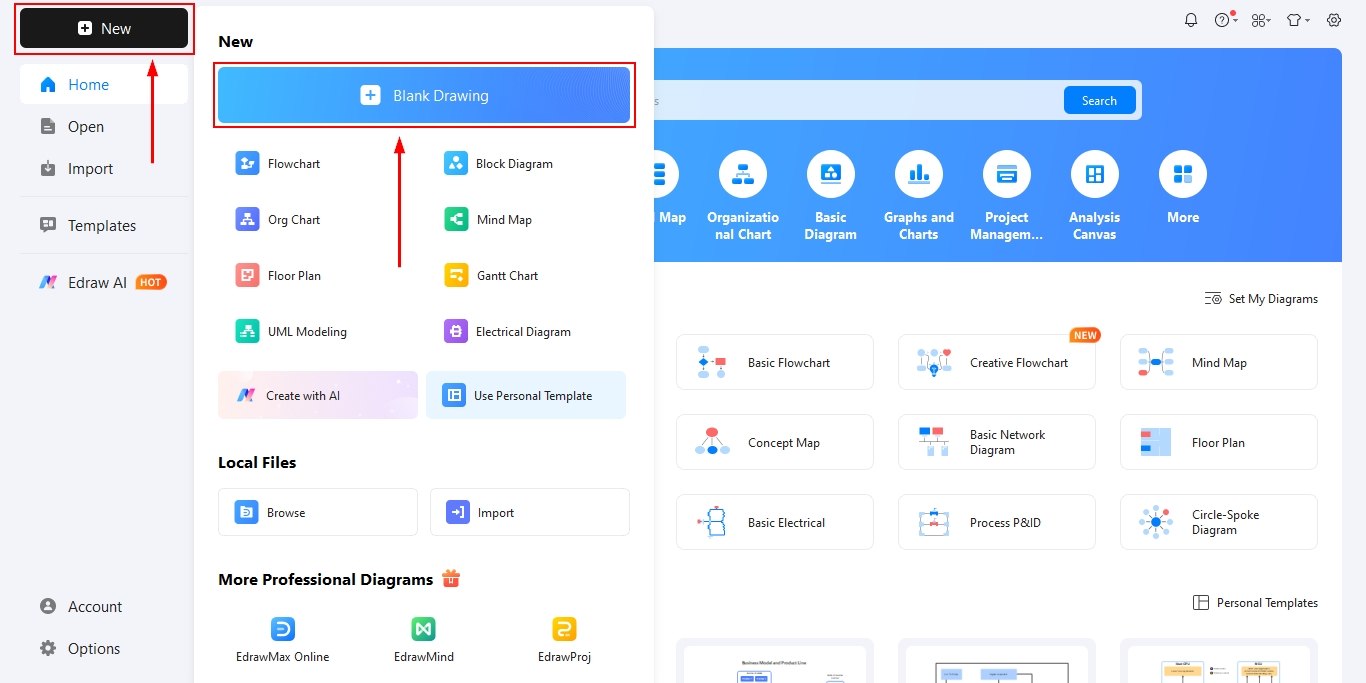
Step1 Open the Tool and Get Started
- Launch EdrawMax and click New and then Blank Drawing to begin with a clean workspace.
- Turn on helpful tools like Gridlines and Snap to Grid from the View tab for easier alignment.
- Set your page orientation and size from Layout and then Page Setup to prepare the canvas for your mitosis diagram.
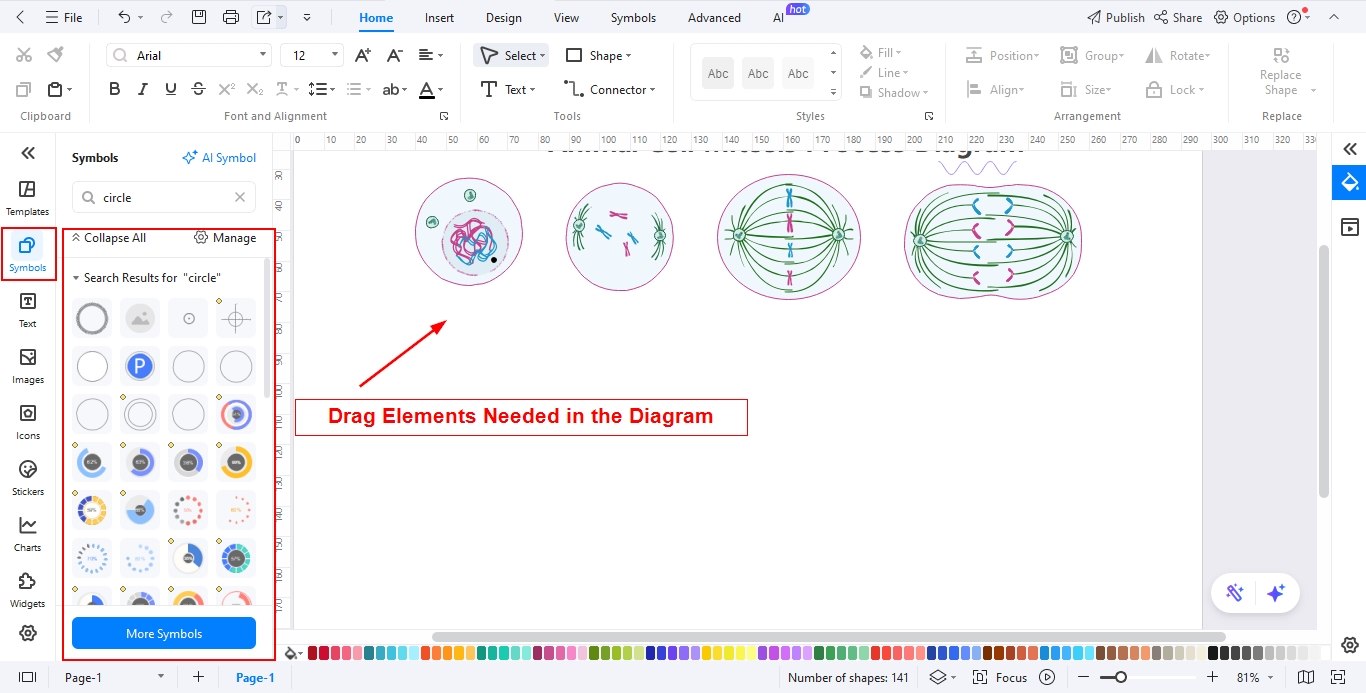
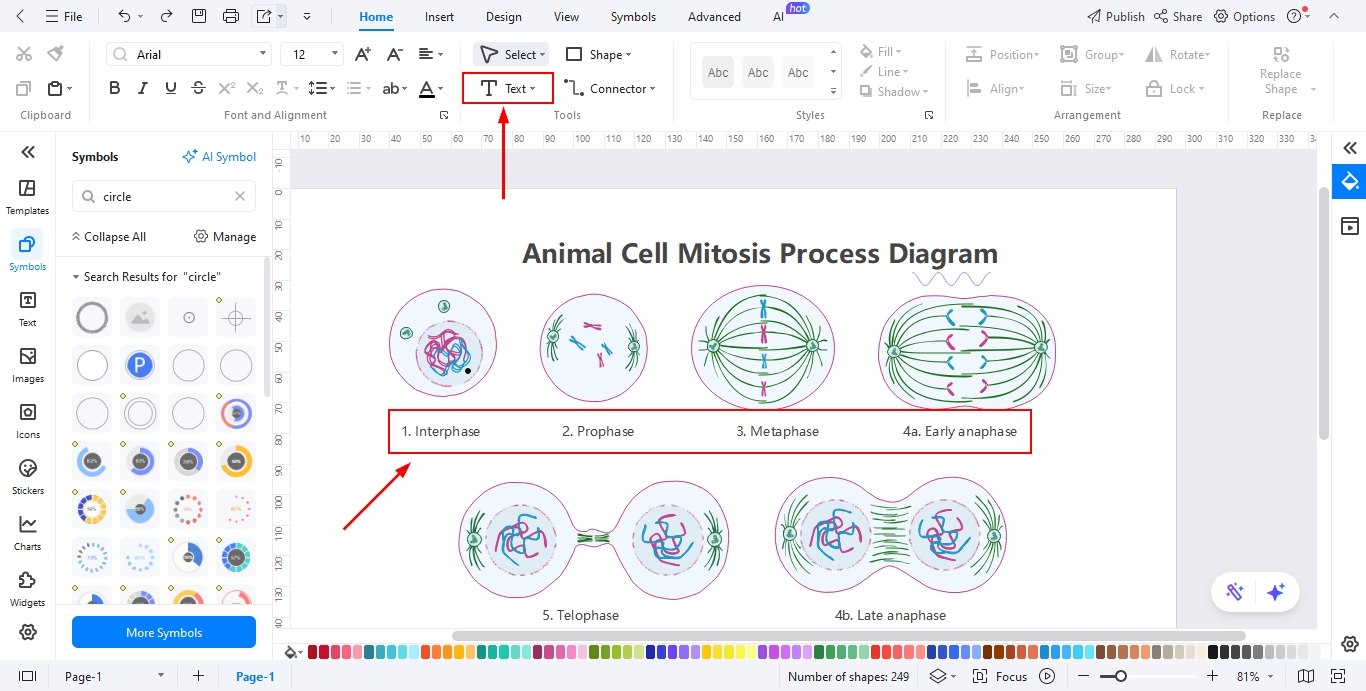
Step2 Add Elements Needed
- Insert basic shapes (circles, rectangles, lines) from the libraries panel to represent cells, nuclei, chromosomes, and stages.
- Use Duplicate (Ctrl + D) to keep elements consistent across each mitosis phase.
- Arrange shapes neatly within sections or frames to visually separate Interphase, Prophase, Metaphase, Anaphase, Telophase, and Cytokinesis.
Step3 Add Text for Each Stage
- Select the Text Tool, click on any shape, and type names like “Prophase,” “Metaphase,” etc.
- Add short explanations under each stage to describe key events (e.g., chromosome alignment, separation).
- Customize text style (font, size, color) using the Text Format toolbar to maintain clarity and consistency.
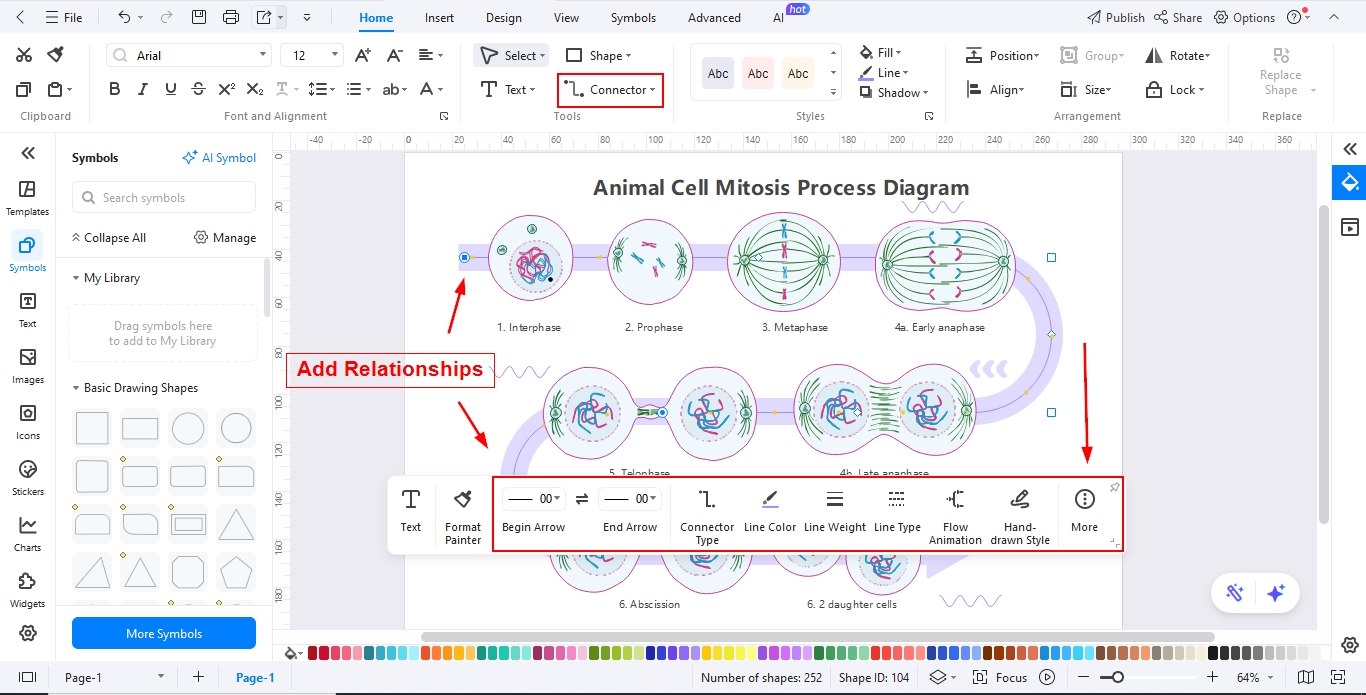
Step4 Add Relationships Using the Connector Tool
- Use the Connector Tool to link each stage in sequence, showing the flow of the mitosis process.
- Add arrows to your connectors to illustrate direction from one phase to the next.
- Adjust connector styles (curved, straight, line weight) from the Format panel to improve readability.
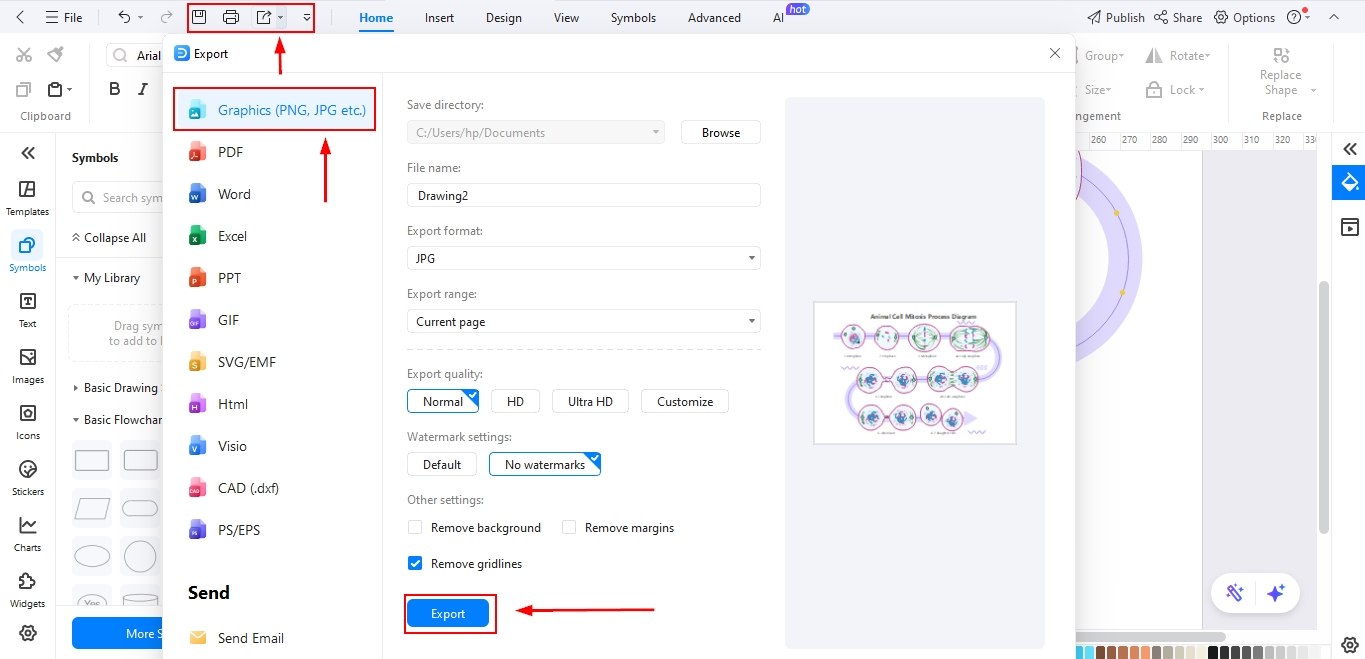
Step5 Export the File
- Go to File and click Export & Send and choose your preferred format: PNG, JPG, PDF, SVG, or PPTX.
- Select the quality parameters and resolution for print-quality diagrams.
- Save both the exported file and the original EdrawMax format so you can edit it later anytime.
Common Mistakes to Avoid When Illustrating Mitosis
You can make the best diagram, but still, because of a few mistakes, you might lose marks. Here are things you need to watch out for:
- Keep chromosome numbers consistent across stages.
- Do not skip metaphase alignment; a lot of students make this mistake.
- Confusion regarding centrosomes and spindle fibers; some students mislabel these.
- Make sure that in telophase you show clear nuclear membranes.
- Some confuse mitosis with meiosis, never show crossing over or tetrads.
- Do not overcrowd the diagram; keep each stage distinct and clean.
Digital tools like EdrawMax automatically align and space elements, making it easier for the user to reduce these errors.
Mitosis Diagram Templates and Resources
There are plenty of mitosis diagrams available online for studying. You can find these images by simply searching on Google Images.
For referencing, you can consider authentic research papers where detailed diagrams with proper labeling are present. Here are some examples of labeled mitosis diagrams:
AI Diagram Generator
Enter your prompt. Upload files if needed. Generate diagrams, charts, or slides instantly.


