


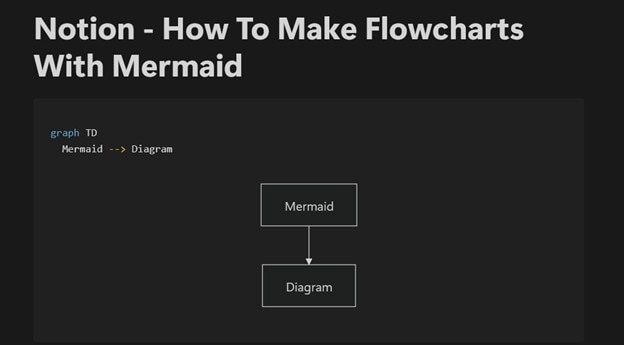
Struggling to visualize processes in Notion or GitHub? Mermaid notation lets you generate flowcharts using simple text-based syntax—perfect for developers and technical writers.
This guide covers everything from basic syntax to AI-powered shortcuts, plus easier alternatives if coding isn’t your style.
🔍 What You’ll Learn in this blog:
✅ Basic Syntax – Nodes, arrows, and directions
✅ Conditional Logic – If/else branches (%%{if}%%)
✅ Custom Styling – Shape colors, rounded edges
✅ AI + Mermaid – Generate diagrams faster with AI tools
✅ No-Code Alternatives – Drag-and-drop tools like EdrawMax
In this article
What Is Mermaid Notation
Mermaid is a text-to-diagram tool that creates flowcharts, sequence diagrams, and more using Markdown-like syntax. Key benefits:
✅ Code-Compatible – Works in GitHub, Notion, and VS Code
✅ Version Control Friendly – Diagrams update with your code
✅ No Manual Alignment – Auto-generates clean layouts
Mermaid vs. PlantUML
| Feature | Mermaid | PlantUML |
| Ease of Use | Simpler syntax | Steeper learning curve |
| GitHub Support | Native preview | Requires plugin |
| Diagram Types | 8+ (flowcharts, Gantt) | 10+ (more niche types) |
Tip: For non-developers, try drag-and-drop tools (like EdrawMax) to skip syntax entirely.
Creating Flowcharts With Mermaid Notation
You can use the Mermaid Live Editor, a web-based tool, to build diagrams with Mermaid notation. The syntax is the same across platforms, so this walkthrough still applies if you're using Notion or VS Code.
How To Create Diagrams Using Mermaid Notation
Visit the Mermaid Live Editor website. You’ll see the sample code and a preview chart displayed when the site loads. You can also explore more examples under Sample Diagrams on the left sidebar.
This makes starting easy, even if it’s your first time working with Mermaid.
Writing a Basic Flowchart Using Mermaid Syntax
Now, review the basic syntax and see a sample in action.
Define the Flowchart Type and Direction
Every Mermaid flowchart starts with the keyword “flowchart”, followed by the direction in which you want the chart to flow (either “TD” or “LR”). Thus:
- Use “flowchart TD;” to create a top-to-bottom layout.
- Use “flowchart LR;” if you prefer a left-to-right layout.
Add Nodes and Arrows
Each node (or element) needs an ID and a label. You connect nodes using “-->” to create arrows. Here’s an example:
A[Text A] B[Text B]
A -- C[Text C]
B -- D[Text D]
C -- D
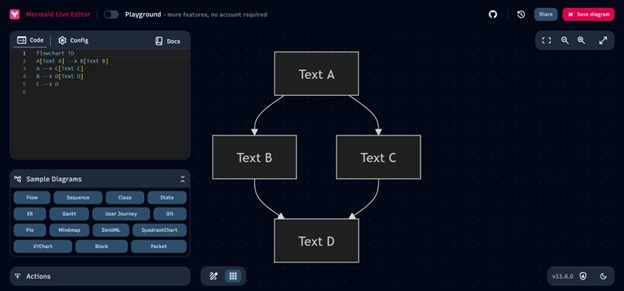
Note: In the Mermaid Live Editor, as you type the code in the editor pane on the left, the diagram updates instantly on the right. You'll get a complete working flowchart when you combine parts (1) and (2).
Try switching the direction in part (1) from TD (top-down) to LR (left-right) to see the flow change in real-time.

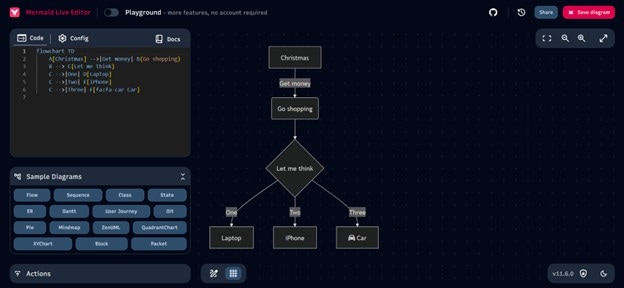
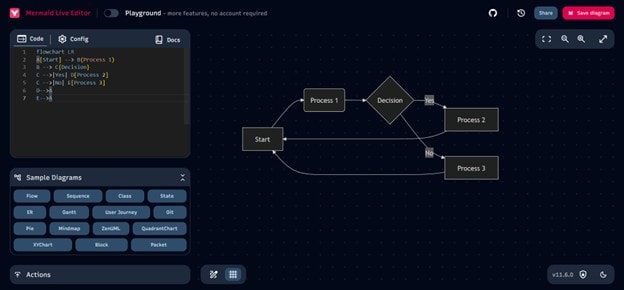
How To Create Conditional Branches in a Flowchart
Adding Conditional Branches
To show a condition in a flowchart, draw arrows from a single node to two or more nodes. This creates a decision point. When you draw arrows from one node to two or more nodes, you create a conditional branch. The key syntax elements here are the curly braces “{}” for decision nodes and the pipe symbols “|” to label the arrows:
Here’s an example:
Example
A[Start] --> B(Process 1)
B --> C{Decision}
C -->|Yes| D[Process 2]
C -->|No| E[Process 3]

You can also create loops by connecting arrows back to a previous node. This helps represent repeated steps or conditions within the flow. To make loops, direct your arrows back to earlier nodes in your flowchart using the standard arrow syntax “-->.”
How To Customize Shapes, Arrows, and Colors
Change the Shape of a Node
You can switch up the shape of your diagram elements by using different types of brackets around your text:
- [Text]: Square
- (Text): Rounded rectangle
- {Text}: Diamond (for decisions)
- [(Text)]: Cylinder
- ((Text)): Circle
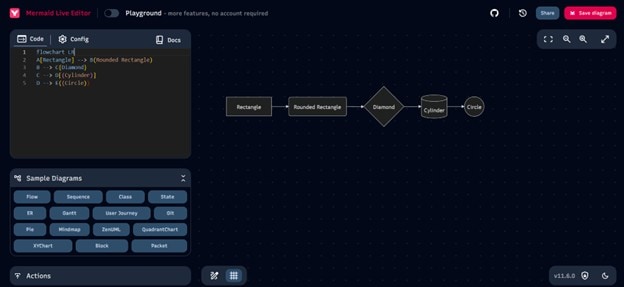
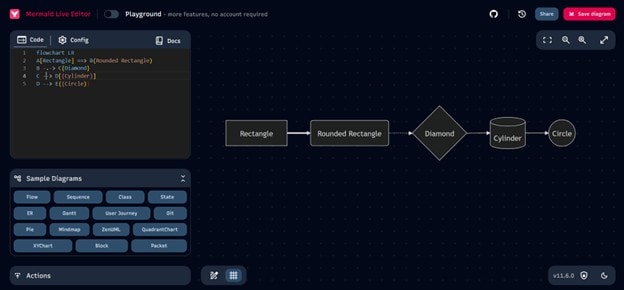
For example, you can make a flowchart such as the one below with different shapes:
Example
flowchart TD
A[Rectangle] --> B(Rounded Rectangle)
B --> C{Diamond}
C --> D[(Cylinder)]
D --> E((Circle))
Customize Arrow Styles
You can change the line style of arrows by changing the symbols within the arrow notation. You can also add text to arrows with the following (sample) syntax:
Example
“A ==> B;”: Bold arrow
“B -.-> C;”: Dotted arrow
“B --> |Text| C;”: Arrow with text
Setting Colors
You can set colors for the entire node or individual arrows:
To change the overall theme, use this code:
Code
%%{init: {'theme': 'forest'}}%%
To use a style for a specific arrow:
linkStyle 2 stroke:red,stroke-width:4px

Since the Mermaid Live Editor updates in real-time, you’ll instantly see if something’s off—an error message or a broken diagram. Don’t worry if it takes a few tries. Testing different styles is part of learning Mermaid syntax.
Use AI To Generate Mermaid Syntax
Mermaid syntax is pretty simple, but if you don’t want to learn the structure, you can still create flowcharts by combining Mermaid with AI tools and copy-pasting them later.
Here’s how:
Step 1
Open an AI chatbot (like Claude or ChatGPT) and describe your desired flowchart. Ask the AI to generate Mermaid code. An example prompt would be: “Create a flowchart of the user registration process using Mermaid syntax.”
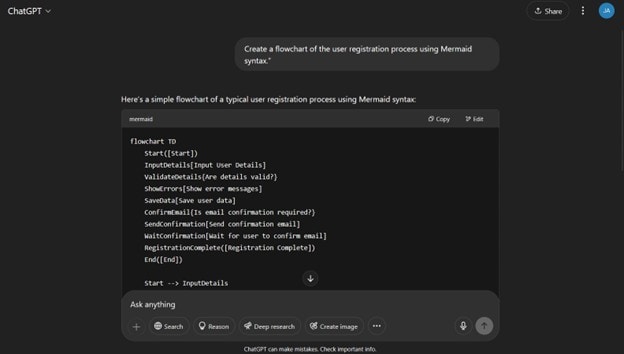
Step 2
Copy and paste the generated code into the Mermaid Live Editor to see the chart.

Step 3
If something looks off, ask the AI to tweak or edit the code until the chart looks right.
This approach makes it easy to generate diagrams even if you’re new to Mermaid.
EdrawMax: A Dedicated Tool for Creating Flowcharts
Mermaid syntax is excellent for quickly building flowcharts using text. But if you're looking for a more intuitive interface or flexible editing, consider using EdrawMax.
Here’s how it compares to Mermaid syntax:
| Feature | Mermaid Syntax | EdrawMax |
| Operation | Text-based | Graphical interface |
| Learning Curve | Easy but requires syntax knowledge | Simple drag-and-drop |
| Templates | Limited samples | 30,000+ templates (not just for flowcharts) |
| Customization | Requires syntax editing | Edit the flow chart as is (everything is customizable, from shapes, lines, colors, and fonts) |
| Speed | Fast once you’re familiar | Faster via drag-and-drop |
| Complex diagrams | Harder to build | Easy with built-in support and templates |
| Version Control Integration | Easy with text | Supported, with recovery options |
| Export Options | PNG, SVG | PNG, JPG, PDF, SVG, and more |
| Cost | Free | Paid (but the free version is available with sufficient features) |
EdrawMax’s AI Features
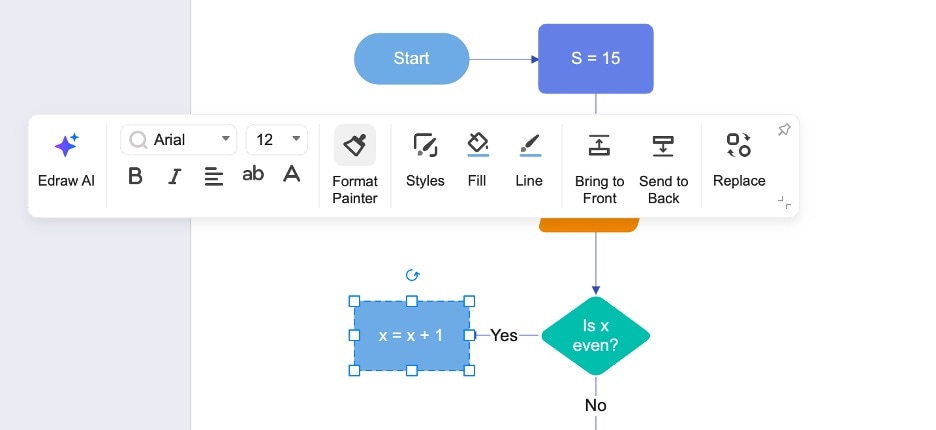
Another key advantage to EdrawMax is its AI-powered features, specifically the one-click mindmap/diagram. EdrawMax lets you generate diagrams from AI prompts directly within the software. That includes flowcharts and many other diagram types.

It also comes with drawing assistance. Diagrams are easy to edit, and you can switch up the design using one-click menus.

You can also tweak diagrams using the right-click menu or one-click design options. That makes editing much faster, especially for complex flows.
For complex or design-heavy flowcharts, EdrawMax is a solid choice. But if you’re after speed or want smooth version control integration, Mermaid syntax still works well. Use whichever tool fits your goal.
When To Use What?
If you're working on technical documentation or need version control, Mermaid is a strong choice, especially for developers and engineers. But if you want more visual control, better design options, and easier customization, EdrawMax is a better tool. It’s ideal for creating polished, professional flowcharts fast.
Try EdrawMax’s free version now and see if it fits your workflow!
AI Diagram Generator
Enter your prompt. Upload files if needed. Generate diagrams, charts, or slides instantly.
