


In businesses, it’s common practice for several departments to work on a single process with different roles. In such cases, it’s wise to use swim lane diagrams to clarify the step-by-step process and the actual roles of each team.
By dividing the lanes for each department and person in charge along with the process flow, you can grasp work division and more at a glance. This also helps standardize and improve business flow, strengthening communication between teams.
This article will teach you how to make or draw a swim lane with the help of Mermaid and some examples you can easily copy.
In this article
Why Draw a Swim Lane Mermaid
Disadvantages of Conventional Tools
In a real-life example, a sales team ran into several issues while using PowerPoint to create a swimlane diagram for order processing:
- Editing overhead: When the logistics team added a new quality check step, they had to reposition every connector manually.
- Collaboration issues: Poor version control led the customer support team to work from an outdated process diagram.
- Printing problems: Titles and content are often misaligned during printing.
What Mermaid Does Better
Mermaid is a text-based diagram tool that solves many of these pain points thanks to the following features:
- Version tracking: Works with Git to keep a clear history of all changes to your swimlane.
- No cost: The Mermaid editor is completely free to use.
Limitations of Mermaid
However, Mermaid isn't without its drawbacks. For swimlanes, it isn't easy to align everything perfectly, especially when trying to format lanes neatly, but it still lets you show processes and departments in one diagram.
Since Mermaid uses code to build diagrams, there’s a learning curve. It’s a good fit for those comfortable with writing code. But if that feels like too much effort, there are easier options.
Tools like EdrawMax or Visio let you build swimlanes by dragging and dropping shapes and templates—no code required.
How To Draw Swimlanes in Mermaid
Basic Syntax
To draw swimlanes in Mermaid, start by writing a simple flowchart using this format:
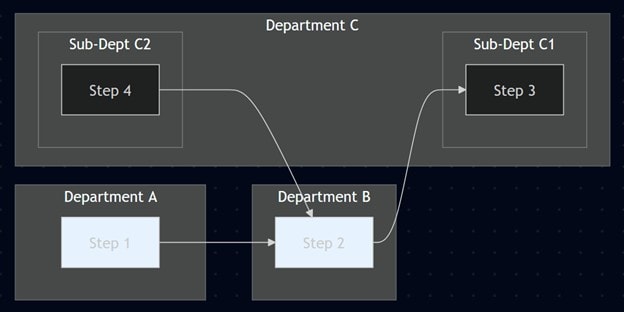
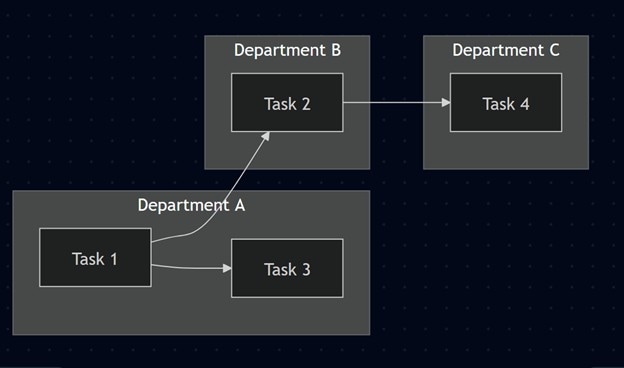
flowchart LR
subgraph Department A
A[Step 1]
end
subgraph Department B
B[Step 2]
end
subgraph Department C
subgraph Sub-Dept C1
C[Step 3]
end
subgraph Sub-Dept C2
D[Step 4]
end
end
A --> B --> C
D --> B
Here’s a breakdown of the codes used in the syntax for your better understanding:
Flowchart LR
This tells Mermaid to draw a flowchart that flows from left to right. You can change LR to TB (top to bottom), RL (right to left), or BT (bottom to top), depending on your layout needs.
Using a Subgraph To Create Swimlanes
Subgraph defines a container or lane, like a department or role. All steps inside the subgraph are visually grouped. You can also nest subgraphs to represent hierarchy, such as a department with sub-teams. Example:
Example
subgraph Department A
A[Step 1]
end
Here are some important tips:
- Always include a space between the subgraph and the label (e.g., subgraph Department A).
- Mermaid doesn’t require indentation, but it helps keep the code readable, especially when nesting subgraphs.
Show the Flow
Use “-->” to connect each step in order. This shows the direction of the process.
Customizing Swimlanes in Mermaid
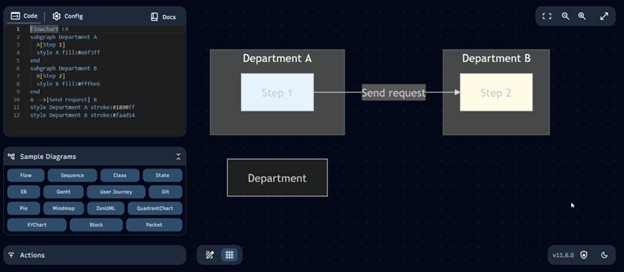
You can style and label your Mermaid swimlane charts to improve clarity and visual appeal. Here's an example:
Example
flowchart LR
subgraph Department A
A[Step 1]
style A fill:#e6f3ff
end
subgraph Department B
B[Step 2]
style B fill:#fffbe6
end
A -->|Send request| B
style Department A stroke:#1890ff
style Department B stroke:#faad14
Again, here’s a breakdown of the syntax used:
Style Command
Use style to customize the look of nodes or subgraphs. You can change:
- fill for background color
- stroke for border color
Example
style A fill:#e6f3ff
style Department A stroke:#1890ff
Line Styles
To change how connectors appear:
- “-.->” creates a dashed line
- “==>” creates a bold arrow
Adding Labels to Connectors
Use |Your label| between nodes to explain the flow.
Example
A -->|Step A process| B
B -.->|Conditional| C
C ==> D
This lets you directly show decisions, messages, or conditions on the lines—great for keeping your diagram readable.
Using a Mermaid Editor
Once you’ve written the Mermaid code for your swimlane diagram, you’ll need an editor to render it visually. Below are some recommended Mermaid editors you can use:
- Mermaid Live Editor. A browser-based tool that lets you paste your code and instantly see the diagram.
- Markdown Preview Enhanced. A Visual Studio Code plugin that renders Mermaid diagrams inside markdown files.
- EdrawMax. It supports Mermaid code and drag-and-drop diagram creation and is ideal for users who prefer visual tools.
How To Generate Mermaid Swim Lane Notations With AI and Modify Them
While learning the basics of Mermaid is a great thing, it’s also good to rely on AI for quicker outputs. This way, you won’t have to manually type in the code.
You can use different tools like ChatGPT, Claude, Gemini, or others that you might prefer.
Step 1
Open your preferred AI chatbot, then create your prompt that describes the following:
- 1) that it will use the Mermaid notation;
- 2) the content of your swim lane;
- 3) the design of your diagram, if any. Remember that being as descriptive as possible is key.
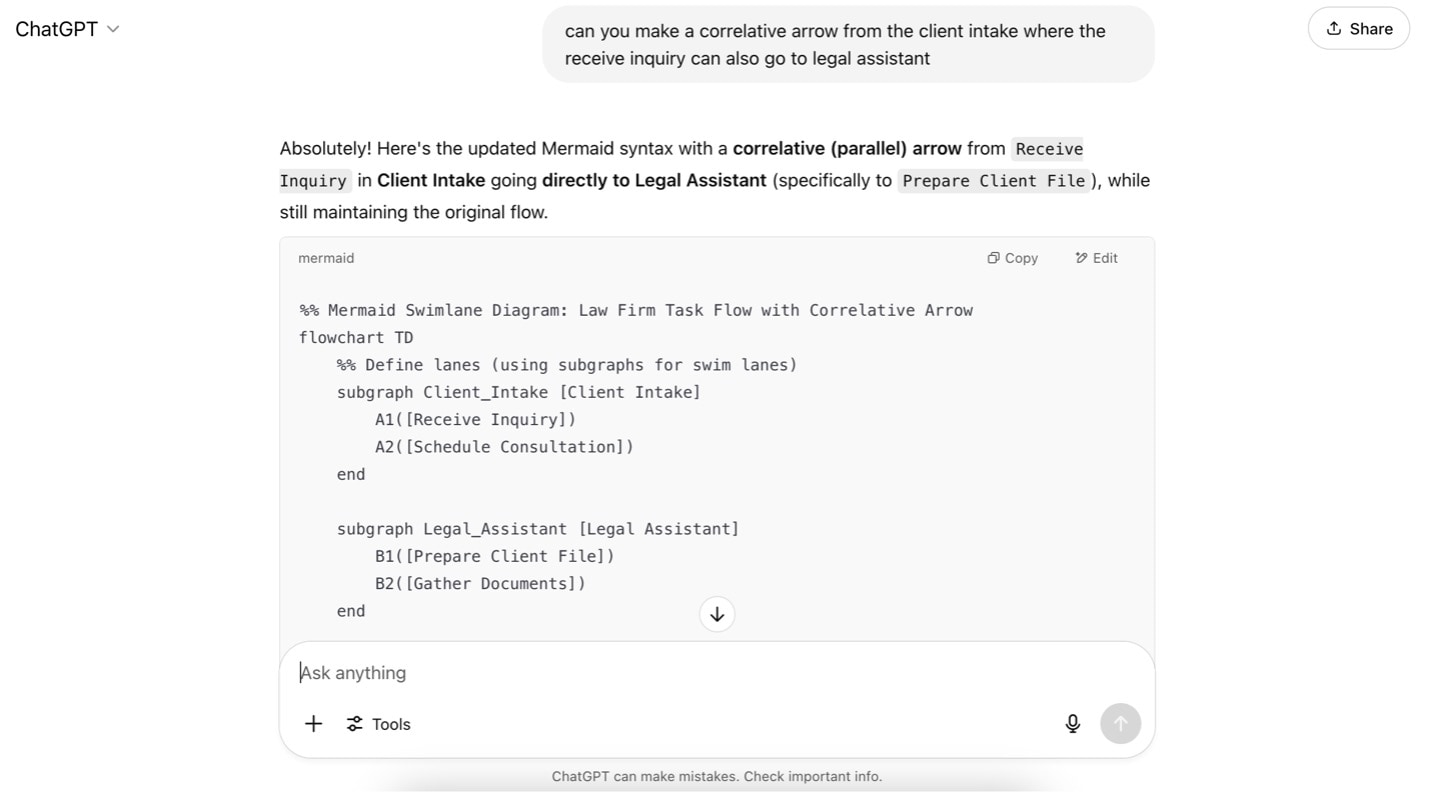
Here’s an example prompt: “Create a swim lane diagram using Mermaid syntax/notation that shows the task flow in a law firm context.”

Step 2
Then, copy-paste the generated code to Mermaid.

Step 3
If you would like to edit any part of the diagram, then describe the change as precise as possible to the AI.
Step 4
After the AI generates your new flowchart code, copy-paste it again to the Mermaid live website.
Two Examples of Swim Lanes Created in Mermaid Notation
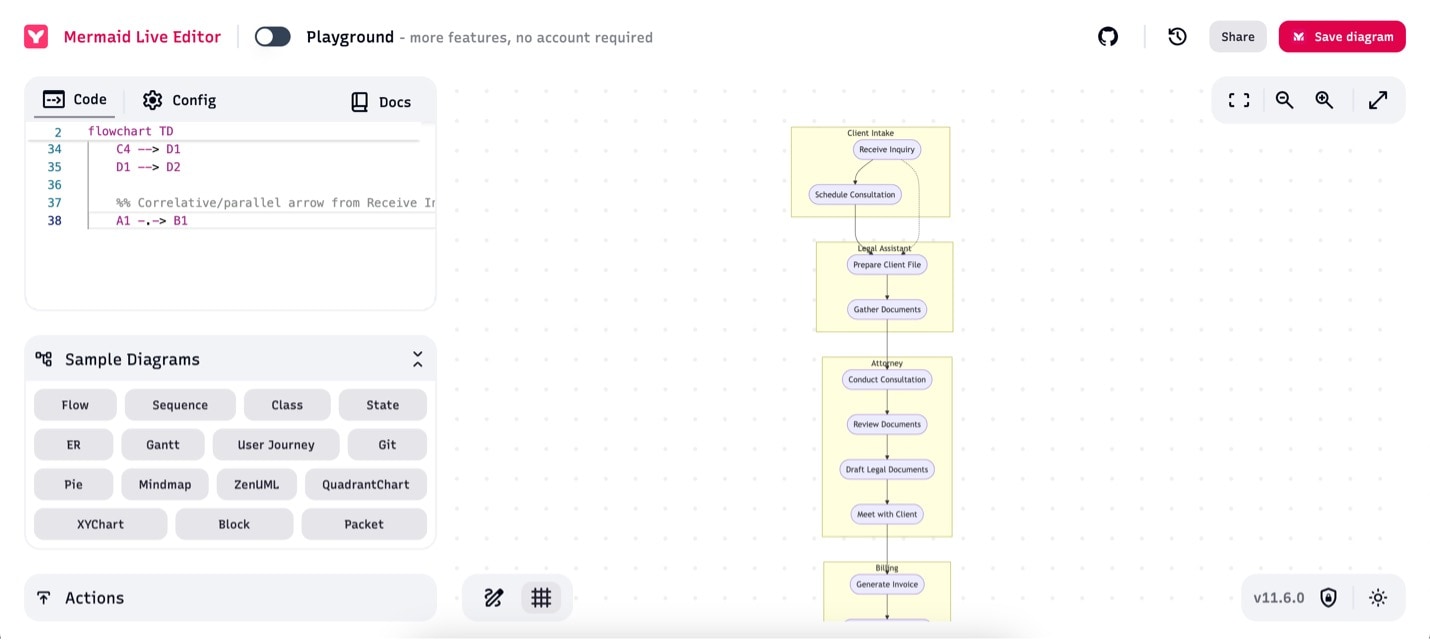
Medical Examination Flow
Here’s an example of a swimlane diagram created using Mermaid syntax, showing the flow of a medical examination.

Some key design points here are:
- Clear separation between departments
- Use a subgraph to divide the diagram into emergency, radiology, and cardiology departments.
- Apply distinct colors (e.g., red, blue, green) to each department for better visual clarity.
- Flow that’s easy to follow
- Lay out the process from left to right (LR) to show the emergency response sequence at a glance.
- Use a circular flow (e.g., B → C → D → E → B) to show how tests, diagnoses, and treatment repeat in a cycle.
Expense Reimbursement Flow
This example shows a swimlane diagram built with Mermaid syntax, outlining the expense reimbursement process.
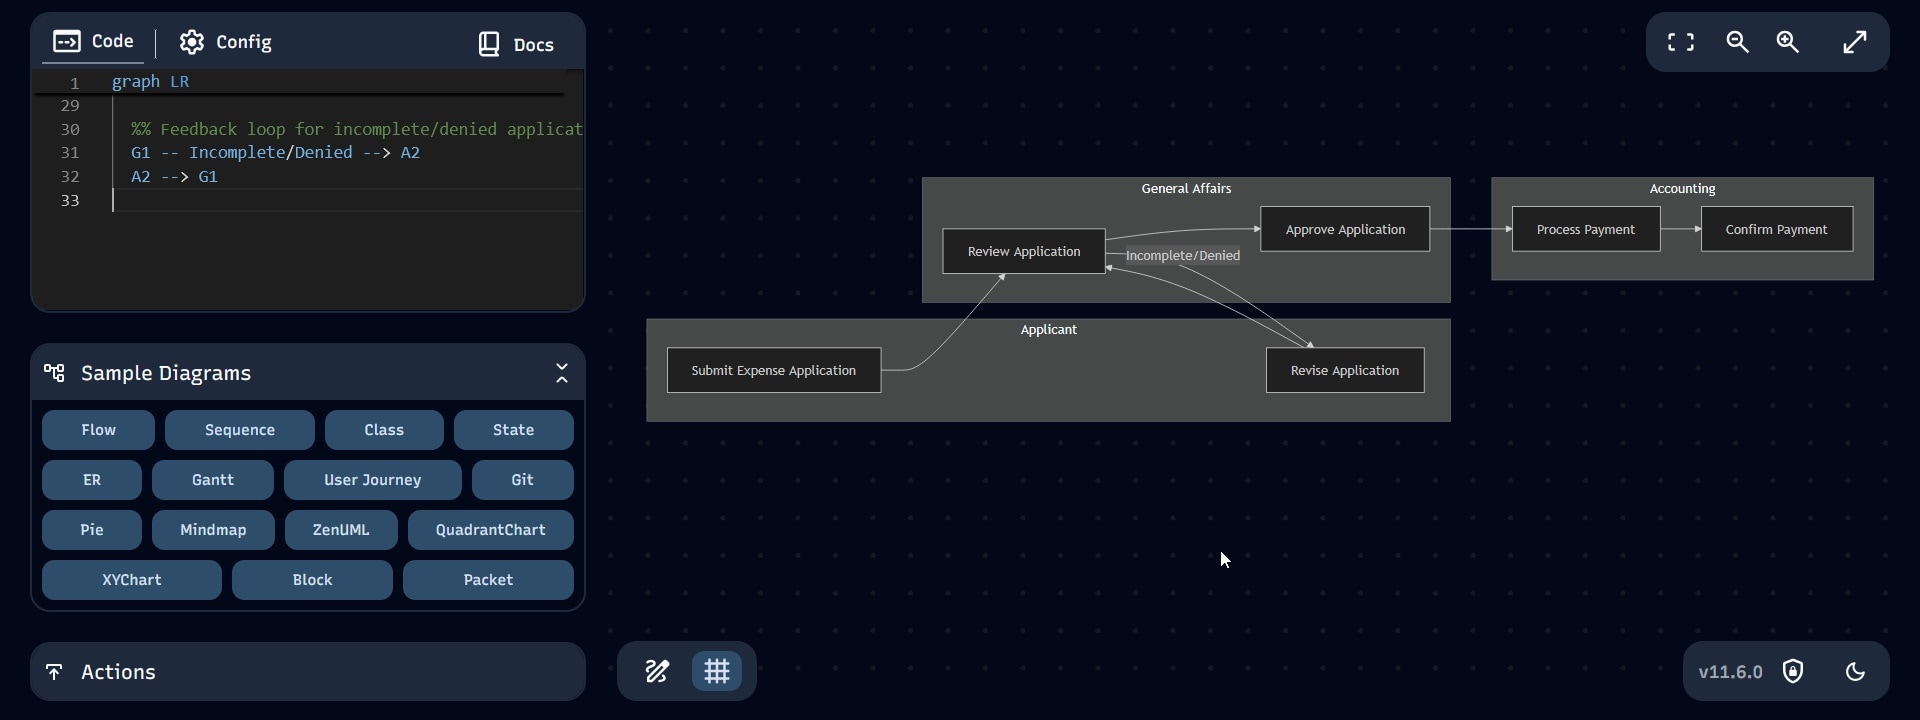
Here are the key design points on this flowchart:
- Clear separation by department
- Use a subgraph to divide the flow into Accounting, General Affairs, and Applicant sections.
- This helps clarify each department’s responsibilities in the process.
- Visualizing the reimbursement process
- Lay out the steps from application to approval to payment in a left-to-right (LR) direction.
- Include a feedback loop for the approval stage to show that incomplete applications return to the applicant.
Frequently Asked Questions
-
Q1. Can I customize swimlane diagrams in Mermaid?
A1. Mermaid has limited styling options by default, but you can apply custom CSS for further control. Another option is to export the diagram as SVG and make edits using graphic software. -
Q2. Are there other tools that make swimlane diagrams easier to create?
A2. Yes. If you want more built-in swimlane features, try these:- EdrawMax: Offers plenty of templates and flexible customization.
- Draw.io (diagrams.net): Easy drag-and-drop interface.
- Microsoft Visio: Ideal for creating detailed business-oriented swimlane diagrams.
-
Q3. Can Mermaid handle swimlanes with conditional branches?
A3. Yes. You can use curly braces {} to represent decision points, similar to diamond shapes in standard flowcharts. -
Q4. Can I insert a Mermaid swimlane diagram into PowerPoint?
A4. Yes. Export your diagram from Mermaid Live Editor as SVG or PNG, then insert it into PowerPoint. SVG is recommended since it scales cleanly and allows further editing.
AI Diagram Generator
Enter your prompt. Upload files if needed. Generate diagrams, charts, or slides instantly.
