


Rearranging a room on paper is simple. You sketch it out, move things around, and it looks right. Then you move the actual furniture and realize the sofa is six inches too wide, the bed blocks the closet, and the desk ends up under the only window.
I've rebuilt the same room layout twice because I got the proportions wrong on paper.
A 3D view would have caught it in minutes. That’s the exact problem a 3D view solves.
And, you can turn the layout into a 3D view in EdrawMax and notice whether the room still works once the furniture is actually in it.
Here, I'll cover everything about 3D room floor plans, including how to create a 3D room design in EdrawMax and some pro tips to help you along the way.
In this article
What a 2D Sketch Can't Tell You
A tape measure tells you the sofa fits. It won't tell you whether the room still feels walkable once the sofa's in place.
Everything looks proportional on paper because everything on paper is flat. In the 3D room plan, volume reveals what the 2D plan hides.
The first time I put a floor plan into 3D, I realized the bedroom layout I'd been happy with for two weeks had a king bed placement that left eighteen inches of clearance on one side. That’s definitely useless. The dimensions were fine. The proportions weren't.
And it happens faster than you'd expect.
A 2D sketch won't show you the pinch points until you see the room in 3D view. Catch it before anything gets bought, built, or moved. That's the only point where fixing it is still free.
Where 3D Room Design Makes the Biggest Difference
Here are three room types that expose flat-plan mistakes faster than most:
Bedroom Layouts That Look Fine Until You Walk Through Them
I've planned bedroom layouts that looked fine on paper and felt immediately wrong once the furniture was in place.
Door swing, window position, closet access. None of these breaks a layout individually. Combine them with one bed orientation decision, and you're left with a corridor that functions like a hallway. Every measurement cleared. The room still doesn't work.
The 3D view showed it in thirty seconds.
Kitchen Clearance
The fridge door swing looks fine on a flat plan.
Open it in 3D, and you see immediately whether it blocks the counter space next to it.
I planned a kitchen layout where that clearance seemed fine until I modeled it. The entire adjacent counter became unusable when the fridge was open.
Caught it in design. Would've been a different conversation after cabinetry.
Does the Sofa Actually Belong in the Living Room?
Scale against wall length is the living room problem that flat plans hide most.
I repositioned the sofa three times on paper. Same measurements every time. The wall length was the problem, not the furniture.
3D shows it before you order anything.
How to Create a 3D Room Design in EdrawMax
That sofa question, the kitchen clearance, the bed orientation against the window: here's where you actually see the answer.
These steps run on the EdrawMax desktop. Floor Plan to 3D generation needs an internet connection. Everything else works offline.
Step1 Choose a Room Template or Start From a Blank Canvas
- Open the Templates gallery and search for your room type: bedroom, kitchen, living room
- Click Use immediately on the closest match
- Building from scratch? Hit New
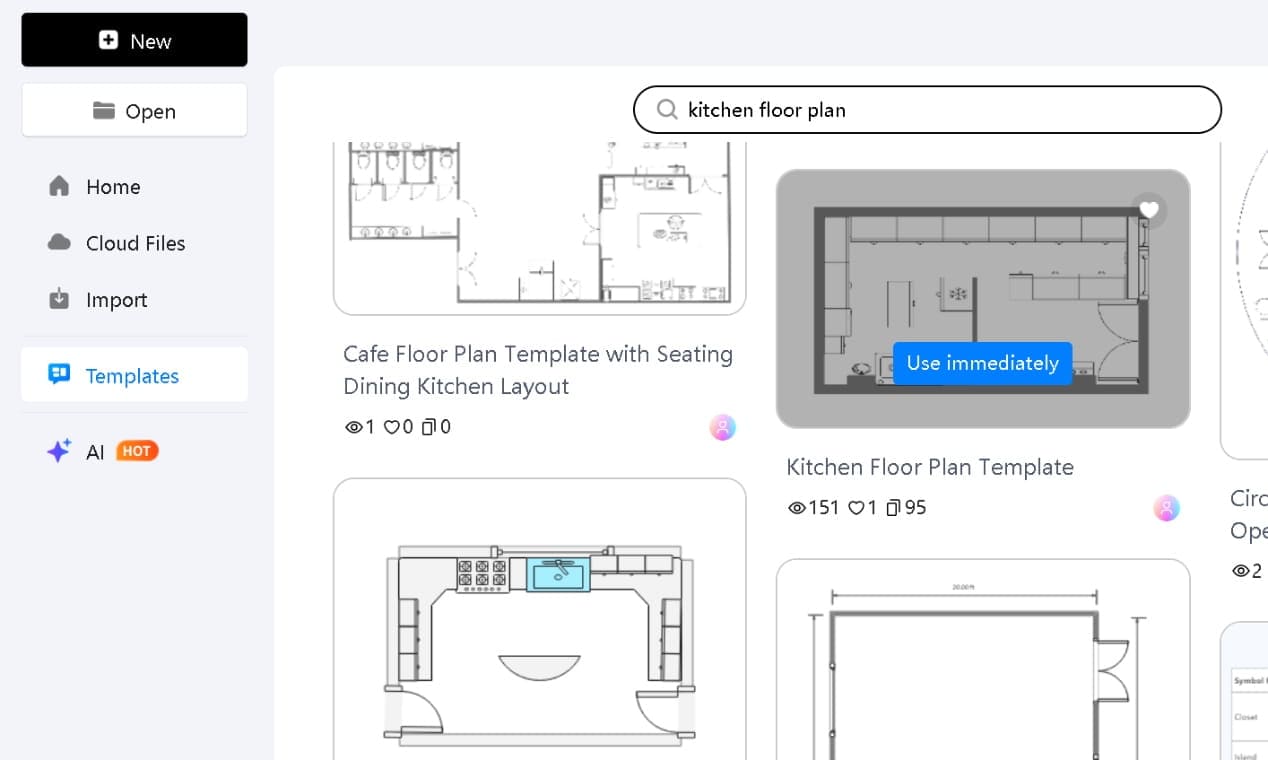
Templates load with the full floor plan symbol library already active. Walls, doors, windows, furniture, 26,000+ symbols categorized in the left panel. You're adjusting a room that already exists, not drawing one from scratch.
The closest match is good enough. I've never needed a perfect template before converting.
Step2 Select Your Room and Convert to 3D
- Select the room layout on the canvas
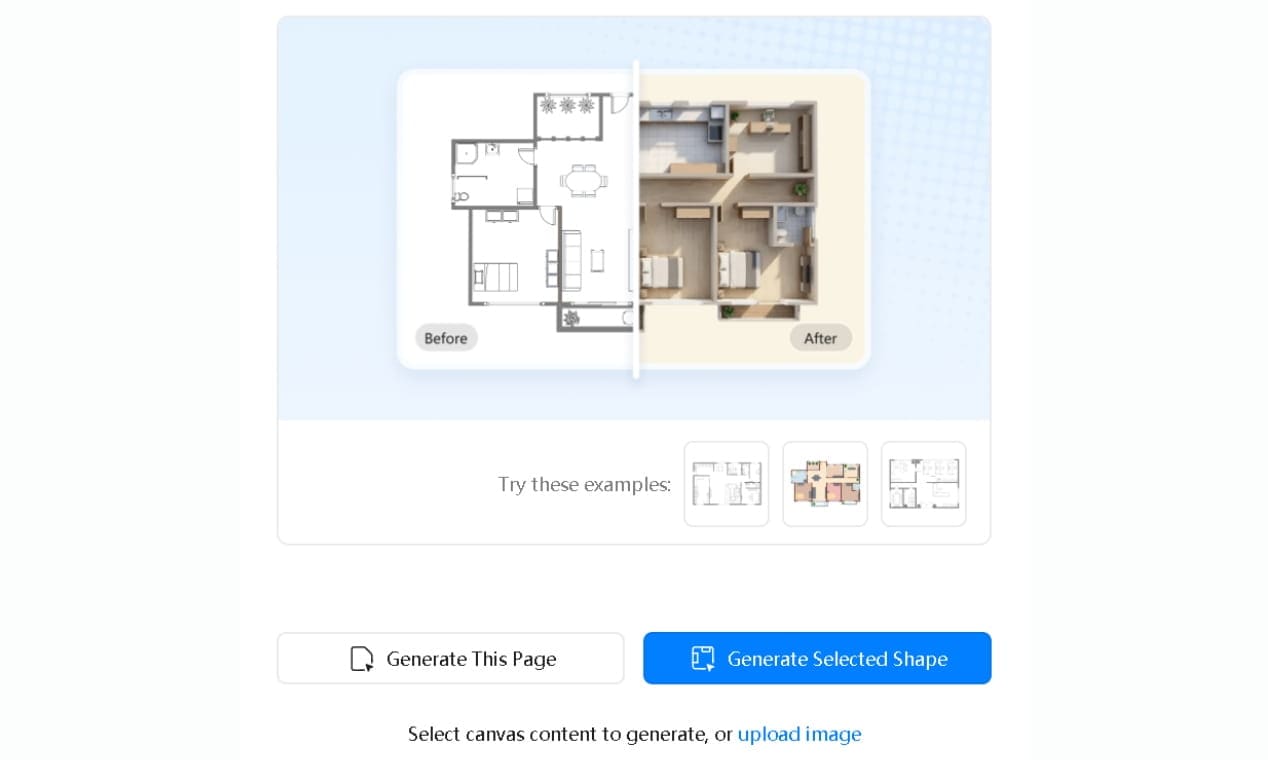
- Click Floor Plan to 3D in the pop-up toolbar
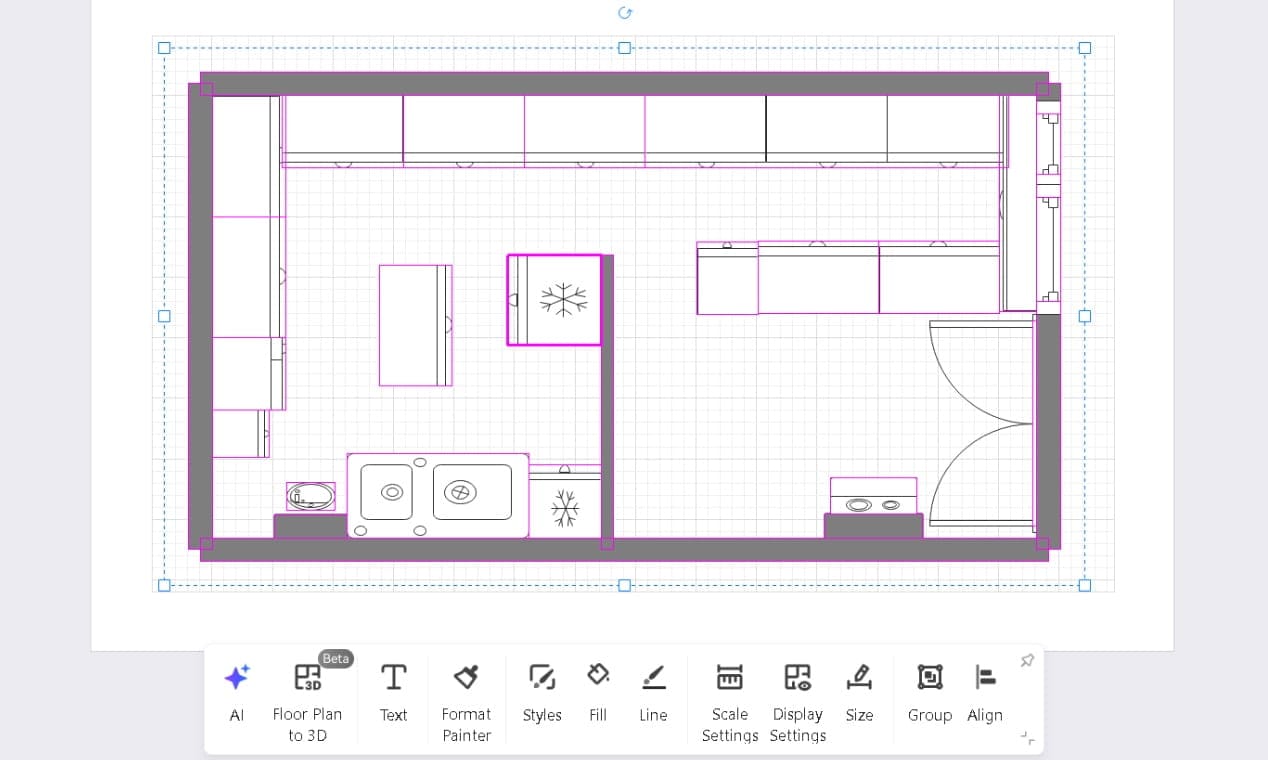
- Choose Generate This Page for the full canvas, or Generate Selected Shape, i.e., if you're converting one bedroom inside a multi-room layout without touching the rest
- Open the Style dropdown: Auto Match for speed, Natural Wood when showing a homeowner, Modern Minimalist for contractors. Click Generate Now
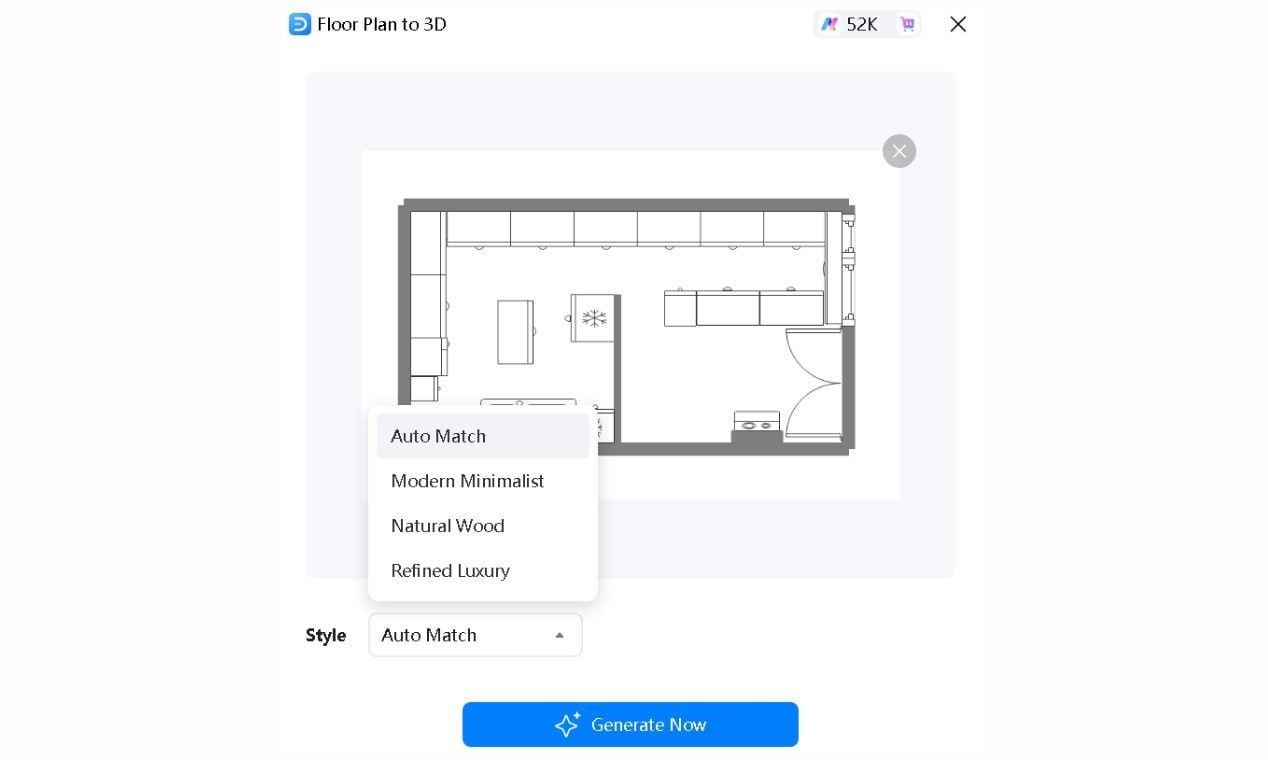
Wrong style for the wrong audience, and the output lands flat regardless of quality.
I pick based on who's looking at the output, not what looks best on my screen. Natural Wood gets a more immediate reaction from clients than the cleaner styles do.
Step3 Optimize the Output
The 3D result lands on the canvas. Check the furniture scale against the wall height first. That's where single-room outputs miss most often.
- Select the generated image
- Use Adjust for brightness, contrast, and transparency
- Use Edit Image to remove background artifacts that make the image look unfinished when shared
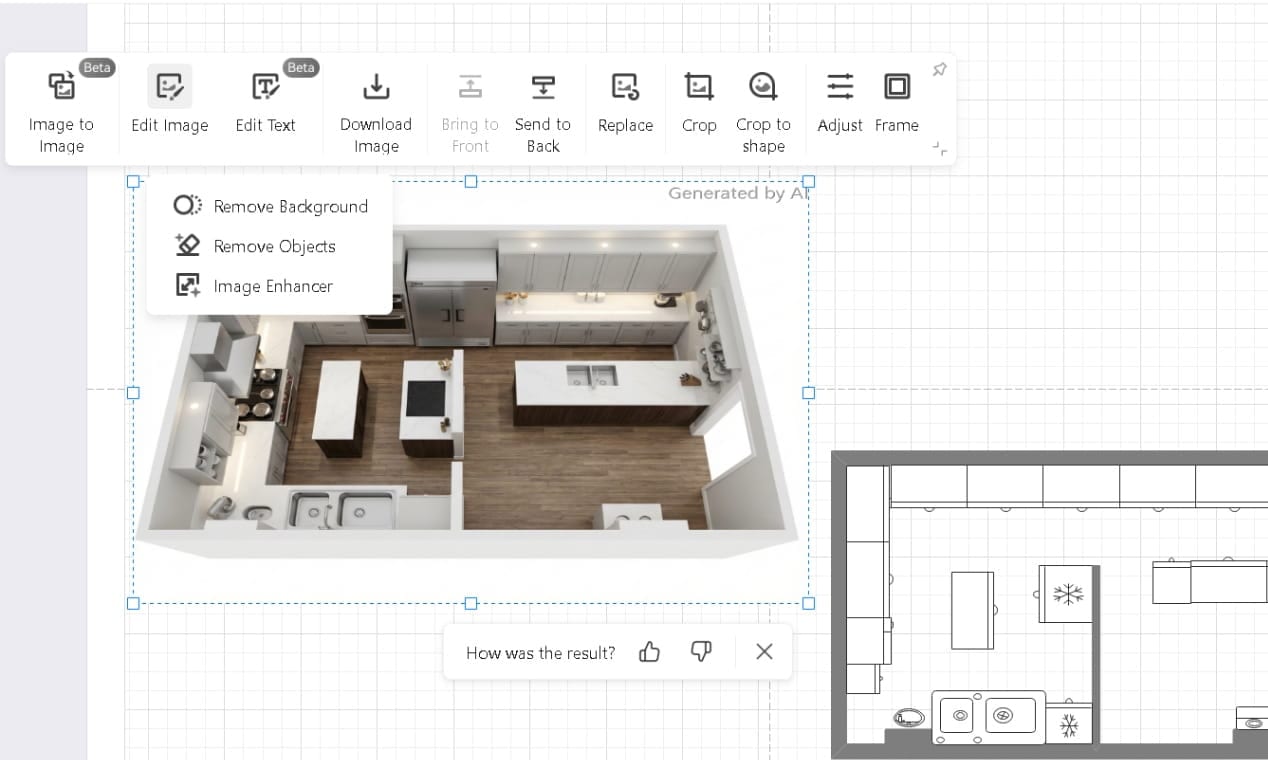
If the geometry is unusual, narrow galley, non-standard ceiling height, angled walls, run it twice with identical settings. The second pass almost always lands cleaner. I've skipped it exactly once and immediately regretted it when the client pointed out the ceiling looked compressed.
EdrawMax's Image Processing Suite handles the cleanup without leaving the canvas. No separate editing tool required.
Step4 Export and Share
- Hit Download Image in the pop-up to save the 3D image only
- Or go to Export in the top-right: PNG, JPG, PDF, PPT, SVG
- Set quality to HD or Ultra HD, then click Export
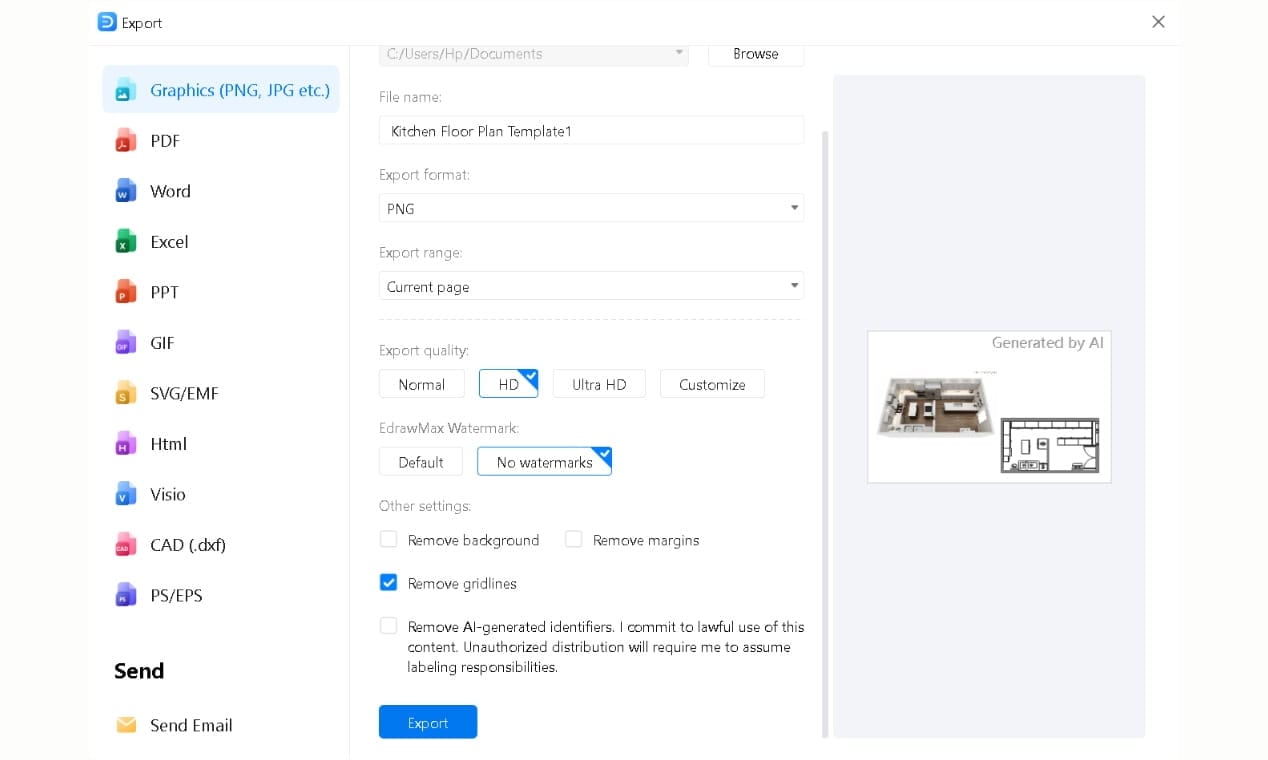
I send PNG to anyone who isn't a designer or contractor. Opens on any device, no setup, no questions. For scale printing, PDF. For client presentations, PPT.
The person receiving it doesn't need EdrawMax. You send the file, they open it, and you're both looking at whether the bed actually clears the closet before anything gets ordered or moved.
Tips That Make Your 3D Room Design More Accurate
- Measure the real space accurately. Start by capturing room dimensions, door swings, and ceiling height with a tape measure or laser. Precise measurements prevent downstream errors.
- Use the right symbols and labels. Drag furniture and fixtures from the floor‑plan symbol library (not basic shapes) and name each room on the 2D plan. Symbols carry practical proportions, and labels carry through to your 3D view. This makes it easier to orient yourself later.
- Match the wall and ceiling height to reality. Adjust wall and ceiling heights in the plan if your space isn’t standard. A low ceiling or sloped roof needs to be reflected in the model, or the 3D view will feel off.
- Generate early and often. Don’t wait until the end to see the room in 3D. Generate a 3D view after each major furniture placement, and run a second pass for complex rooms with angled walls or vaulted ceilings. Extra passes help smooth out distortions.
- Check furniture against doors and windows. In 3D, verify that large pieces clear door swings and window openings. A sofa that fits a wall length might still block a doorway.
- Tailor your outputs to your audience. When you’re ready to share, choose the format and style that best fits who’s viewing it. PNG or JPG for most clients and PDF for contractors who need a scalable print. A “Natural Wood” style for homeowners, or “Modern Minimalist” for design reviews.
Wrap-Up
Getting a room layout right used to mean moving furniture until something worked, or paying someone to tell you it wouldn't. Neither option is necessary anymore.
EdrawMax's Floor Plan to 3D feature brings the whole process into one place. Draw the room, generate the view, catch the problems, export the result. No modeling background, no expensive software, no surprises after the furniture arrives.
I still sketch layouts by hand sometimes. But I don't commit to anything until I've seen it in 3D first. That habit has caught two kitchen clearance problems, one sofa scale disaster, and a bed orientation mistake in the last four months.
AI Diagram Generator
Enter your prompt. Upload files if needed. Generate diagrams, charts, or slides instantly.


