


RISC (Reduced Instruction Set Computer) is a type of microprocessor architecture commonly used in modern CPUs. Unlike CISC (Complex Instruction Set Computer), which relies on a large and complex set of instructions, RISC focuses on simpler instructions that can be executed more quickly. This streamlined design enables faster data transactions and supports parallel processing, allowing CPUs to handle multiple operations efficiently.
In this guide, we will explore:
- What is an RISC?
- Its working principle and main components are used in this microprocessor.
- It's a block diagram and a method to create such beneficial block diagrams.
In the end, you will be able to learn how to create these block diagrams with ease and learn the basics of these microprocessors.
In this article
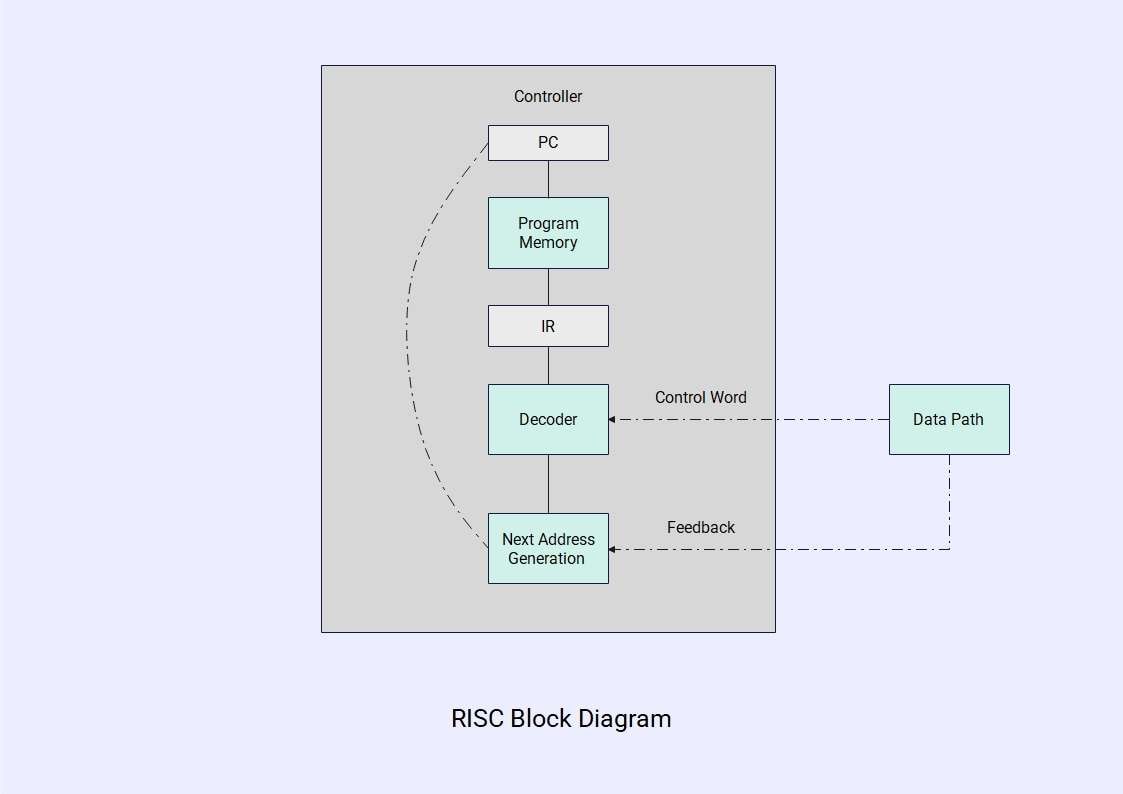
Block Diagram of RISC
RISC block diagram breaks down the complex circuitry of these microprocessors. It helps you learn about the basic components and how they work.
Let's check out the block diagram of RISC.
Working Principle of an RISC
RISCs are specialized microprocessors used to perform smaller operations in one cycle only. They are used to support the CPU, helping it to perform better and offer maximum speeds. Here are the key principles to consider when breaking down the overall workings of an RISC.
Reduced Instruction Set
The instruction set in RISC is programmed to perform a single transaction or calculation at a time, offering maximum speed. Each set operates in parallel operations and performs one activity, like moving the data or managing a calculation.
No Arithmetic and Logical Operations
The instructions in RISC don't help perform any logical or Arithmetic operations. Only load and store instructions are allowed to access the memory in the RISC. The register files are responsible for Arithmetic and Logical operations.
Execution of Data through a Single Cycle
The speed of the processor is dependent on the single-cycle executions in RISC. Most of the instructions are operated through single cycles, improving the speed of the CPU. This is what CISC lacks, as it performs multiple tasks in multiple cycles, causing a delayed response.
Register Files
The register files are large in the RISC system. They are responsible for most of the operations, neglecting access to the main memory in RISC systems. The information is operands and retrieved from these registers.
Hardwired Operation
A Simple hardwired logic is used to respond to the instructions, making the overall process faster. It happens due to the instruction sets, as it doesn't require microcode to make complex calculations. Their operations are prone to provide maximum efficiency and programmed to change their operation when needed.
Applications of an RISC
Here are a few of the applications of the RISC microprocessors.
Smartphones
Most of the ARM architecture uses RISC-based microprocessors to speed up mobile device operations due to their fixed instructions. The low power consumption of these RISC processors helps smartphones extend their battery life.
Embedded Systems
RISC-based processors are the best for embedded systems in the automotive industry, home appliances, and industrial machinery. These embedded systems require single tasks readily, and RISC provides maximum efficiency using the minimum resources, which saves a lot of power.
Networking and Telecommunication
RISC microprocessors were first created for networking and telecommunications devices. The reduced instructions and latency make these devices ideal for routers, modems, and modern communication infrastructures.
Educational and Research Purposes
The RISC microprocessors offer simplicity and are good for educational and Research Purposes. Students use these processes to learn different things about instruction sets, compilers, and operating systems. This helps create an environment for the researcher and improves the computing systems as well.
How to Create an RISC Block Diagram
The RISC block diagram provides a simplified view of the processor’s architecture, breaking down complex circuits into understandable components. These diagrams are particularly valuable for developers and students, as they highlight the core elements of a system without unnecessary complexity. Since the purpose of block diagrams is to simplify rather than complicate, creating them is not a difficult task—especially with the right tool.
One such tool is EdrawMax, a versatile diagramming software that supports the creation of a wide range of visuals, including block diagrams, family trees, flowcharts, bar charts, and circuit diagrams. Below are some of the key features that make EdrawMax a reliable choice.
- User-Friendly Interface: EdrawMax is a user-friendly tool and comes with a clean interface that is suitable for beginners as well.
- Huge Symbols Library: Elements and symbols needed to make a diagram are available in the tool. You will be able to use drag and drop functionality to use your own symbols and shapes as well.
- Customization Tools: It comes with all the customization tools needed to complete a diagram. It offers connectors, text formats, and color schemes for your design.
- Templates Library: The large templates library helps you get the ready-made designs to be used for your diagram. You can use a template to start and complete your diagrams using extensive editing tools.
- Multiple Import and Export Options: The numerous import and export options for EdrawMax help users save their designs in any format they need. It offers premium quality for each file type.
Now, let's check out how to create an RISC Block diagram using EdrawMax. It offers two different methods to complete your block diagram.
Method 1: Create an RISC Block Diagram from Scratch
For a new user, it might get difficult to create newer designs, but with EdrawMax, it is still possible to get things done quickly. Here is a step-by-step guide to complete your RISC block diagram with EdrawMax.
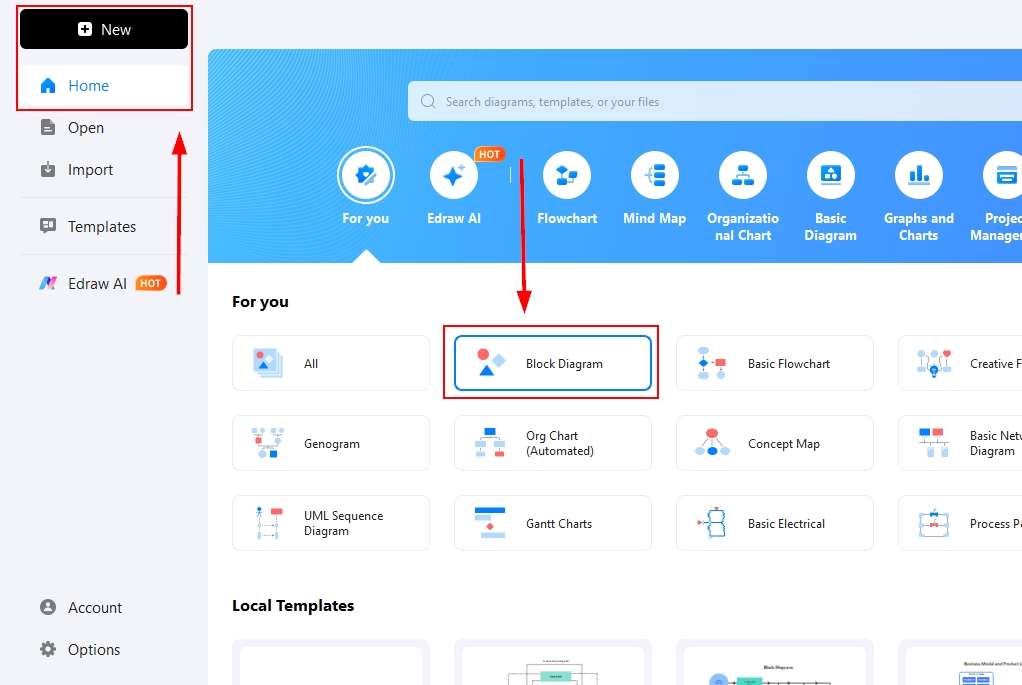
Step1 Open EdrawMax and get started
- Open EdrawMax Homepage and find the Block diagram Section. Click New Drawing to access the empty canvas.
- Once opened, you will find the relevant shapes and blocks needed to start designing.
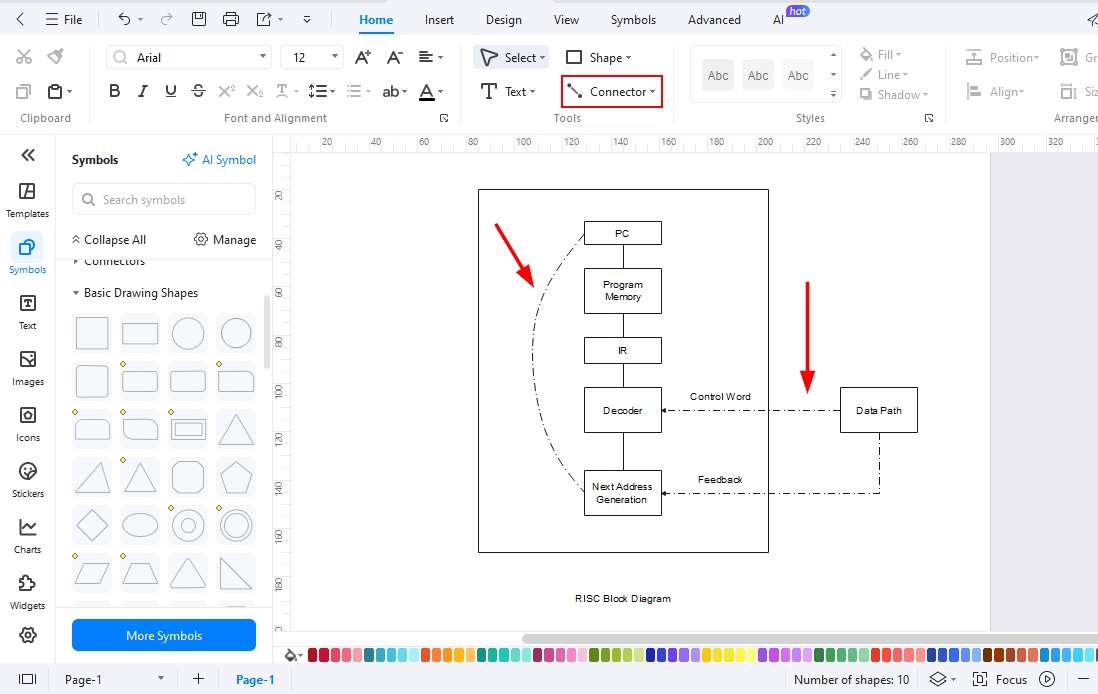
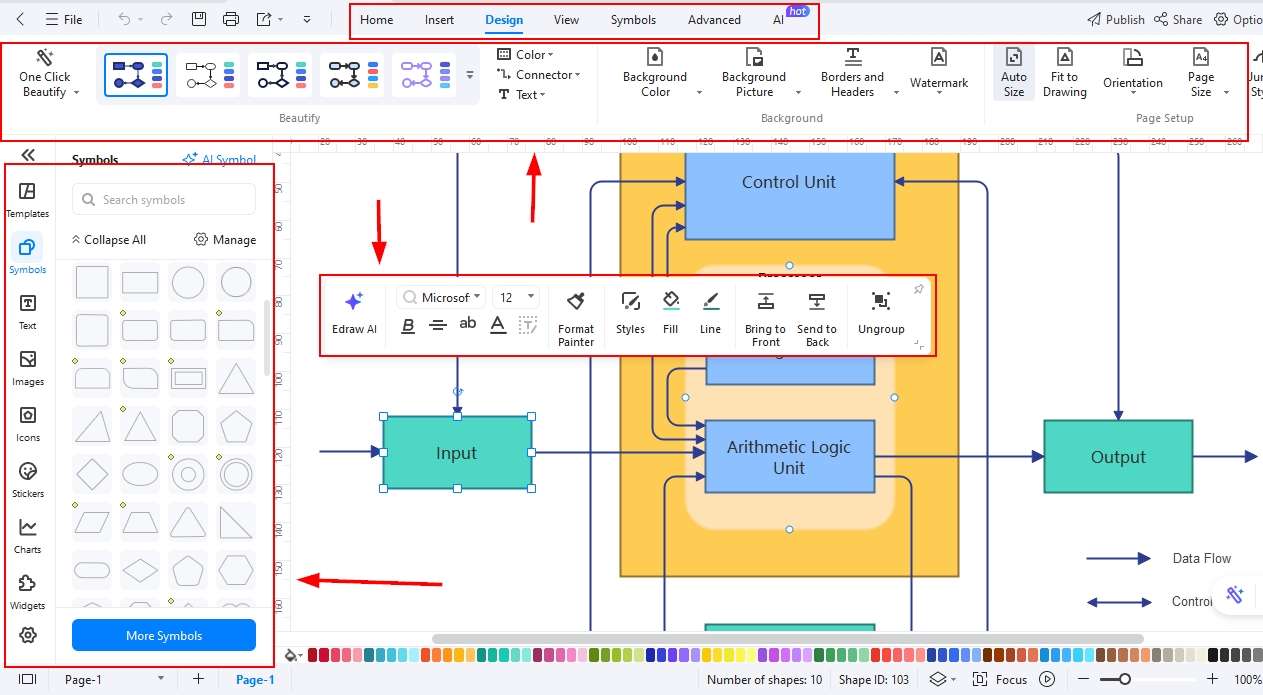
Step2 Drag and drop symbols and elements on the canvas
- Find the relevant shapes and elements in the symbol’s library.
- Click an element or drag it directly to the canvas.

Step3 Add text for each block
- Arrange all the elements and shapes added according to your block diagram needs.
- Use the Text tool or click the element to add text for each component added.

Step4 Add relationships/connections
- Find the connector tool in the top menu bar and add connections among the elements. Choose the connector type to add appropriate connections.
- If you need arrows, you can also use the symbols library to find arrows of different shapes.
- Add different colors for blocks to make your design look better.
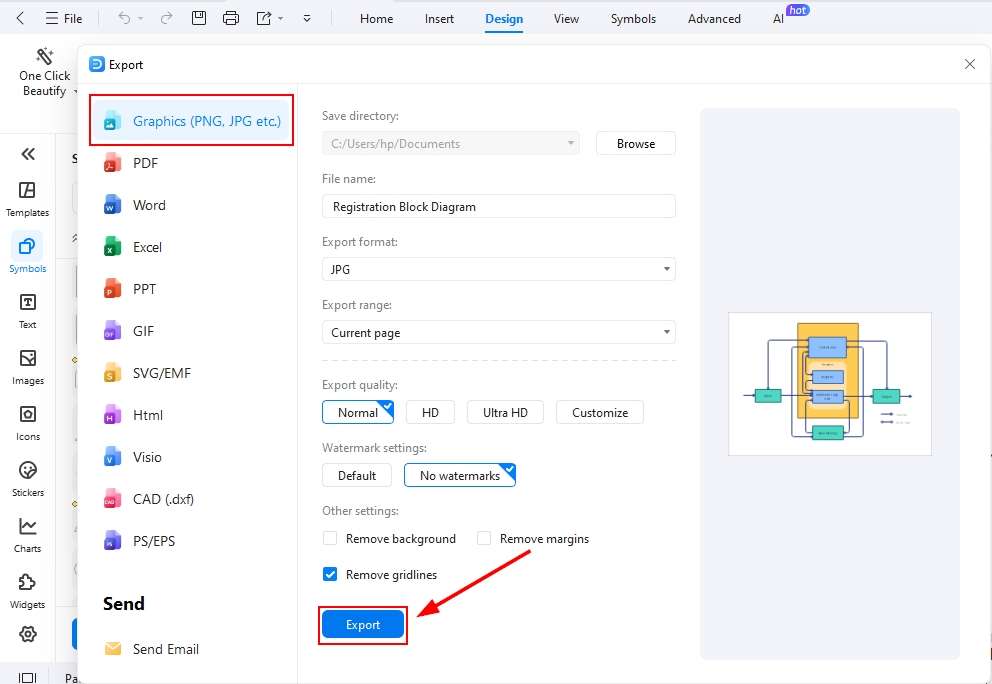
Step5 Export your block diagram
Once all the editing is done, keep the source file and save your block diagram for further use.
- Click the export button or file in the upper left corner of the screen and choose a format. Set your design quality standard and save it.

Method 2: Start with a block diagram template
Starting with a template always helps, as you already get a design on the canvas that is available for further editing. EdrawMax offers a large template library offering templates for each category. You can use these templates to make your own block diagrams. Here is a step-by-step guide for you to follow and create an amazing block diagram with the help of a template.
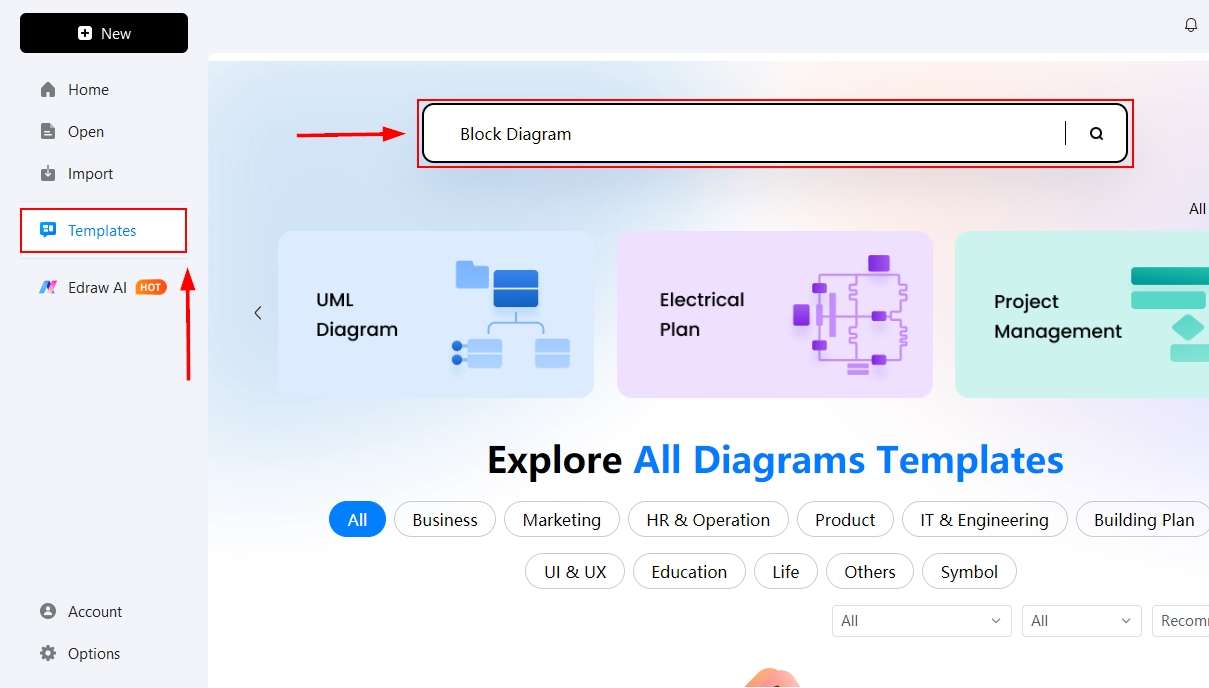
Step1 Open the templates library
- Click templates on the Home Page of EdrawMax and use the search bar to find block diagrams.
- Scroll down to find the best template that you think is the closest to your design.
Step2 Select a template and click it
- Once you find the template that could help you generate your block diagram, click it to bring it to the canvas.

Step3 Edit the template
To edit the template, you need to use the customization tools like connectors, text formats, themes, colors, and shapes.
- Add or delete shapes from the template. Use your own text to make your own block diagrams.
- You can change colors and themes for your block diagram here.
Step4 Export your file
- After all the edits, you need to export your design.
- Click the file and find the export option available, or use the export button available at the top of the menu bar and select a format to save it.
Final Thoughts
RISC microprocessors have significantly transformed computing by enabling faster and more efficient operations across various system architectures. Today, they are widely adopted in multiple industries, powering everything from everyday household devices to large-scale enterprise systems.
The RISC block diagram discussed in this guide provides a clear understanding of the processor’s complex circuitry and operations, making it an essential resource for both learning and research. To create such block diagrams with ease and precision, EdrawMax offers extensive customization tools that simplify the process while ensuring professional results.
AI Diagram Generator
Enter your prompt. Upload files if needed. Generate diagrams, charts, or slides instantly.


